Wednesday, July 30, 2014

Types of Apple ProRes Codecs

Here are types of Apple ProRes Codecs: Apple ProRes 422, Apple ProRes 422 (HQ), Apple ProRes 4444, Apple ProRes 422 (LT) and Apple ProRes 422 (Proxy), and mainly tells the difference between them.

Many users know FCP(X)’s native video format is Apple ProRes, but most of them don’t know he Apple ProRes format comes in five versions: Apple ProRes 422, Apple ProRes 422 (HQ), Apple ProRes 4444, Apple ProRes 422 (LT) and Apple ProRes 422 (Proxy).


The Apple ProRes codecs provide an excellent solution for the most demanding modern post-production workflows. Many of today’s HD formats were developed under significant camcorder(Panasonic, Sony, Canon, JVC, Nikon, etc.) engineering constraints and therefore limit the full quality that can be carried in an HD signal. Other camera codecs preserve full quality but are too complex to achieve the software decoding speeds required for real-time editing. Uncompressed HD formats deliver the highest image quality, but the high-bandwidth, RAID-storage requirements of uncompressed HD video are daunting for most users’ budgets.

If you are a FCP (X) user, you’d better know about the features of each version. The following list describes the features of each version.

Apple ProRes 4444

The Apple ProRes 4444 codec offers the utmost possible quality for 4:4:4 sources and for workflows involving alpha channels. It includes the following features:
  • Full-resolution, mastering-quality 4:4:4:4 RGBA color (an online-quality codec for editing and finishing 4:4:4 material, such as that originating from Sony HDCAM SR or digital cinema cameras such as RED ONE, Thomson Viper FilmStream, and Panavision Genesis cameras). The R, G, and B channels are lightly compressed, with an emphasis on being perceptually indistinguishable from the original material.
  • Lossless alpha channel with real-time playback
  • High-quality solution for storing and exchanging motion graphics and composites
  • For 4:4:4 sources, a data rate that is roughly 50 percent higher than the data rate of Apple ProRes 422 (HQ)
  • Direct encoding of, and decoding to, RGB pixel formats
  • Support for any resolution, including SD, HD, 2K, 4K, and other resolutions
  • A Gamma Correction setting in the codec’s advanced compression settings pane, which allows you to disable the 1.8 to 2.2 gamma adjustment that can occur if RGB material at 2.2 gamma is misinterpreted as 1.8. This setting is also available with the Apple ProRes 422 codec.
Apple ProRes 422 (HQ)

The Apple ProRes 422 (HQ) codec offers the utmost possible quality for 4:2:2 or 4:2:0 sources (without an alpha channel) and provides the following:
  • Target data rate of approximately 220 Mbps (1920 x 1080 at 60i)
  • Higher quality than Apple ProRes 422
Apple ProRes 422

The Apple ProRes 422 codec provides the following:
  • Target data rate of approximately 145 Mbps (1920 x 1080 at 60i)
  • Higher quality than Apple ProRes 422 (LT)
Apple ProRes 422 (LT)

The Apple ProRes 422 (LT) codec provides the following:
  • Roughly 70 percent of the data rate of Apple ProRes 422 (thus, smaller file sizes than Apple ProRes 422)
  • Higher quality than Apple ProRes 422 (Proxy)
Apple ProRes 422 (Proxy)

The Apple ProRes 422 (Proxy) codec is intended for use in offline workflows and provides the following:
  • Roughly 30 percent of the data rate of Apple ProRes 422
  • High-quality offline editing at the original frame size, frame rate, and aspect ratio
  • High-quality edit proxy for Final Cut Server 
A new ProRes flavour – 4444 XQ:
4444 XQ is the latest ProRes codec and it is designed to be extremely efficient yet almost indistinguishable from uncompressed footage.


  • The highest-quality version of Apple ProRes for 4:4:4:4 image sources (including alpha channels), with a very high data rate to preserve the detail in high-dynamic-range imagery generated by today’s highest-quality digital image sensors. 
  • Preserves dynamic ranges several times greater than the dynamic range of Rec. 709 imagery—even against the rigors of extreme visual effects processing, in which tone-scale blacks or highlights are stretched significantly. 
  • Like standard Apple ProRes 4444, this codec supports up to 12 bits per image channel and up to 16 bits for the alpha channel. 
  • Features a target data rate of approximately 500 Mbps for 4:4:4 sources at 1920 x 1080 and 29.97 fps.   

Tips:

1. If you are a camcorder/camera lovers, You may be interested in the following pages:

Final Cut Pro - The FCP Column offers the best ways to Convert any video files (such as: MXF, MOV, AVCHD, MTS, M2TS, M2T, TS, Tivo, AVI, MKV, WMV, DVR-MS, MP4, FLV, F4V, M4V, MOD, TOD, DV, EVO, Rmvb, etc.) to Final Cut Pro (X) compatible formats – Apple ProRes codec MOV format, and then you can import and edit videos in FCP (X) smoothly.

ProRes Converter for Mac (Only $35) is what you need, it not only convert any videos to FCP (X) with presetted Final Cut Pro output profile, but also support batch import and conversion. (Supplement: I know it isn’t relevant to the topic of this article, but god, please believe me, I just want to let the purchaser know the value of this Mac app is beyond its price, such as: it support convert any (HD) videos for playing on iPad Air, Galaxy S5, Surface Pro 3, Nexus 7, etc. tablets and phones; support batch conversion; deinterlace and reduce image noise to keep better quality; convert any videos to Mac (Avid, iMovie, FCE, Premiere Pro, etc.) compatible format.

2. If you are a professional MXF videos editor, Pavtube MXF Converter for Mac is the best choice for you. It is an easy-to-use and intuitive Mac tool for camcorder users. It is good at converting MXF recordings shot by Panasonic P2 camcorders, Canon XF series camcorders and Sony XDCAM camcorders to formats compatible with your video editing software like iMovie, Final Cut Pro (X), Final Cut Express, Avid Media Composer, Adobe Premiere, and more. 

Notes:

When converting MXF footage using Final Cut Pro oriented format templates(e.g. Apple ProRes), please ensure that your computer has Final Cut Pro installed, otherwise the converted files will have audio only without image.

If you are using FCP X, please make sure you have installed ProApps QuickTime Codecs, or you may get files with sound only without video.

The FCP X does not install the ProApps QuickTime Codecs automatically, so you need download and install the codec manually from 
http://support.apple.com/kb/DL1396.

Sunday, July 27, 2014

The No. 1 Media and Blu-ray Player Software- PowerDVD 14 Ultra

This guide will assist shoppers in selecting the top Blu-ray player- PowerDVD 14 Ultra that best meets their media playback needs.

Blu-ray players offer people the ability to watch movies in high-definition at home. As home entertainment technology expands, Blu-ray players have become so popular. 

PowerDVD 14 Ultra

What is the No. 1 Media and Blu-ray Player? 

There is no doubt the World No.1 Movie & Media Player is PowerDVD 14 Ultra. which includes a large number of decoding and encoding libraries to read Blu-ray information, remove Blu-ray protection and support Blu-ray playback. It should work together with Blu-ray drive, when you want to play Blu-ray Disc.

PowerDVD 11 Features Highlights 

1. PowerDVD is all you need to play any media

Whether you're playing back AVCHD format home videos captured on your camcorder, or MKV & FLV files you've downloaded online, PowerDVD lets you play it back flawlessly.  
  • Blu-ray software, Blu-ray 3D, and DVD player
  • Movies and videos files, including MKV, MP4, AVCHD, XAVC-S
  • UltraHD 4K and HEVC (H.265) videos
  • Music files in MP3, FLAC, ALAC and popular formats
  • Camera RAW, photo slideshows with pan & zoom
  • YouTube, Facebook, Vimeo and Flickr content
2. PowerDVD is the Central Player for All Your Media.

Experience stunning performance and seamless playback of movies, music, photos and video clips with it will be no better.
  • Play media from your PC, home network, connected devices, your content in the cloud, and social networks
  • Manage and enjoy all your media in one place
  • Create video, music and photo playlists
  • Browse videos and photos in Calendar view

3. Quality Truly Beyond Expectation

PowerDVD’s unique TrueTheater enhancements make movies come alive with sharper detail, enhanced lighting, smoother motion and immersive surround sound effects. Instantly convert movies and slideshows to eye-catching 3D! 

4. Enjoy High Fidelity HEVC/H.265 Video

PowerDVD blu-ray player software now supports the brand new HEVC/H.265 format. This next-gen advanced video format is designed for higher quality entertainment and more efficient delivery.

5. HD Surround Sound for Your HD Movies

Match your visual experience with the best audio available. PowerDVD blu-ray software offers a high quality listening experience for all your media.

6. Entertainment On-the-Go with CyberLink Cloud
  • Store Your Media in the Cloud
  • Sync Your Content Automatically
  • Stream Content from the Cloud
In collusion, PowerDVD 14 Ultra is the No. 1 Media and Blu-ray Player. However, now the prices may be a little higher for common consumers. Plus, if you are tired of the crashing problems caused by PowerDVD 14 Ultra, and already have a BD drive, you can find an alternatives to PowerDVD 14 Ultra for playing Blu-ray movies.
Here I recommend you to choose Pavtube ByteCopy to backup my Blu-ray collections to MKV format with lossless quality, and play the MKV with VLC and MPlayer. It’s a good way, because ByteCopy is able to preserve all audio/subs tracks and chapter markers for me, which enables me to select at will during playback. Regarding to transfer my BD movies to iPad and iPhone, I always use Pavtube BDMagic, an easy-to-use yet nice little program, perfect quality and no audio delay in output video files. 

Both are encoding with CUDA/AMD APP. And read required Hardware for playing Blu-ray.  

Friday, July 25, 2014

Best Way to Backup/Transfer data from iPhone 5s to PC

Except iTunes, iCloud, there is another easy way to backup and transfer the data on your iPhone 5s. This article will share the way with you.

As commonly known, iTunes and iCloud are two ways to backup your data and help your transfer your data between iPhone 5s and computer. But if you sync your iPhone to your iTunes or iCloud, the previous data will be recovered by the latest one. Another limitation is that you could not preview all the data directly in your iTunes on your computer. 

backup data from iphone5s

Then is there an easy way that not only could replace the transfer function of iTunes and iCloud, but also allow me to preview these data? The answer is certainly yes. iFonebox is such an alternative of iTunes and iCloud. 

You can download the free trail version to scan and preview the data in your iPhone 5s, including the deleted one. To restore and transfer these data to your computer, you can purchase the paid version and backup iPhone 5s data to computer.

Step 1: Choose Recovery Mode

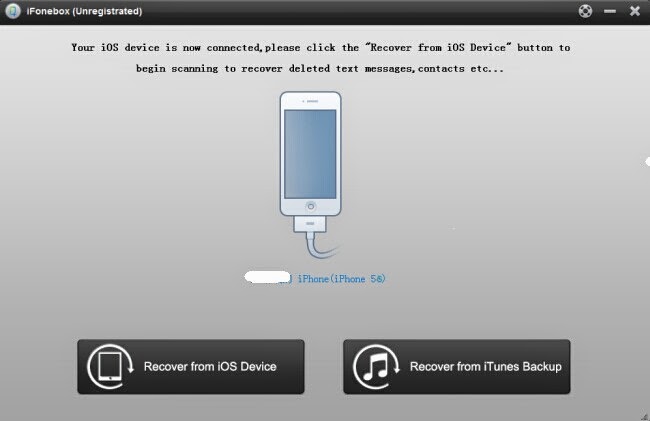
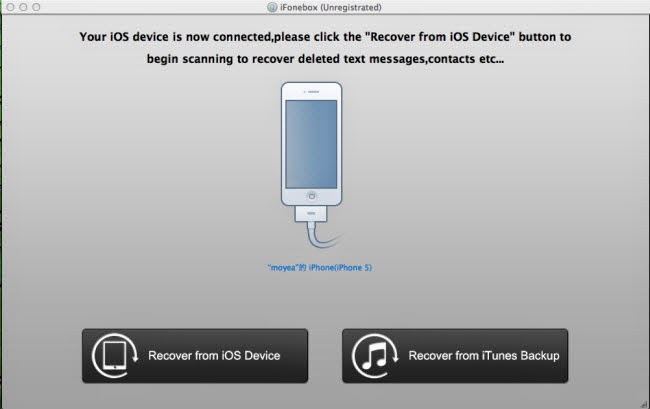
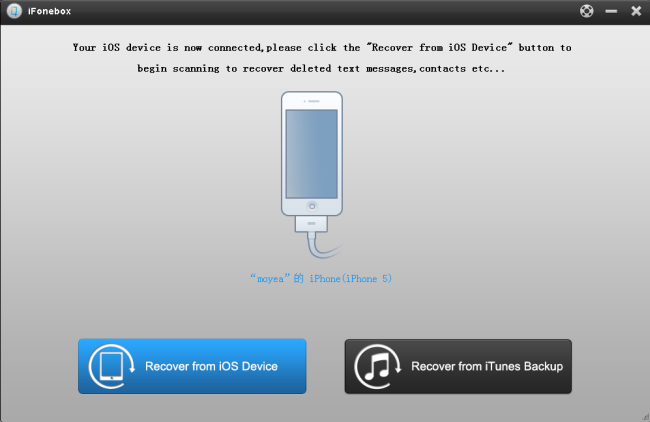
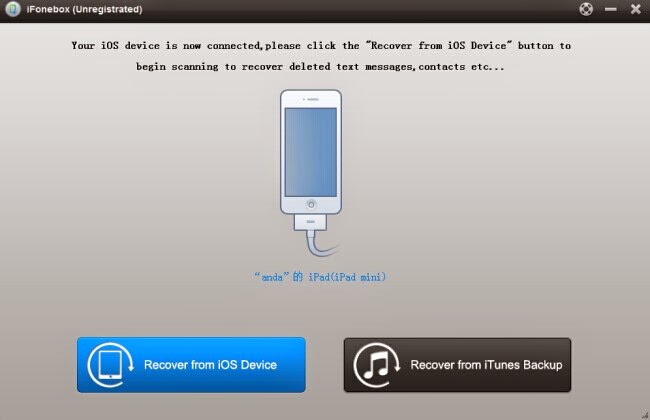
Launch iFonebox on your computer, then connect your iPhone 5s with your computer through USB cable. Then the interface on your computer will be showed as follows, choose “Recover from iOS Device” as the recovery mode.

iphone5 main nterface from ios device 

Step 2: Start scanning iPhone 5s

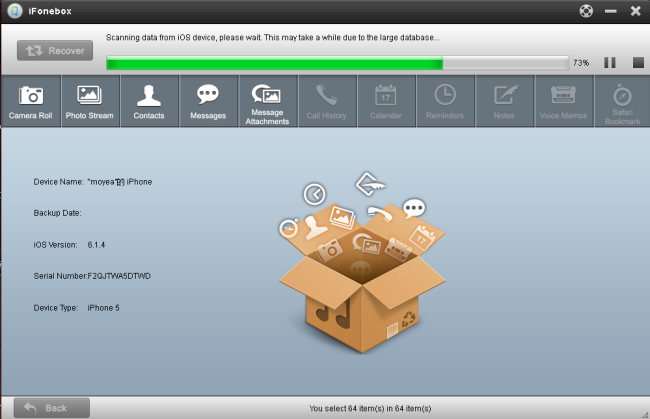
iFonebox will automatically scan your iPhone 5s after clicking the “Recover from iOS Device”. The scan time depends on the number of the database on your iOS devices. Just wait patiently until the software finish the scanning.

scanning from ios device

Step 3: Backup and Transfer iPhone 5s data

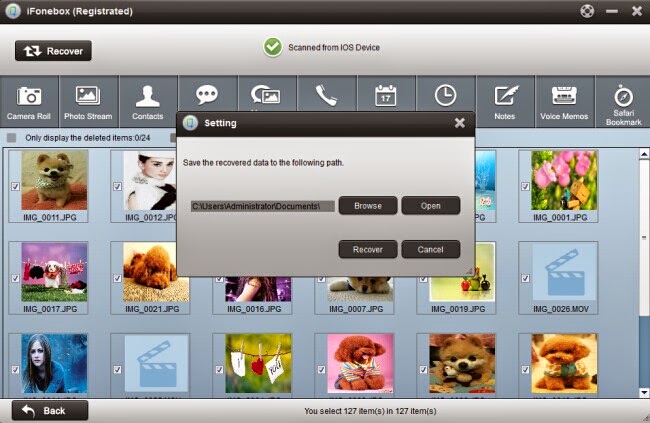
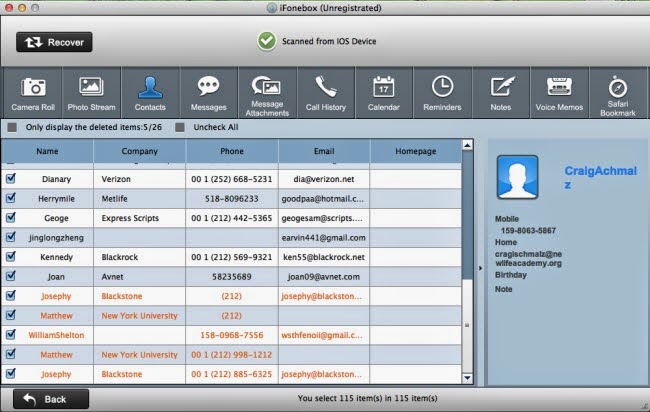
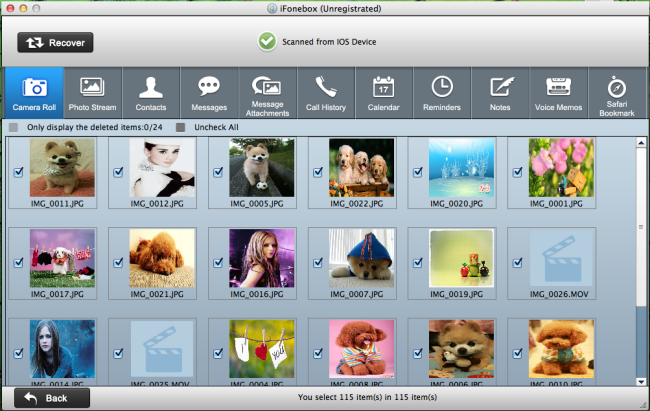
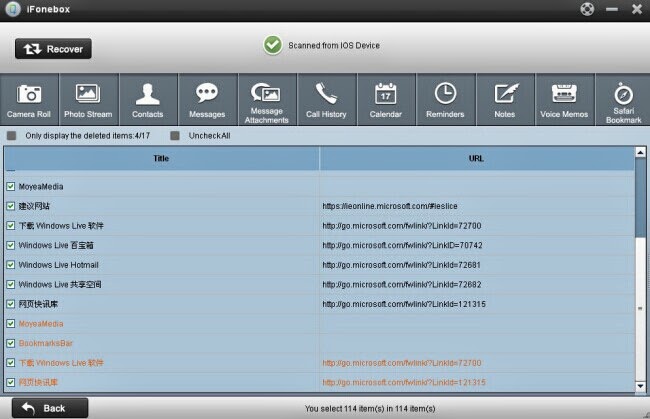
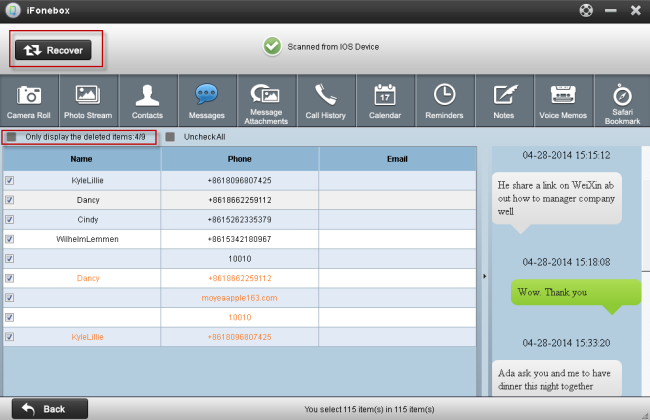
When the scanning finished, all the data on your iPhone 5s will be displayed in categories on the interface. Click one by one to preview all the data in your iPhone 5s, including the deleted contacts, messages, call history, calendar, reminders, notes, Safari Bookmark. Click “Recover” button on the top left of the interface to backup them on your computer, just choose the folder locate you want to transfer them.

recover photos from ios device 

Wednesday, July 23, 2014

Recover iPhone Lost Data (Contacts,SMS,Photos,Notes,calls) that was Very Important To You

Important iphone data lost or deleted? Don’t worry, this s article introduce a superb iPhone data recovery tool to help you recover your iPhone Lost Data. 

Nowadays, iPhone data becomes more and more important to some people because it records contacts, photos, notes and so on crucial data. There are people who rely on their iPhone for almost everything, from their daily schedules, business and personal files and what have you.

recover iphone lost data

Sometimes bad things happen to good data. Whether you’ve deleted an important file by careless, forgotten the posscode to your locked iPhone, or lost or damaged your iPhone somewhere, How to Recover iPhone Lost Data that was very important to you?

Actually, you don’t have to let your valuable files, contacts, photos, and other data disappear forever. With iFonebox-iOS data recovery, you can easily recover deleted Contacts, Photos, Notes, Call logs, SMS, Calendars, Reminders etc from iPhone, iPad, or iPod Touch no matter you did or didn’t have backup file.

Click to free download iFonebox for Mac version
Click to free download iFonebox for windows version

How to Recover iPhone Lost Data That Was Very Important To You:directly Recover data From iPhone
If your iPhone takes a tumble down the escalator or falls face down on the pavement, you can still get to its data no matter how badly damaged the screen looks. As long as your iPhone can boot up, you can use iFonebox to access its data. Simply launch iFonebox on your computer, connect the iPhone to computer, and choose”Recover from IOS device”. iFonebox will begin analyzing your iPhone and discover all of its contents, just a few minutes, you can recover your iPhone lost data with ease.

recover iphone lost data 

recover iphone lost contacts

recover iphone lost photo

How to Recover iPhone Lost Data That Was Very Important To you:restore data from iPhone backup
 If your iPhone has been lost or stolen, you’re still in luck. iFonebox can open up the contents of any iTunes backups on your computer, and give you the same level of access that you’d get with an attached device. In fact, the steps for retrieving your data from a backup file are exactly the same. You can then either selectively recover individual files or export all the contents of the lost iPhone to a folder. Recovering data from an iTunes backup is typically much quicker than from iPhone, because the data’s already on your computer.

Monday, July 21, 2014

Have fun with these lost iPhone 5 Safari Bookmark

Do you like surfing online on your iPhone 5? If so, this post will help you solve one problem that recover lost Safari Bookmark directly from iPhone 5.

Surfing online on iPhone 5 would be a good choice to kill time when you are waiting for the bus or on the way for traveling. As it is inconvenient to enter the url each time when you need it, many people choose make Safari Bookmark as a fast way to enter the website they usual use. Some Safari Bookmark are even very important. If the Safari Bookmark on iPhone 5 once lost in accidental deletion, crashed system or any other kinds of unknown reasons, how to get them back?

retrieve lost safari bookmark from iphone 5

With the help of iFonebox, it could help you retrieve and recover all the Safari Bookmarks directly from scanning iPhone 5.

Free download the Windows version or Mac version of iFonebox below and follow below tutorial to recover iPhone 5 lost Safari Bookmarks.

Win: iFonebox
Mac: iFonebox for Mac

Retrieve lost Safari Bookmark directly from iPhone 5

Step 1: Choose “Recover from iOS device” 

Install iFonebox on your computer and then launch it. Connect your iPhone 5 with your computer through USB cable. Then you will see the interface as follows.
recover from ios device  

Step 2: Start the scanning

iFonebox will automatically scan your iOS device after clicking the “Recover from iOS Device”. The scan time depends on the number of the database on your iOS devices. Just wait patiently until the software finish the scanning.
scanning from ios device

Step 3: Preview and Restore Safari Bookmarks

When the scanning finished, all the data on your device will be displayed in categories on the interface. Click “Safari Bookmark” to preview all the history of your Safari Bookmark on your iPhone 5, both deleted and exist. Choose the one you need and click “Recover” button on the top left of the interface to backup them on your computer.

safari bookmark from ios device

Related articles:

Recover deleted/lost calendar events on iPhone 5
Save your iPhone 5’s memory of call history

Friday, July 18, 2014

Save your iPhone 5’s memory of call history

How to avoid the storge limitation of call history on iPhone 5? Read on and you will find the solution.

As an iPhone user, you will find that there is the the storge limitation of call history on iPhone 5. In order words, if you have the amount of your call history up to a certain amount, when you have the new call and the previous ones will be replaced automatically.


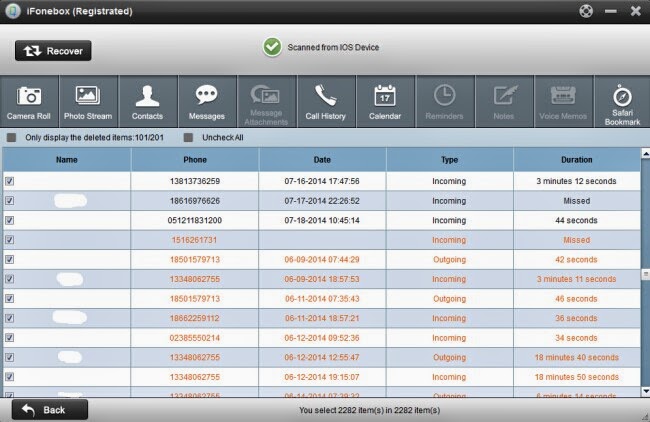
If you want to find your previous call numbers, this limitation will bring trouble to allow you preview them. So want to find a solution to recover these lost call history? For those who want to restore their lost call history from iPhone 5, this post can help you to solve the problem. Just with the help of an iPhone 5s call history recovery tool, iFonebox or iFonebox (Mac), it will allow you to preview and recover all the received and missed calling records, either existed or lost. Here is the full review.

Please download the trail version of this iPhone 5s call history below and run it on your computer for free.


How to Directly Scan iPhone 5 to Restore Call History

Step 1. Choose recovery mode

Install and run iFonebox on your computer, plug your iPhone 5 to the computer via USB cable. Click “Recover from iOS Device”.


Step 2. Scan iPhone 5 Call History

Then the iPhone 5 call history recovery tool will automatically scan your iPhone 5.


Step 3. Preview and Recover Notes

When the scanning is finished, you could see scanned call history in the “Call History” category on the top bar of this iPhone 5 data recovery. Select desired ones for recovering. After that, click the top right “Recover” button to start recovering lost call history for iPhone 5.


Besides call history, you can find and restore your lost calendar eventsdeleted contacts from iPhone 5. 

Wednesday, July 16, 2014

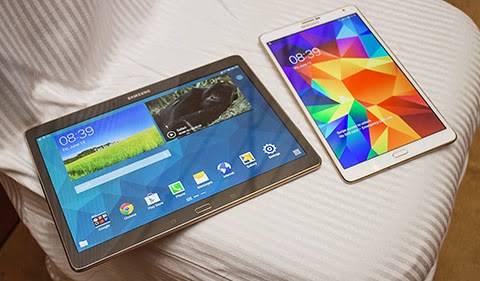
Transferring DVD to Galaxy Tab S 10.5 and Galaxy Tab S 8.4 for watching

This tutorial is going to show you how to convert DVD to Galaxy Tab S 10.5 and Galaxy Tab S 8.4 supported video using DVD to Galaxy Tab S Converter.

Samsung has announced its next-generation Galaxy Tab Android tablets, the Galaxy Tab S 8.4 and Galaxy Tab S 10.5, which include high-resolution AMOLED displays designed to compete with Apple's retina products. The Galaxy Tab S series of tablets features with a 2560x1600 pixels resolution, matching what's found in the Tab Pro series. 


And these Galaxy Tab S tablets are capable of 1080p HD video playback for all kinds of video formats including MP4, WMV, XviD, MPEG4, H.263, H.264 and audio formats including MP3, WAV, eAAC, AC3, FLAC. With such a gorgeous movie player, you may want to put your DVD movies to Samsung Galaxy Tab S for enjoying in travel time.

Well, as we know, Galaxy Tab S 10.5 and 8.4 doesn't have a DVD-ROM for playing DVD movies, you need to convert DVD to video files that are supported by Galaxy Tab S tablet and then transfer the video files to your tablet for playback. Looking for a reliable tool to do that? 

Seeing so many reviews, having tried many softwares, free or paid, I find Pavtube DVDAid is just such kind of easy-to-use program to help you do the conversion in a few clicks. Tried Handbrake – didn’t like it – tried DVD Fab – couldn’t get it to work. But Pavtube is easy to use and free water-marked version a great idea to check it worked. The Mac version is DVDAid for Mac.

Tutorials: How to transfer DVD to most compatible MP4 preset for Galaxy Tab S 10.5 and Galaxy Tab S 8.4 watching 

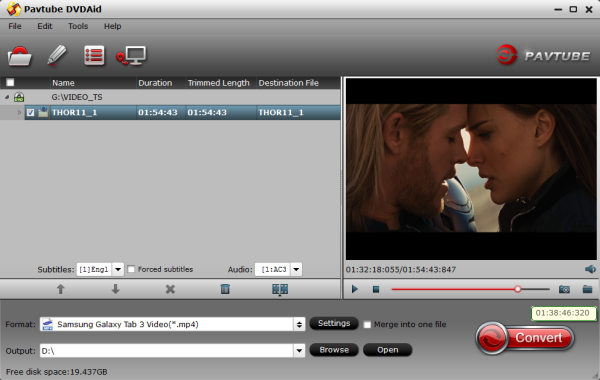
1. Run this Pavtube DVDAid; load disc.

Click the top left icon, you can choose to import DVD from ROM, DVD folder or DVD ISO/IFO. It will check the main title by default; moreover, ISO files could also be recognized automatically so that you no longer need to run virtual drive to mount it.


2. Choose format.

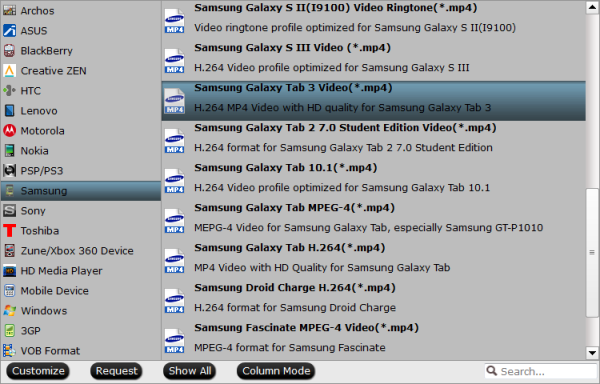
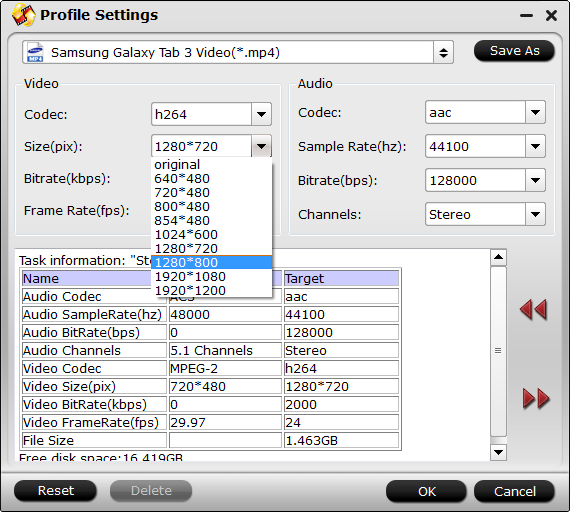
Click "Format" drop-down list and choose "Samsung > Samsung Galaxy Tab 3 Video (*.mp4)" as the compatible MP4 preset for playing on Galaxy Tab S 10.5 and Galaxy Tab S 8.4 with best video quality.


Tips: You can Adjust specs or edit video before conversion (Optional).

If you want to customize output video size, bitrate, frame rate and others, just click "Settings" to enter profiles settings window. Just set video size to "1280*800" for playing DVD video on Galaxy Tab S with 2560 x 1600 resolution:


And you can click the pencil-like icon on the top to crop, trim, edit audio/subtitles/ or add watermarks before conversion.

3. Start Conversion.

You can hit the big red "Convert" to start converting DVD to Galaxy Tab S 10.5 and Galaxy Tab S 8.4 MP4 with best video settings. After the conversion, click "Open output folder" in the conversion window, or "Open" in main interface to quick locate the converted video.

After getting the converted movies files, you can transfer them to Galaxy Tab S 10.5 and Galaxy Tab S 8.4.

So there you have it. Prette simple. Now, you can enjoy and view DVD movies on Galaxy Tab S 10.5 and Galaxy Tab S 8.4 anytime everywhere for great digital fun.

Related Articles:


Monday, July 14, 2014

Easily Recover deleted/lost calendar events on iPhone 5 with iFonebox

Delete calendar schedule on iPhone 5 by mistake and didn’t have backup file, don’t worry, here is the solution. 

I usually make daily schedule and having an alarm to inform me of the upcoming events with my iPhone 5 Calendar. Because of the poor memory, calendar plays an important role in my life. However, yesterday, I found some of the calendar events were deleted on my iPhone 5,I have no idea why this happen, I want to know is there a way to recover lost calendar schedule on my iPhone 5. I haven’t backup them..  
recover lost calendar on iPhone 5

Actually, you still have chance to get the lost calendar backup though you didn’t have backup files, what you need is an iPhone calendar recovery tool to help you scan your iPhone 5 and retrieve the calendar events back. iFonebox is such a professional iPhone calendar recovery tool, this iPhone calendar recovery tool works well with iPhone5/iPhone5S/iPhone5C iPhone4/iPhone4S/iPhone3GS. Just a few clicks, you can view the content of lost calendar events and recover them on your computer. 

Free Download iFonebox or Mac 
Free Download iFonebox for windows

Here is a tutories on how to recover deleted calendar events on windows computer, if your are Mac user, please take the similar steps below. 

Step 1: Choose “Recover from iOS Device” mode 

install and launch iFonebox, and connect your iPhone 5 to computer, then you will see the interface as below. Choose “Recover from iOS Device” as the recovery mode. 

main interface
Step 2: Scan your iPhone 5 to extract deleted/lost calendar events 

This powerful iPhone calendar recovery will automatically scan your iPhone 5, Scanning time depends on the number of the files on your iPhone 5.Please be patient to wait for scanning finished. 

scanning 

Step 3: Preview and recover the calendar events on iPhone 5 

After scanning finished, all data found on your iPhone 5 will be categorized and displayed in front of you. You can click “calendar” to check which you want, all the files include deleted events and existing events displayed here. Then mark those you want and click “Recover” to save them on your PC for viewing. 

recover iphone 5 calendar events  

Notes: You can tick off the “only display the deleted items” to list the deleted calendar events

Other iPhone 5 solutions:

How to selectively restore lost/deleted notes from iPhone 5
An Easy way to recover deleted contacts from iPhone 5 itself

Friday, July 11, 2014

Is it possible to rescue iPad Mini lost iMessages? Retrieve lost iMessages from iPad Mini

As an iPad Mini user, I will share my own experience of retrieve lost iMessages in my iPad Mini.


As a texter, you may like iMessage, a service that’s an even better kind of texting. It is a good way for iPad users to text over Wi-Fi. Take me as an example, as an iPad Mini user, it is very convenient for me to communicate with my friend through iMessages as long as under the condition of Wifi. But I lost all my iMessage contents after my iPad Mini crashed. That would be a big trouble to me.

Thanks to one guy that recommend an iPad Mini iMessage extractor to me. Just with few steps, all of my lost iMessages comes back. I am going to share how to do that with all of you.


iFonebox Review: Easy way to get back lost data in your iOS Mobile

How to retrieve lost iMessages from iPad Mini

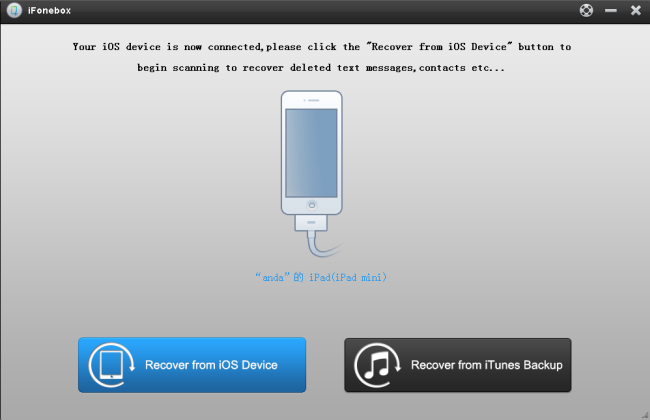
First, just install the iPad Mini iMessage extractor, iFonebox on your computer and launch it, then connect iPad Mini to computer. I showed he main interface as follows for you.


Then you just need to choose “Recover from iOS Device” as the recovery mode and wait for the software to scan and analysis the iPad Mini automatically.


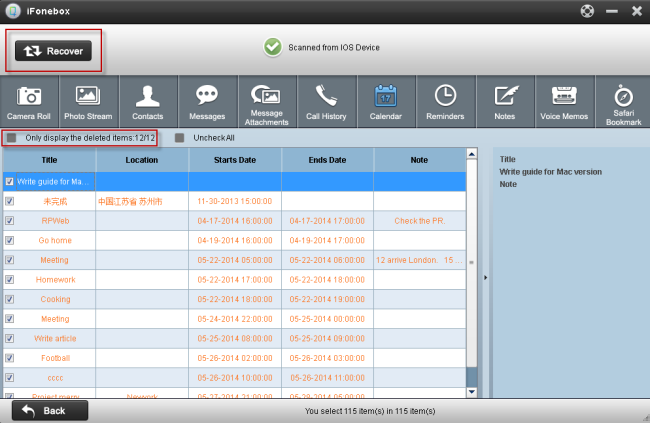
Finally, when the scanning is finished, all of my data in the iPad Mini is showed in the interface. What I need to do is click “iMessages” to preview all the iMessages. It could help me to recover these contents on my computer by clicking “Recover” button on the top right of the interface. Remember the folder location that restore these iMessages.


Hope my own experience will help these people who want to get their lost/deleted iPad iMessages.

You could download this software with below link:

Win: iFonebox
Mac: iFonebox for Mac

Get 30% off for Summer Holiday!

Thursday, July 10, 2014

An Easy way to recover deleted contacts from iPhone 5 itself

Is there anyway to recover contacts from iPhone 5 itself? Sure! This article tells you how to recover deleted iPhone contacts with 2 steps at ease.

My little son played my iPhone 5 and deleted several contacts by mistake, and I didn’t back them up with iTunes. Now I need them urgently, is there a way to recover data from my iPhone5 itself without iTunes backup? Please help! Thanks in advance.


Due to the special technology of iOS devices, it's not impossible to recover data directly from the iPhone itself. There is indeed such a program that enables you to recover contacts from iPhone 5S/5C/5/4S/4/3GS without iTunes backup files: iFonebox (Windows) or iFonebox (Mac).

Download the free trial version below to have a try.

Note: If you've synced your iPhone 5 with iTunes on your PC or Mac before losing your contacts, you can also recover your contacts by extracting the iTunes backup.


Recover iPhone 5 contacts without backup in 2 steps

The tutorial below is about the Windows version of iFonebox. If you are a Mac user, please read the guide for iFonebox (Mac) here: Recover iPhone contacts on Mac.

Before recovering deleted iPhone 5 contacts, you need to know that you shouldn't use your iPhone 5 for anything after you lost your contacts, because any operation on your iPhone 5 may overwrite the lost data. The best way is to power off your iPhone 5 until you get back you lost data.

Now follow the next steps to recover deleted iPhone 5 contacts without any backup files

Step 1. Connect your iPhone 5 to the computer

First of all, connect your iPhone to your computer, and then run iFonebox on PC. Here choose “Recover from iOS device”

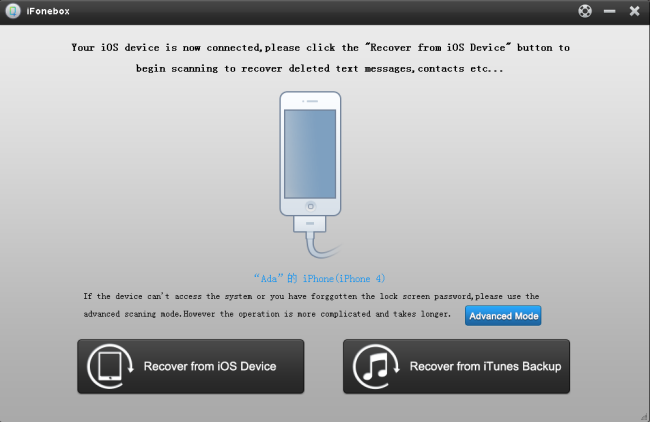
For different iPhones, you can enter different recovery ways after you connect your iPhone. Below is the main window for all iPhones.


For iPhone 4/3GS, you can choose to go to the Advanced Mode to get a deeper scan for your iPhone. Just click on the “Advance Mode” button.


step 2. Preview & recover deleted contacts on your iPhone 5

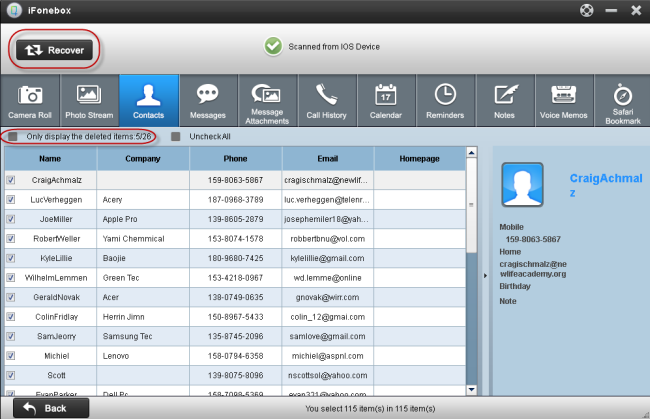
After the scan, you can preview all data that have been found by iFonebox. Choose "Contacts" on the top and you can preview all your deleted contacts here as follow, including job titles, addresses, emails and more.


The data found here includes those contacts you have on your iPhone 5 now. If you only want to retrieve deleted contacts from your iPhone 5, check box “Only display the deleted items”. Then mark and recover them.

Further Reading

Recover deleted photos on iPhone: This article shows you how to recover deleted photos on iPhone.

Wednesday, July 9, 2014

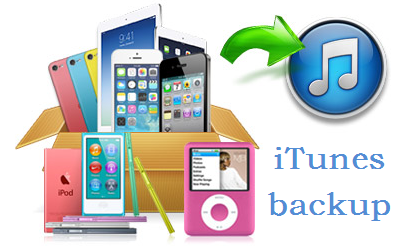
How to Find and View iTunes Backup Files

This article shows you how to find iTunes backup file on your computer and view the whole contents manually in 2 steps

We all know that when we synced our iPhone/iPad/iPod to computer, iTunes will automatically generate a backup for the device. You can restore your iPhone from the previous backup any time you want.
find itune backup file

The problem is do you know the location of iTunes backup file on your computer? If no, don't worry, this article show you where the iTunes backup is stored on your computer:

iTunes backup location on Mac: ~/Library/Application Support/MobileSync/Backup/

iTunes backup location on Windows XP:
 \Documents and Settings\(username)\Application Data\Apple Computer\MobileSync\Backup\
iTunes backup location on Windows Vista, Windows 7, and Windows 8: \Users\(username)\AppData\Roaming\Apple Computer\MobileSync\Backup\

To quickly access the AppData folder, click Start. In the search bar, type %appdata% and press Return.

How can I view iTunes backup file on PC or Mac

Finding the backup file doesn't mean you've really got it. In order to protect personal privacy, iTunes backup is a kind of SQLITEDB file, which doesn't allow anyone to access or preview. You only can restore the whole backup to your iPhone, single SMS or contacts not permitted. If you want to access it, you need a tool like iFonebox (Windows Mac). It empowers you to view all details of your iTunes backup content in 2 steps.
windows download  mac download

This step-by-step guide is based on Windows operating system. If you're a Mac user, the steps are actually the same.

iFonebox Review: Easy way to get back lost data in your iOS Mobile

Step 1. Scan and Extract iTunes backup

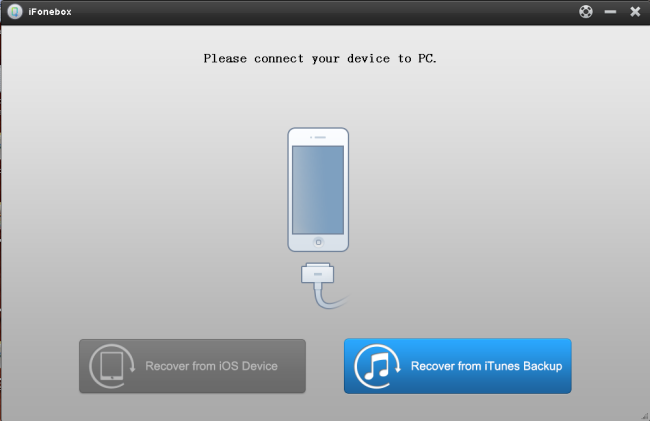
Install and Launch iFonebox on your computer and you’ll get the window below. Please select the “Recover from iTunes backup”.

recover from itunes backup

Here all your iTunes backup files will be found and displayed. Select the one you want to view and hit on “Start Scan” to get the details.

choose a backup

Step 2. Preview and recover iTunes backup files

After scanning finished, all files in iTunes backup are extracted including camera roll, contacts, messages, notes and so on. You are allowed to preview the contents of all files. Then choose what you want and click “Recover” to save them all on your Mac as readable files. In a few minutes, you can view them on your Mac.

recover photo from backup

More information: 

This program also enables you to recover data directly from iPhone/iPad/iPod. If you lost or deleted your important data and you have no backup files, you can use this software to scan you Phone/iPad/iPod directly and recover the lost or deleted files.

Monday, July 7, 2014

Can I Recover Photos From iPhone Backup file?

Q:  My iPhone was stolen recently while out with friend. I'm really bummed out about losing my iPhone, but that can be replaced. What I'm really worried about is getting some of the photos I stored on my phone but never transferred into iPhoto. I know whenever I connect my iPhone to PC it would sync and backup my data, but is there a way to extract photos from backup without an iPhone?  Sent by Gary

Editer: Sorry to hear your iPhone was stolen. But the good news is if you've backed up your iPhone, you can easily get back your photos by using this tool. iFonebox scans and retrieve iTunes' backup files on the computer and presents any recoverable photo via an image interface to preview. Export all of the photos at once or browse to pick and choose for restore. This software is free to try and scan backup data, and then $19.99 to unlock the recovery feature.

iFonebox Review: Easy way to get back lost data in your iOS Mobile

With iFonebox, you can also pulls out contacts, photos, videos, SMS messages, notes, call history, voice memos, calendar events, reminders, etc from iTunes backup files. Available as a free, Price from $19.99~$59.99 (choose the data you want to recover on this page to get discount).

See how to use iFonebox on windows

Friday, July 4, 2014

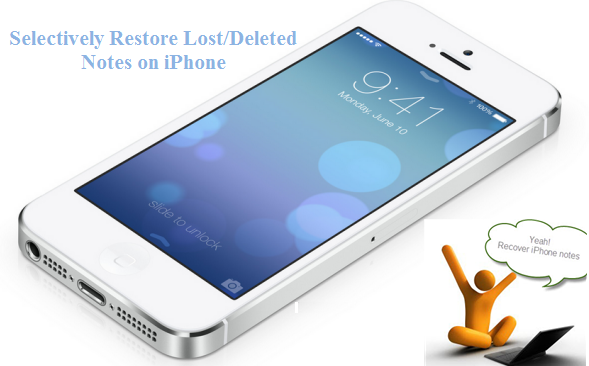
How to selectively restore lost/deleted notes from iPhone5/5S/5C/4S/4/3GS

This article show you how to preview the deleted notes on iPhone5/5S/5C/4S/4/3GS and get the deleted notes back only.

Accidently deletion of notes on iPhone5/5S/5C/4S/4/3GS or the notes lost inexplicable, what is worse the lost /deleted notes records some important information were crucially, so you must be eager to get lost/deleted notes back from iPhone? Then how to restore lost/deleted notes from iPhone?


In fact, there are two ways for you to recover your deleted notes from iPhone. One is restore note from iTunes backup; another one is restore notes by using iFonebox, iFonebox is a professional iphone notes recovery tool which can help you extract the notes from iTunes backup to only get deleted notes back, you shouldn’t have to restore the entire data. if you didn’t have backup file or the backup file is too old, what should you do? Don’t worry; iFonebox provide you another solution: directly scan you iPhone to retrieve deleted notes by. Before recovery; you are allowed to preview the contents of notes. is it wonderful?

Recover notes from iPhone by using iFonebox 

First, free download the trail version of iFonebox, Both windows and Mac are available for iPhone 5S/5C/5/4S/4, iPad air/mini/3/2, iPod touch4/5, etc.

Windows: iFonebox for windows 
Mac: iFonebox for mac)

Here, let's take iFonebox for Windows as an example (steps with Mac version are similar as follow)

Solution 1: How to selectively retrieve notes directly from iPhone/iPad/iPod

Step1: Connect your iOS device with the computer

Connect your iPhone to computer by using the USB cable and run iFonebox, Choose “Recover from iOS Device”


Step 2: Scan your iPhone for deleted notes

After a few seconds, when the program has recognized your iPhone connected to the PC, it will automatically scan your iPhone. Scanning time depends on the number of the files on your iPhone.


Step 3: Preview and selectively recover notes

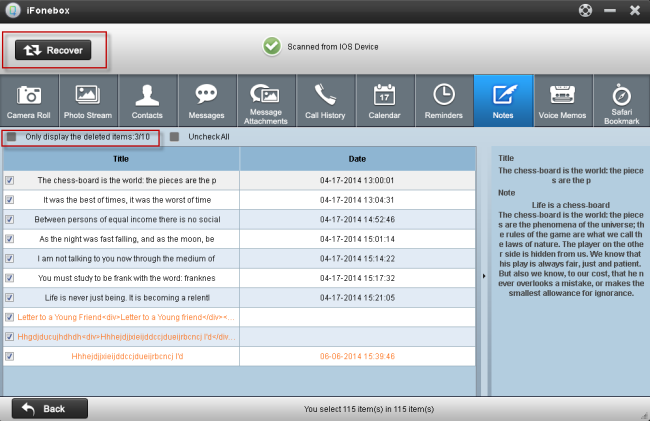
When the scan completes, all data found on your iPhone will be categorized and displayed in front of you. You can click “Notes” to check which you want. All the files include deleted notes and existing notes displayed here. You can tick off the “Only display the deleted items” to list the deleted notes only to save time, Then choose what you want and click "Recover" to save them all on your computer. In a few minutes, you can view them on your computer.


Solution 2: How to extract the notes from iTunes backup to only get deleted notes back 

Step1: Choose the mode “Recover from iTunes backup” and select a right backup file.
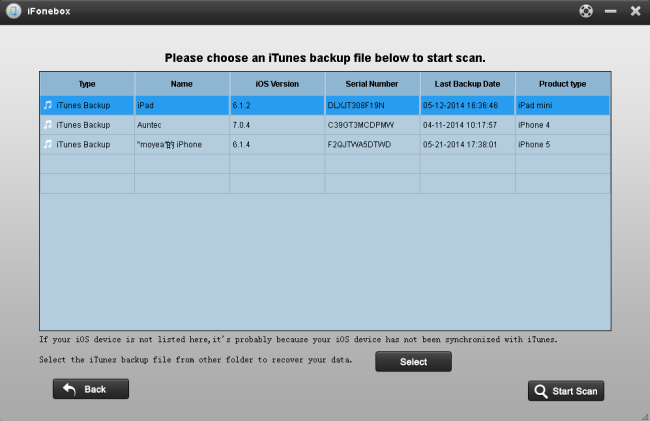
When you choose “Recover from iTuns backup”, all the iTunes backup files which you have synced your iPhone/iPad/iPod with this computer will be found and displayed here. Select the one you need and hit on "Start Scan" to get the details.


Step 2: Preview the data and selectively recover the deleted notes

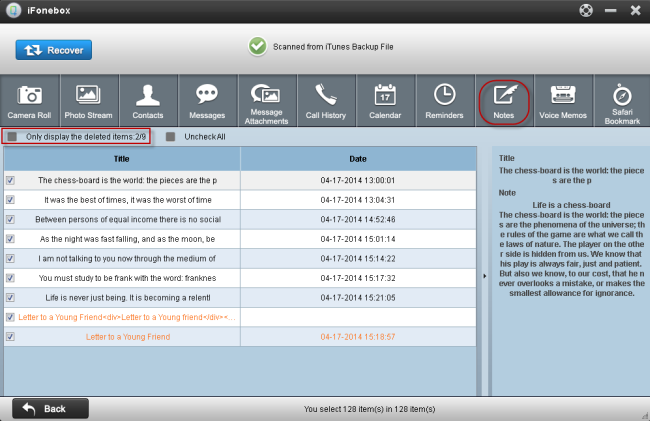
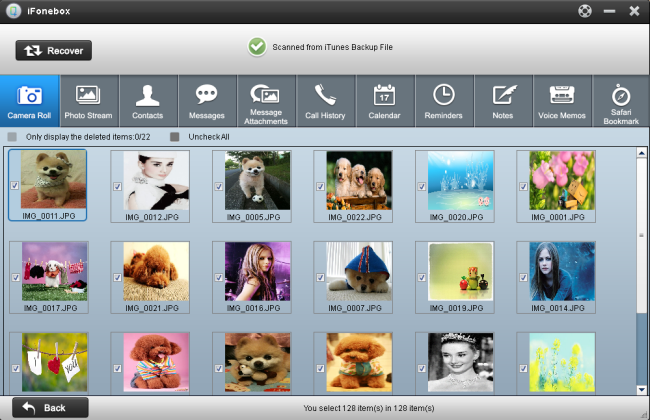
After scanning finished, all files in iTunes backup are extracted including camera roll, contacts, messages, notes and so on. Click the “Notes” to preview the contents. Tick off those you want and click “Recover”. Now you can save them all on your computer with one click.


Tips: You can also recover other data like photos, videos, contacts, messages, memo voice, call history and so on if you need.