Monday, June 4, 2018

How to Edit Sony 4K XAVC S with FCP

You can get high bit rate of 4K 100Mbps through use of the XAVC S format via Sony/Panasonic/Canon camcoders. As for post shooting, the 4K video content from the camcorder can be played back directly on a compatible 4K television through the supplied HDMI cable, or in super-sampled Full HD when connected to an HD TV. How about working them with Final Cut Pro?

Import Sony XAVC S to FCP with Sony Plug-in

As we all know that the XAVC S format record by Sony UHD camcoders is mainly designed to deliver 4K video signals with a resolution of 3840x2160, it is not an the native video editing codec for Final Cut Pro. To fix the workflow of XAVC S with FCP, sony has created a special plug-in for Mac which helps to provide support for XAVC S in FCP allowing viewing and editing capability. However, most people complain that the process to install plug in is very complicated, more worse, the plug-in some times don't even work at all.

Alternative way to ingest 4K XAVC S to FCP

If you are looking for a fast and fluid workflow of 4K XAVC S with FCP, the best way is transcoding 4K XAVC S to Final Cut Pro professional editing codec - Apple Prores 422 codec, a post-production format designed for pristine quality and high-performance Final Cut Pro real-time editing. In addition, if you Mac is very old or not has the capability to handle 4K video, it would be much better for you to compress 4K Prores to 1080p prores to fix video play backs choppy issues.

There is professional solution in hand called Pavtube iMedia Converter for Mac (to get Windows version), which enables you to directly wrap Sony 4K XAVC S to FCP  Apple Prores Codec in different file types.

If you computer is old or slow, or you just want to do some rough editing, you can select to output "Apple Prores 422(Proxy)(*.mov)"or "Apple Prores (LT)(*.mov)"format to save more space and bandwidth. However, if your Mac version is powerful enough to handle multicam and high-resolution video, even the 4K video and you are going to do many effects editing work with FCP, you'd better choose to output "Apple Prores 422(*.mov)"or "Apple Prores 422(HQ)(*.mov)"for better performance.

How to to encode and compress 4K XAVC S to 1080P Prores for FCP?

Step 1: Import 4K XAVC S videos.

From "File"drop-down option, select "add Video/Audio"to add source 4K XAVC S video files to the program.

Import 4K XAVC S videos.

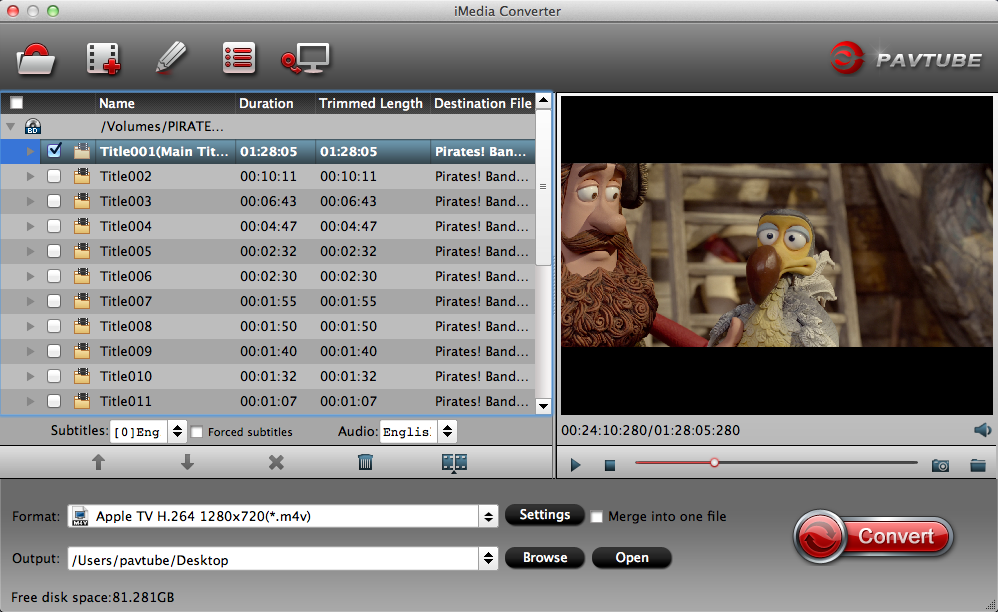
Step 2: Select output file format.

Click "Format"bar, from its drop-down list, select "Final Cut Pro"> "Apple Prores 422(*.mov)"as your desired output file format.

Choose Apple Prores 422 format

Step 3: Adjust video parameters

Open "Profile Settings" window, you can edit video codec, resolution, bit rate, frame rate, sample rate. channels here. To keep the output video resoltuion as 4K, just set it as 3840*2160; to compress 4K to 1080p, you can change the resolution to 1920*1080.

compress 4k proes to 1080p

Step 4: Convert 4K XAVC S to Apple Prores format.

Go back to the main interface and press the "Convert"icon on the right-bottom to start Sony 4K XAVC S to Final Cut Pro Apple Prores process.

When the conversion is done, you can easily import the converted video to FCP  for furthering professional editing.

Wednesday, May 30, 2018

How to Edit AVCHD Files Effortlessly

AVCHD (Advanced Video Coding High Definition) is a file-based format for the digital recording and playback of high-definition video. Developed jointly by Sony and Panasonic, the format was introduced in 2006 primarily for use in high definition consumer camcorders. And AVCHD files generally use extensions like MTS and M2TS, and can not be accepted by many meida players and devices.

By using AVCHD format, you can burn high definition video to a standard DVD disc. Later you can play that DVD disc in a Blu-ray disc player. Thus you don't have to own a Blu-ray disc burner to enjoy high definition video on Blu-ray disc player. AVCHD video can also be outputted to TV via an HDMI cable or components outputs. It can also be transferred and viewed to computer. Whereas, most people prefer editing the AVCHD before sharing or uploading to the social network. So the best way to get full use of the AVCHD is to convert the file to other format like: MPEG, MP4, MOV, MKV, AVI, etc. After that you are able to play the AVCHD file on iPhone X, iPad, Galaxy S9, Xbox One, and editing in iMovie, Final Cut Pro, Premiere, etc.

The Best AVCHD Video Converter for Windows/Mac

Pavtube Video Converter Ultimate is an application that you can use to encode AVCHD media files to multiple formats, including MPEG-1, MPEG-2, MPEG-4, H.264, H.265, DNxHD, ProRes in MP4, MKV, AVI, WMV, MOV formats. The interface of the program is clean and pretty intuitive. AVCHD files can be imported into the list by using the file browser, by the way the "drag and drop" method is also supported. Batch processing is allowed so that you can add multiple AVCHD files to batch convert AVCHD to any video format you desired with this software. To edit AVCHD effortlessly, you can convert AVCHD to MPEG for Premiere, Sony Vegas editing. If you are Mac users, you also can choose to output "Apple InterMediate Codec(AIC)(*.mov)", "Apple ProRes 422 (*.mov)" for iMovie/FCP postproduction.

Since you can adjust the video bitrate and resolution, you can make the output AVCHD video more compatible with your devices. With the built-in video editor, you can merge multiple AVCHD files into a single one file and you also can trim the AVCHD file to cut off the unwanted part. You also can add external subtitles to the AVCHD file to make the file easier to understand.

Steps to Convert AVCHD to Premiere/Sony Vegas/FCP/iMovie Compatible Video Formats for Further Editing

Step 1: Load protected AVCHD files into the program.

Install and launch AVCHD video converter program on your computer, click "File" > "Add Video/Audio" or "Add from Folder" to load AVCHD files into the program. You also can directly drag and drop the AVCHD files into the software. Batch conversion is supported here.

load avchd

Step 2: Choose output file formats.

Click "Format", from its drop-down option, you can choose MOV, AVI, M4V, MKV, H.264/H.265 MP4, etc. If you want to edit AVCHD with NLE software, you can choose the MPEG-2 preset for NLE software from "Adobe Premiere/Sony Vegas" category.

MPEG format

Choose the "Apple InterMediate Codec(AIC)(*.mov)", "Apple ProRes 422 (*.mov)" for iMovie/FCP postproduction from "iMovie and Final Cut Ex..." and "Final Cut Pro" category respectively on Mac version software.

Option 1.

Option 2.

output for fcp

Click "Settings" on the main interface to open "Profile Settings" window to tweak the output video codec, bit rate, sample rate, resolution, audio codec, bit rate, sample rate and channels to make the output video more fit with your devices or programs.

Check an item to active the "Video Editor" function, then click the pencil like icon on the top tool bar to open the "Video Editor" window, you can trim the AVCHD file length, crop video black bars, add external subtitles to AVCHD files, apply sepcial rendering effect, remove/replace audio in video, etc.

edit avchd

Step 4: Start the conversion process.

After all setting is compelted, press the "Convert" button in the right-bottom and the AVCHD video conversion process will start automatically. When the covnersion stops, please go to the output folder to get the covnerted files.

Wednesday, May 23, 2018

Top 5 Best 4K Camera Phone You Should Know

More and more often you can see 4K technology everywhere. More and more devices, monitor add support of 4K playback, 4K enables people to pursue the extremely audiovisual enjoyment. Nowadays, you can even shot video in 4K resolution with the smart phone in your hand. The following article will give you top 5 best 4K camera phones for you.

1. Sony Xperia XZ Premium

Sony Xperia XZ Premium

In terms of photography, Sony is one of those respected names in the industry. The Sony Xperia XZ Premium has everything you want when paying top dollar for a phone, with its 4K display and slow motion camera two standout party pieces. It will please Sony fans around the world. The camera has an amazing feature that we loved: it is able to record slo-mo video at only 980 frames per second. With this kind of camera, you can even film a nature documentary because it will catch all the details. However, we also need to tell you this up-front: you do need a good light.

2. Huawei P10

Huawei P10

The Huawei P10 comes with one front camera with 8Mp and two back cameras: one with 12MP and another one with 20MP. Just like it already happened with the previous Huawei models, you can use the 20MP one to take black-and-white photos. However, when you use both rear cameras, your photos will have a better clarity. Although the Huawei P10 comes with the feature that allows you to shoot 4K videos, the fact is that it doesn't offer any stabilization when you're recording at this resolution. As if this wasn't enough, if you use Windows, you won't be able to open them by using Windows's 10 Photos app, VLC, and you won't even be able to upload it directly to YouTube. 

3. Samsung Galaxy S9

Samsung Galaxy S9

The Samsung Galaxy S9 is a great phone, but one that hasn't really kicked on from the Galaxy S8, bringing a very similar design and screen to 2017's version. The improved biometrics were sorely needed, and the camera is a leap forward, but the amazing low light capabilities have resulted in sacrifices elsewhere. Samsung Galaxy S9 comes with a front camera with 8Mp and a rear camera with 12Mp. In case you're serious about shooting 4K videos, you need to know that the sound quality is not the best in the market and that you might have a few problems with the hybrid stabilization system. 

4. iPhone X

iphone x

iPhone X comes with a 7Mp camera in the front and 2 back cameras, both with 12Mp. Losing the home button and altering the design was a dangerous move, but one that was sorely needed after years of similarity and the premium design, extra power, all-screen front mix together to create - by far - the best iPhone Apple's ever made. It's impossible to give a perfect score to something that costs this much - but this is the closest to smartphone perfection Apple has ever got. iPhone X allows you to shot 4K videos at 24/30/60 fps steadily. What's bad is that it is the most expensive flagship phone around.

5. MOTO Z2 Play

MOTO Z2 Play

Featuring a 5MP camera on the front and a 12Mp camera on the back, we can say that the photos taken with the MOTO Z2 Play are among average. While the rear camera includes phase detection autofocus, dual-pixel autofocus, laser autofocus, and a dual-tone LED flash, this should imply that low light photos would have an awesome quality. In what concerns video capabilities, the MOTO Z2 Play allows you to shoot using Full-HD or 4K. Although the videos could be a lot better, they are quite ok. Besides, one of the things that you can easily do is to use the Go Live mode and go live directly on YouTube.

Best 4K Camera Assistant

Convert Any Phone Recorded Video to Non-linear Editing Software

Some day, 1080p will be the past, since the 4K will dominate the market. Finally you made the 4K videos, the next thing you want to do is to edit and enhance video and upload it to social network for sharing. Here we strongly recommend you a 4K editing software and covnerter for you which is called Pavtube Video Converter Ultimate (to get Mac version). It allows you to convert 4K video to iMovie, Final Cut Pro, Adobe Premiere optimized presets with the best settings. It also can upscale SD/HD to 4K video, and compress 4K to 1080p if you need.

As we know, when you import 4K video into non-linear editing software and the exported file in 4k resolution will has a large size. You will spend a lot of time to upload the render file to Youtube, Vimeo, Facebook. Don't worry, this software also allows you to customize the video codec, bit rate, frame rate, channels, etc to make the most suitable video for your media player, devices. Know more here(guide).

Pavtube Video Converter Ultimate

Wednesday, May 16, 2018

How to Split Large VOB File into Parts

VOB (Video Object) is the container format in DVD-Video media. VOB can contain digital video, digital audio, subtitles, DVD menus and navigation contents multiplexed together into a stream form. Files in VOB format may be encrypted. Besides that normally VOB files are very large, it brings difficulties to VOB transfer and share. Thus, many guys desire one perfect VOB splitter to split the large file into parts for storage and share. And in post, we will sare the best VOB splitter with you.

vob splitter

What we will share with you is a Pavtube Video Converter Ultimate (to get Mac version), with this software, you can not only split encrypted VOB file, digital file formats with verious different file formats but also commercial Blu-ray/DVD disc. The program offers 3 different way for you to split large video files into small equal parts: by file size, file count or time length to satisfy your different video splitting need.

Besides splitting video, this advanced program also offer other beneficial simple video editing function for you. You can flip or rotate video to get it displayed in the right angel, trim or cut video files to remove unwanted parts or segments, crop video to remove the unwanted black bars or area, add image/video/transparent text watermark to video, apply special rendering effect to video, flip or rotate video angel, remove/replace audio in video or merge separate videos into one file.

Tips: To get smaller VOB video file size, you can convert VOB file to MP4, MOV, and other more compressed video formats. And then lower the video bit rate to get smaller video file size. Welcome to download this software, read this tutorial guide and try it.

Hot Guide: 3 Ways to Compress VOB files on Computer

Step by Step to Split Large VOB Video Into Small Parts by File Size, Count or Time Length?

Step 1: Import large VOB video files.

Launch and start the program on your computer, click "File" > "Add Video/Audio" or "Add from Folder" to import VOB source files to the program. For splitting Blu-ray or DVD disc, insert Blu-ray/DVD into DVD optical drive or external Blu-ray drive, then click "File" > "Loadf from Disc" option.

Import large VOB video files.

Step 2: Define output file format.

From "Format" bar drop-down list, select one of your desired file format to output. If you don't want to loss any file quality, just select to output the same video as original file format by select format from "VOB Format" category. You also can convert VOB to MP4, which is the most popular video format in this world.

Define output file format.

Step 3: Split VOB video into small parts.

By clicking the "Split" button under the file displaying list, checking "Enable" to enable it, and then you can split the file by file count, time length, or file size according to your own needs.

Split VOB video into small parts

Step 3: Trim/Crop/Watermark video.

Select an item on the main interface to active the "Editor" function, then click the Edit icon on the tool bar of main interface to open the Editor Window, you can play and preview the original video and output effects. Also you can flip video, trim, crop, add effect, add watermark, apply special effect, etc.

Trim/Crop/Watermark video.

Step 4: Start VOB video splitting process.

Press the right-bottom "Convert" button to start the large video into small parts or segments splitting process.

When the video splitting is completed, you can find your converted files by clicking "Open output folder" with all splitted small files for convenient sharing, emailing and distributing.

Hot Search: Different Ways to Split AVI File

Friday, May 11, 2018

Edit Bandicam Recorded Files on Mac

For some people who usually record their game videos or other full Desktop screen record, this Bandicam Recording software totally works well.  Bandicam is the most advanced screen recording software on the planet for screen, game and webcam capture. The install space is small but output quality is very sharp. The recorded videos came from Bandicam usually goes to AVI or MP4. There are some occasions that you may want to edit the recorded video on Mac with Final Cut Pro, iMovie or Final Cut Express before sharing with others. However, when you try to import Bandicam recorded file to FCP/iMovie/FCE,you will find the Mac apps return the error said that file or folder is not suitable for import. Why this happened? Let's start with saving Bandicam recorded file as MP4 file.

edit bandicam on mac

As you know, MP4 is most compatible and widely used format in this world. You fail to import MP4 to FCP/iMovie/FCE due to MP4 is just a container and covers different video and audio codec. So it is common that you can not import some Bandicam MP4 to FCP, iMovie and FCE for further editing. To fix the issues, the easy workaround is to convert Bandicam recorded video to a more editing-friendly format. Here is how to do it.

Before that you have to get a third-part assistant, Pavtube iMedia Converter for Mac is highly recommended. This program features high efficiency and seamless conversion. With it, you can easily convert Bandicam recorded file to iMovie, FCP most compstible video formats with just 3 clicks. You also can do batch conversion from AVCHD, MTS, AVI, WMV, VOB, MP4, MOV, etc to native codecs - Apple Intermediate Codec, ProRes, DNxHD and more - ensuring maximum editing quality and efficiency when working with iMovie, Final Cut Pro, Avid Media Composer or Adobe Premiere and more. 

With it, you can effortlessly convert your DVD/Blu-ray files including DVD/Blu-ray discs,  DVD/BD Folder, DVD IFO File, DVD/BD ISO Image File for smoothly importing and editing in various non-linear editing systems (NLE), including After Effects, Adobe Premiere, Final Cut Pro, iMovie, Avid Media Composer, Davinci Resolve and more.

Quick Guide to convert Bandicam recorded file to FCP, iMovie and FCE editable video on Mac

Step 1. Import Bandicam recorded file

Download the video converter for Mac from the below button. After the download is over, run it and click "File" to add source Bandicam recorded file into this tool for FCP, iMovie and FCE.

free try mac buy

On the main interface, there is a preview window provided for you to preview the Bandicam recorded file to ensure the files are what you want to rip. You can also take snapshots of the Bandicam recorded file when previewing them.

imedia converter

Step 2. Select output format

Click "Formats" bar, in the pop-up window, you will find many optimized presets for iMovie, Final Cut Express and Final Cut Pro. Just select the one you need for your editor. By selecting them, you needn't to adjust the video settings like video format, video resolution, frame rate and more by yourself.

imovie format

Tip: You can click the "Settings" button and customize proper video/audio parameters including Video size, bitrate and fame rate and more.

Step 3. Start conversion

Click on the "Convert" button which is red in right bottom screen to start converting Bandicam recorded file to Final Cut Pro, iMovie, Final Cut Express. Just wait for the process to finish. After that, you can get the converted videos and just open the Final Cut Pro/iMovie/Final Cut Express and import the converted videos for editing.