Saturday, April 7, 2018

How to Attach External Subtitle File into a MKV File with Ease

When you have downloaded a MKV video from the internet but you found that there is no subtitle track in the movie during the playback, how to do now? As we all know, subtitle plays an important role in the movie, especially when the movie in a foreign language. Subtitles help us to know the movie better, so to solve the question in the first sentence, an easy way is to attaching subtitles to MKV files with a right tool you are available to get and use. This article will share the best tool for you, with Top 10 subtitle download sites for your movies & TV series.

Part 1. How to add SRT/ASS/SSA Subtitles to MKV Video with Pavtube Video Converter Ultimate

Though there are tons of subtitle to MKV software on the internet, many of them work slowly and output quality is not so satsiafactory. Well, Pavtube Video Converter Ultimate (available for both Windows and Mac users) always stands out from its competitors and will meet all your needs. It allow you to import 3D Blu-ray movies, 2D Blu-ray movies, Blu-ray Folder, Blu-ray ISO Image File, DVD movies, DVD Folder, DVD IFO File, DVD ISO Image File, H.264, MP4, MOV, MKV, VOB, WMV, MPG, Tivo, AVI, Divx, M4V, QT, M4A, WMA, WAV, MP3 ect as you like and output any video format you want. Furthermore, you also can output optimised device presets like Apple devices, Android devices, Windows devices, Game consoles and media players with the best standard settings, and you don't need to worry about A/V parameters anymore.

Best of all, it allows you to attach downloaded SRT/ASS/SSA subtitles to MKV, MP4, BD, DVD, MOV etc with just three steps. Below, we will show you the steps of adding subtitles to MKV file.

Step 1. Load MKV videos

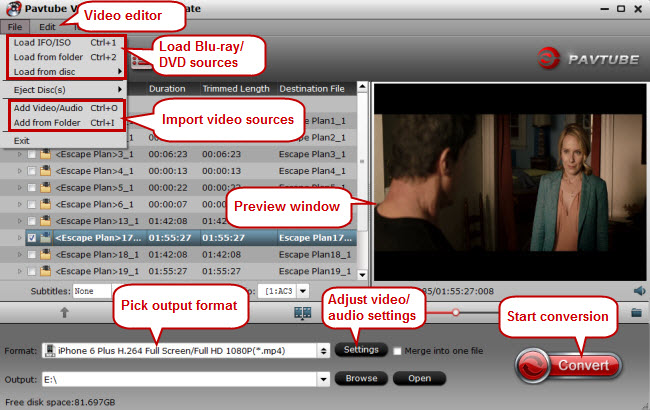
To import your videos to the program, please go to the main menu and then choose "Add video" icon. Alternatively you can drag and drop the media into the converter.

LOAD MKV

Step 2. Add subtitles to your movie

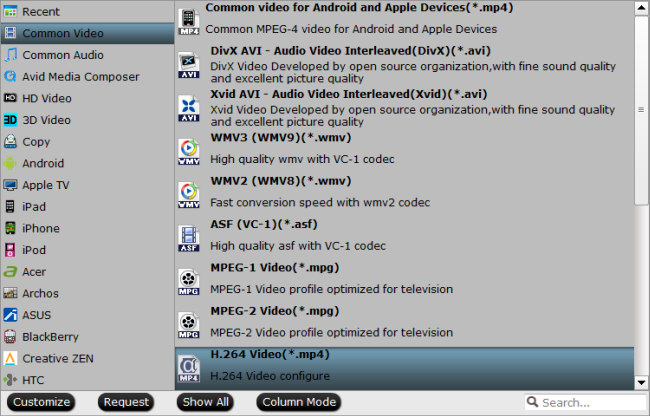
Note: Before adding subtitles to your MKV, you have to define the output video format you want. Click Settings, you will enter a list with hundreds video formats, you can choose to keep the MKV as final generated file formats, or change it to MOV, MP4, AVI and others according to your needs.

video formats

Then click the "Edit" icon on the main interface to open "Video Editor" window, under the "Subtitle" panel, check "Enable", then browse your local drive to import the "SRT/ASS/SSA" subtitles that you want to add to movies.

how to add srt ass ssa subtitles to mp4 video

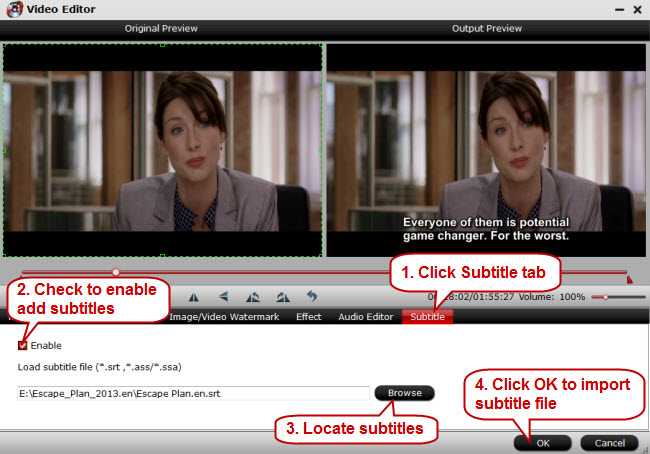
Kindly note:  The subtitles that you add your movies with our application is hard subtitles, which means the subtitles will be printed on the movies permanently.

Step 3. Start inserting subtitles to MKV file

Go back to the main UI and click "Convert" to start inserting SRT/ASS/SSA subtitles to your movies.When the conversion is over, click "Open output folder" to locate and find the generated files, then will be able to watch movies and TV series with subtitles easily either on your computer or portable devices.

Part 2. Top 10 Subtitle Download Sites for You

A great subtitle download site should not only be rich in resources but also be safe and flexible. Make sure you are not downloading any malware or getting any virus to harm your computer when you just simply want to download subtitles.

Subtitle Download Sites Descriptions
Moviesubtitles.org

The largest collection of subtitles for movies, here you can find subtitles for the most popular movies and TV series. Moviesubtitles.org offers multiple-language subtitles, and all subtitles here are packed with WinZip, you must unpack to use it. 

Subscene Subscene.com is the most widely used subtitle download site among the others, this Indonesia based subtitle download site offers the richest resource in Indonesian, and Arabian. No matter you want to watch South Korean soap opera or American Hollywood movies, and it got a great deal of loyal users and contributors.
Open Subtitles Subtitles free download for DivX movies, search in many languages from a multi-language website. Thousands of translated subtitles for XviD movies and TV series. You can download tonnes of DivX subtitles from the biggest Open Subtitles database.
DivX Titles DivxTitles.com is a place where you will find every single DVD or DivX subtitle you are looking for. There are 135218 DVD and DivX subtitles in their database so its unlikely you will not be able to find subtitle for your movie or TV show.
DivX Subtitles DivXSubtitles is well detailed with crucial information on all the latest movie subtitles in the market. There is the date of release, title of the movie, language used and its uploader, which makes it easy to choose the best subtitles to download.
Subtitles Box Subtitles Box uses divx subtitles for your favorite movies, free subtitles downloads, movie & subtitles news and gossip, actors and celebrities profiles update, hot new stories about movies and movie stars, a divx subtitles calendar with all the hot dates in movie industry this year.
My Subtitles In My Subtitles, you can download all the Subtitles of the DivX Movie Database hosted by MySubtitles.com. You can also upload subtitles by registering in My Subtitles. You can download all the latest subtitles for free.
All Subs All Subs contain all the subtitles in all the famous languages. You can download subtitles of all the DivX movies.
TVsubtitles.net TVsubtitles.net is famous for its diversity of TV program subtitles, on this subtitle download site you are free to find and download subtitles of TV shows, Talk shows, Netflix TV Series, Hollywood movies, etc.
SubtitleSource This site supports three main formats namely XviD, DivX and x264. They are all well suited for TV series and movies so make sure your searches are precise in relation to quality and language.

Wednesday, March 28, 2018

How to Make Blu-ray/DVD Playable on Samung Galaxy S9/S9+

The Samsung Galaxy S9 and Galaxy S9 Plus have been launched for several days since March 16, let's have a look at the new Android phones. You won't find a bigger and better Android phone than the Samsung Galaxy S9 Plus, thanks to its oversized 6.2-inch curved screen and low-light-defeating dual-lens camera. Sure, it looks exactly like last year's S8 Plus, but it does fix the fingerprint sensor location and speakers (now stereo). 

s9

With this smartphone in hands, transferring all your Blu-ray/DVD collections to it for watching when you're out for travelling to kill the boring time. Maybe, many people will say they can purchase the BD/DVD movie form the online movie store, it will be a waste if you have already had the same BD/DVD disc in hand.

There are lots of Blu-ray/DVD ripper which can copy and convert the movies form the plastic to Samung Galaxy S9/S9 Plus playable movies. However, the point is how to get the best one in the market. You are in the right place, Pavtube BDMagic | for Mac (review) always stands out from its competitors, and recently, it has upgraded to v4.9.2, added support for Blu-ray AACS MKB v63. It allows you to convert Blu-ray/DVD to H.264/H.265 MP4, H.265 MKV, AVI, MOV, M4V, WMV, WAV and more for playback on Samsung Galaxy S9/S9 Plus, iPhone X/8/8P/7/7P, iPad, Xbox one, PS4 Pro and other popular devices.

To get the best video and audio playback effect on Galaxy S9 (plus), you can use the "Crop" function to adjust output aspect ratio to let it fit with your smartphone screen display, flexibly tweak the output video codec, bit rate, frame rate, resolution or audio codec, sample rate, bit rate, channels, etc. With this perfect tool, you can also flexibly set subtitles on your own. You can select desired subtitles from original Blu-ray/DVD movies, enable forced subtitle option to disable the traditional subtitles while still preserving the subtitles that translate foreign language speaking parts. If the original Blu-ray/DVD movie doesn't contain you wanted subtitle languages, you can download a subtitle file in your first language and then add subtitles to your movie files.

Step by Step to Rip and Play BD/DVD Movies on Samsung Galaxy S9 (Plus)

Step 1: Load movie disc into the program

Launch the program on your computer, click "File" > "Load from disc" to load commercial Blu-ray/DVD disc with copy protection to the application.

load dvd

Step 2. Select output video format for Galaxy S9/S9 Plus

Press “Format” drop-down menu and then select a video container format that the Galaxy S9/S9 Plus supports like MP4, WMV, AVI, etc. You can also select HD MP4, HD WMV, HD MKV, HD FLV, etc format from "HD Video" category.

mp4

After that, click the "Settings" button to adjust the output parameters including “resolution”, “bitrate”, “frame rate”, and “codec” to make the output video play best on your Galaxy S9/S9 Plus.

adjust mp4 settings

Step 3: Start Blu-ray/DVD to Samsung Galaxy S9/S9 + ripping process

After you have finished all the settings, go back to the main interface, press the right-bottom "Convert" button to start to convert Blu-ray/DVD to Galaxy S9/S9 + with original video/audio quality.

When the conversion is completed, click "Open output folder", a window will pop out with all your converted files. Then feel free to transfer converted files to Galaxy S9/S9 Plus for playback anytime anywhere. 

Galaxy S9 vs S9+

S9 and S9+’s obvious difference is the display size. Galaxy S9’s display is 5.8 inches while Galaxy S9+’s display is 6.2 inches and with the increased size comes an increase in power. The S9+ has a 3,500 mAh battery where the S9's battery is 3,000 mAh. Additionally, the S9 will give you 4GB of RAM while the S9+ will give you more with 6GB of RAM. Don't worry both of them support microSD cards for additional storage expansion of up to 400GB.

However, the biggest noticeable difference between the two and what makes the S9+ stand out is its dual cameras. The S9 features a single lens camera while the S9+ features a dual lens camera that offers dual optical image stabilization and 2X optical zoom. Both feature super slow mo though, so we got you covered!

So what makes Galaxy S9 and S9+ better than Galaxy S8 and S8+? The S9 and S9+ have a faster processor, more memory, and larger screens to name a few of the improvements from the S8 and S8+. Want to know all of the changes, check it out for yourself.

Here are the specs:
Galaxy S8 Specs
Galaxy S8+ Specs

Galaxy S9 Specs 
Galaxy S9+ Specs

Thursday, March 22, 2018

Compress DJI Mavic Air 4K to 1080p for After Effects Editing

A marvel of engineering and design, the Mavic Air was built to go wherever adventure takes you. Inheriting the best of the Mavic series, this ultraportable and foldable drone features high-end flight performance and functionality for limitless exploration. The Mavic Air is the most portable DJI drone to house a 3-axis mechanical gimbal, with its angular vibration range reduced to 0.005°. Set in a triangular formation, gimbal dampeners help create even steadier shots. Best of all the Mavic Air shoots video at an incredible 4K 30 fps, recording at 100 Mbps to capture every second with UHD quality.

It is a wonderful idea to input the DJI Mavic Air captured 4K footage into Adobe After Effects for further editing. However, it will be CPU comsuming if you load DJI Mavic Air 4k into After Effect and try to render the final file. If you say you have owned a very power computer and can get this job done, okey, how about the final render file? It can be very easy to say that its size will be very very large after adding vdieo effects to it. So today what we are gonna discuss is how to compress DJI Mavic Air 4k to 1080p for better postproduction, and compress the large render files for better sharing.

Part 1. How to Compress DJI Mavic Air 4K to 1080p before After Effects Editing

To compress DJI Mavic Air captured 4k footage before inputting into After Effects, you have a good choice - finding a smart assistant which comes as a super compressor. Pavtube Video Converter Ultimate always stands out from it competitors will never let you down. It allows you to input 4K MOV, 4K MP4, 4K AVCHD, 4K MKV and output MKV, MOV, MP4, AVI, M4V etc with 4K/2K/SD/HD resolution, moreover, customizing video parameters like video/audio codec, resoluiton, bit rate, frame rate, channels etc are available here. Apart from video rosolution, video file size also depends on video bit rate, get smaller video size by lowering the bit rate.

Quick Guide to Compress DJI Mavic Air 4K to 1080p before After Effects Editing

Step 1: Load DJI Mavic Air 4K video into the program.

Start the program on your computer, click "File" menu and select "Add Video/Audio" or "Add from folder" to import DJI Mavic Air 4K video.

Load DJI Mavic Air 4K video

Step 2: Define output video format

Click "Format" bar, from its drop-down options, choose the best compatible uploading format from "Common VIdeo" > "H.264 High Profile Video(*.mp4)". You also can choose other video formats according to your needs.

Output YouTube best uploading 4k formats

Step 3: Compress DJI Mavic Air 4K to 1080p

Hit "Settings" to open the "Profile Settings" window, here you can adjust the output video codec, resolution, bit rate, frame rate and audio codec, bit rate, sample rate and channels. To compress 4k to 1080p, just type 1920*1080 in Size blank. If you prefer smaller video size, lower the video bit rate can help you achieve this goal.

Output YouTube best uploading settings

Step 5: Start the conversion.

Start to compress DJI Mavic Air 4K video to 1080p conversion by hitting the right bottom convert button, when the conversion is over, you will have no limitation to upload DJI Mavic Air 4K video to After Effects. You will be surprise about the smooth editing process.

Part 2. How to Compress After Effects render file size for sharing

Above is the tutorials to help you compress the DJI Mavic Air 4k to 1080p for smooth editing. Almost all After Effects moive making lovers know that, although the file you input into Adobe AE is very small, the render file will be larger larger larger than what you input, cause you have done the footage's postproduction. So how to reduce the render file size? Here are two ways to help you solve the problems.

Method 1. How to reduce the render file size in Affter Effects

To reduce render file size in Affter Effects is to change the format to H.264, but how? Keep reading.

To render H.264 it's actually very easy.

  1. From your Project window, select the sequence you wish to render.
  2. Right click->Export Media (or File->Export Media)
  3. In the Video tab, select H.264 for format

Then, in the basic video settings below, you can change to smaller-than-original resolution, low bit rates, etc.

Method 2. How to reduce the Affter Effects render file size via Pavtube tool

If you are not faniliar with the operation by reducing in After Effects, this method will be very easy for you. Open Pavtube Video Converter Ultimate and load the render file into it, then define the output format you like just like we just do above, then click Settings on the UI, screenshot like below.

Output YouTube best uploading settings

Now you are able to adjust the output video codec, resolution, bit rate, frame rate and audio codec, bit rate, sample rate and channels. Apart from changing video resolution, you also can lower the bit rate to make the render file smaller.

Up to now, you may have no trouble to play the DJI Mavic Air 4k with any devices, or upload to Youtube Facebook, Twitter for sharing with thousands of net friends.

Friday, March 16, 2018

How to Convert HD MTS to M4V/MOV for Playback on iPad Series

An MTS file is a video file saved in the high-definition (HD) MPEG Transport Stream video format, commonly called "AVCHD". MTS files are often used by Sony, Panasonic, and other HD camcoders. It is worth to say that MTS files can not be played directly by most media player or reconginized by most tablets, smartphones because of its video audio codec. So if you want to sync some MTS files to your iPad with iTunes for sharing with friends, how to do?

convert mts to m4v for ipad air apple tv 3

Converting MTS to iPad supported video formats could solve this problem, for example, converting MTS to M4V/MOV will be a good way. You can search MTS to M4V/MOV converter in Google and pop up hundreds software in the page. The point is how to get the best one. Pavtube Video Converter Ultimate | Mac (review) always stands out from its competitors which could convert HD MTS to M4V, MOV with just 3 steps.

Moreover, apart from converting MTS to M4V/MOV, it also allows you to import Blu-ray/DVD, MOV, AVI, MKV, AVCHD, VOB with resolution of 4K/2K/HD/SD to any formats you need including MOV, M4V, H.264/H.265 MP4, 3GP, M4V and more. For those people who want to do some postproduction to the MTS footage, video editing is also availabe here.

You are able to flip MTS video horizontally or vertically, rotate video clockwise or counterclockwise to get it displayed in the right angle, trim or cut MTS video to remove unwanted parts or segments, crop video to cut off unwanted black borders or area, personalize MTS video with video/image/transparent text watermark, split large video into small parts by file size, count or length, merge separate video clips into one, adjust picture effect like brightness, contrast, saturation or apply special rendering effects like Gray, Flip Color or Aged Flim, etc to your video or add external SRT/ASS/SSA subtitles to videos. To sum up, its features are beyond your imagination. Have a try!

How to upload recorded HD MTS videos to iPad Series

Step 1. Import captured MTS videos

Download and open up recorded HD MTS videos to this MTS to M4V/MOV converter by clicking “File” > “Add Video/Aideo.”

add mts video to mts converter

Step 2. Choose M4V as output video format

All models of iPad support M4V/MOV formats, just go to the format list to find M4V option, select "M4V-MPEG-4 Video(*.m4v)" or "MOV-QuickTime(*.mov)"-->"Common Video", or "H.264 HD Video(*.mp4)" from "HD Video" category.

output iTunes M4V format

Step 3. Edit recorded HD MTS videos (Optional)

Go to "Video Editor" window to create your personal videos by trimming, cropping, adding watermarks and special effects.

edit mts video

Step 4. Convert MTS to M4V for iPad

One click on the red button “Convert” to start to convert recorded HD MTS videos to iPad compatible video format - M4V. After conversion, transfer the converted MTS videos to iPad .

Thursday, March 8, 2018

Free Way to Decode and Convert H265 (HEVC) to H264 No Quality Loss

What is HEVC/H.265?

HEVC is short for High Efficiency Video Coding, which is also known as H.265. The HEVC/H.265 substantially improves the data compression ratio for videos, thus saving a massive bandwidth and ensuring a 50% bit rate reduction at the same level of video quality. Besides, videos encoded with H.265 take up less space than H.264. Or you can say H.265/HEVC offers greatly improved video quality at the same bit rate compared with H.264. To customers, they can watch high-definition TV shows, 3D Blu Ray and even high-quality 4K/8K videos online smoothly.

However, HEVC/H.265 can't be accepted by most devices, to ensure a smooth H.265 video playback on your devices, you'd better convert H.265 to H.264. How to free convert video from HEVC to H.264 (MP4)? You need a professional HEVC to H.264 converter.

Try Smart Approach: Pavtube Video Converter Ultimate | For Mac

To free convert H265 into H264, Pavtube Video Converter Ultimate can provide you with an effortless solution: drag H265 files, select H264 and run.

* 3 steps to decode and convert H.265 to H.264 without no visual quality change.

* Irrespective of your input MKV H265, AVCHD H265, MP4 H265 or NX1 HEVC footage, it can successfully free convert HEVC to H264 from one container format to another like MP4, MOV, M4V, MKV in resolution of 4K/1080p/720p, as well as ProRes 422, AVI, FLV, WebM, MP3, AAC, etc. 180+ video and 14+ audio formats. 

* This free HEVC video converter makes your HEVC/H265 video file playable on almost any device, be it iPhone, iPad, Samsung Galaxy series, Sony, Google Pixel, Surface Pro 4, Xbox One, etc with best default parameter settings.

How to Decode and Free Convert HEVC/H265 to H264

Step 1: Load H265 Files 
Import H265 files via "Add Video" button or just drag and drop H265 files to this top HEVC video converter. Batch conversion is supported.

load h265

Step 2: Choose H264 
Select H264 from "HD Video" profile. The most popular video MP4 MOV M4V are formatted with H264 or MPEG-4. Choose the one with H264 codec.

choose h264

Tip: If you are familiar with the video parameters, you are lucky here. Click Settings you are able to adjust video audio codec, bit rate, frame rate, channels, and more. Video size is based more on bit rate than resolution. Lower the bit rate to get smaller video size.

Related image

Step 3: Start to Convert H265 to H264 
Press "RUN" button and this free H265 video converter will begin to convert HEVC/H265 to H264 on computer. Now you can play the HEVC file on any device without obstacles.