Wednesday, March 16, 2016

How to Play Movies from iTunes to a TV without an Apple TV?

Question from Quora: How can I play movies from iTunes to a TV without an Apple TV?

A 1: There are many ways to do so. You can move the iTunes movies to external hard drive or a USB, then play it on your TV via usb port. Or you can stream the iTunes videos to TV via plex or Chromecast. But, to finish this, you should first remove DRM from iTunes videos.

A 2: You can stream iTunes movies to a TV via Nexus Player. Nexus Player is Google Cast-ready, meaning it can receive a stream from a Chromebook, Android or iOS phones or tablets, and display it on a TV. 

In this guide, we will offer you the top way of get iTunes movie purchases or rentals to watch on your HDTV.

Hot Search: TOP 10 4K Ultra HD TVs | Best Smart TV Brand Reviews | iTunes to Android | iTunes videos to Surface RT |iTunes to Roku 3… 

So how to remove DRM protection from iTunes movies? That is a easy job as long as you have a DRM Removal.Pavtube ChewTune (Review) is a exact user-friendly, professional and popular DRM Removal on the market. This software can remove DRM protection from iTunes movies and turn them to other video format with high quality to adapt to your HD TV. Except for transferring iTunes movies to HD TV via USB, it also can deal with BBC iPlayer video, Amazon movies, Zune Marketplace videos, etc so that you can watch them on TV, tablet, game console and other players. 

With it you can remove DRM protection and convert iTunes movies and Episodes losslessly to USB drive supported normal MP4 format in 6X fast speed. For Mac users, you can turn to Pavtube ChewTune for Mac

Now you can download the right version of Pavtube iTunes DRM Video Converter and begin to transfer iTunes videos to HD TV via USB by following the instructions below. 

Free download and install: 

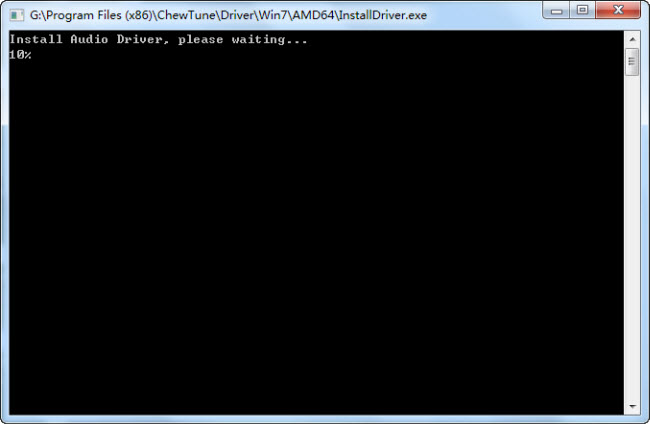
Step 1. Download and install Pavtube ChewTune. There would be a command window pop up during the installation, please do not shut down it and let it running until the installation completed. 


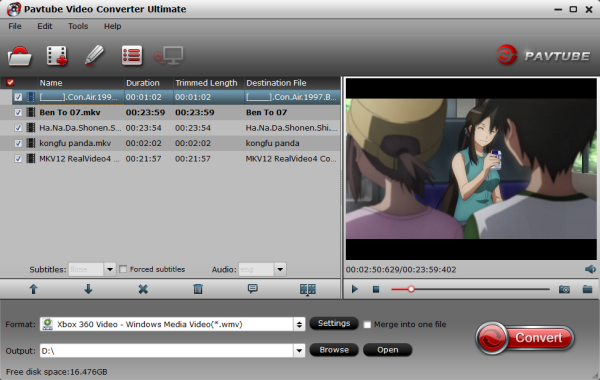
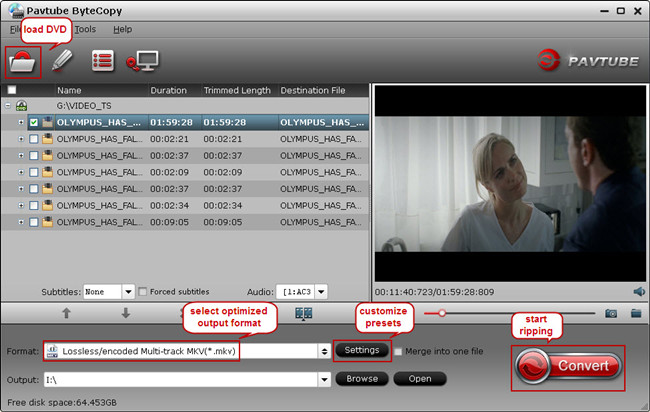
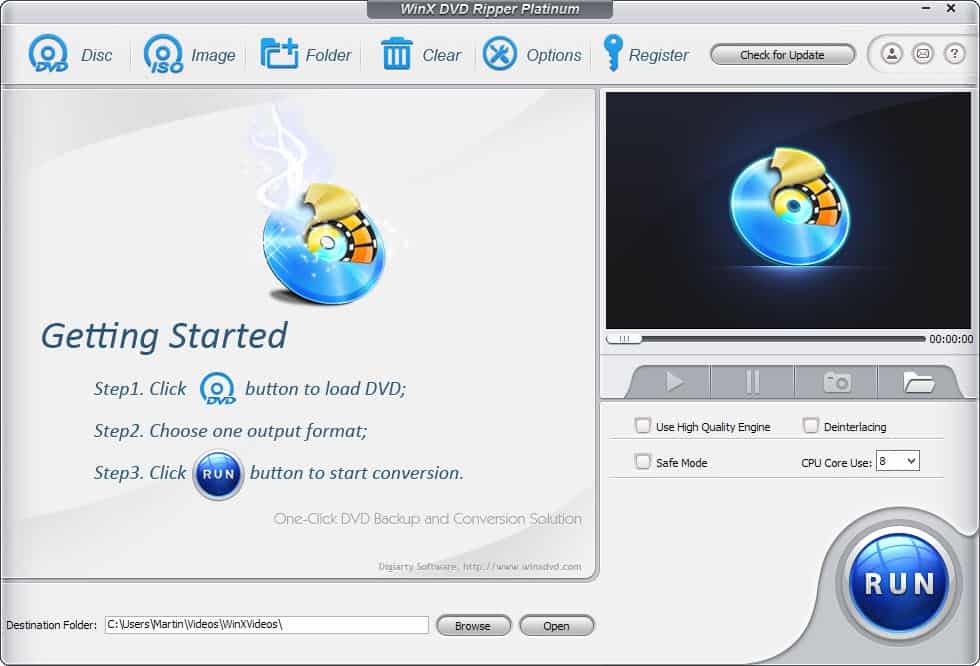
Step 2. Add iTunes Movies and choose target format. Drag and drop your videos to it directly, or you can click icon to import them as below. 


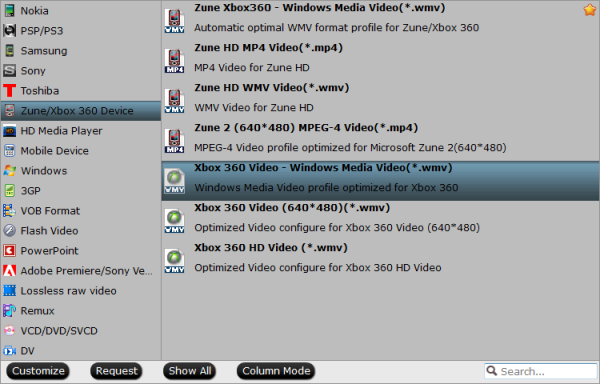
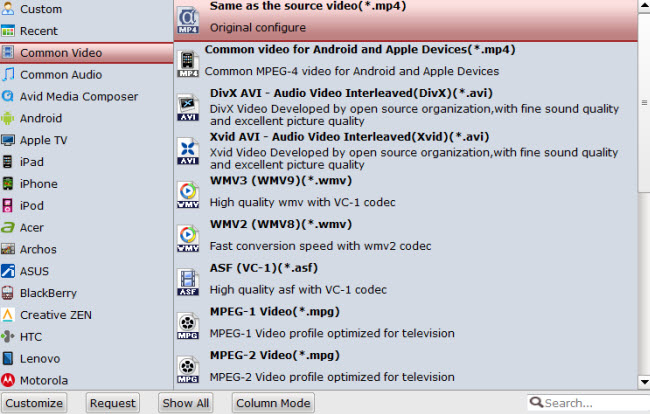
Let’s click the drop-down-list besides “Format” and choose “Same as the source video”for Samsung 4K UHD TV. 


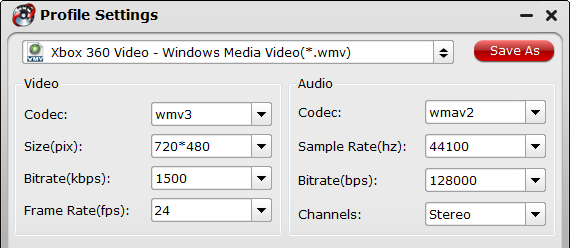
Step 3. Customize target video specs. (Optional) 

Click “Settings” as above to enter Profile Settings window, you can find settings for video size, codec, bitrate and frame rate. Change them at your own needs. 

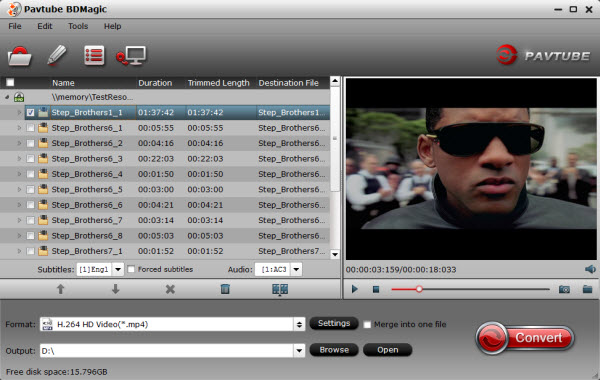
Step 4. Start (batch) conversion. 

Now click the big red “Convert” icon to start converting DRM videos; this converter will activate your media player automatically and start to play this video (let’s keep it running). The player windows cannot be removed or closed. After conversion, click “Open output folder” to quick locate the converted video. Now, you can move the converted videos files to your USB drive. 

Follow these steps to transfer the iTunes library to a USB Flash Drive for HD TV: 

a. Plug your USB flash drive into your computer’s port. Launch iTunes on your computer 

b. Go to the “Edit” menu within iTunes and click on “Preferences.” 

c. Click on the “Advanced” tab to see where exactly your iTunes library is stored. It will be an XML file. 

d. Open your library by going to the “Start” menu, selecting “computer,” clicking on the appropriate drive and browsing to the location of the file. 

e. Open a second window in “computer” and click on the icon for your flash drive. Drag and drop your library to the drive. This could take a long 

time, depending on the size of your library. 

Now, you can transfer the converted videos to your USB flash drive and you are free to move all the movies to USB flash drive

Other Two Methods for Watching iTunes Movies on TV

A: Watch itunes movies on TV via computer

Step 1- If you already have the iTunes on your computer then another way you can salvage those rented movies from going waste is to play the videos on iTunes via the computer. By connecting the computer to the TV you can make sure that you can watch the same through iTunes that is connected in the computer.

Step 2- If you can acquire an HDMI cable then most of your problems are over. By directly connecting what is visible on your computer onto the TV you will have perfect transmission that also does not affect the image quality and definition.

Step 3- You can use the TV remote control to go to the setting. The settings will specify the switch for the TV's input to the correct port. You can even connect and set the graphics adapter and continue to choose and use the TV screen as the monitor where you will be primarily watching the movies. By using this simple step you can play any iTunes on your preferred screen of watching. Do keep that popcorn by your side.

Step 4- You can also join your computer with your TV via other kinds of audio and video cables. To connect audio cables you will need to get a Miniplug-to-RCA stereo cable and by connecting this to your headphone jack on your computer and the audio port on your TV. For a video input you will need two methods. If you have an S-video connection on the PC then you can use an S-video cable to connect to the RCA ports that are available on your TV. A VGA or DVI connection can help with directly connecting your TV and your computer, making the display work like a monitor.

B: Watch Video from Your iPad on your TV

There are two methods under this that can help you watch videos on a TV. The first ia the option of Airplay and the other is the option of connecting the iPad to the TV directly. Whichever suits your pocket and fancy can be used to combat the boredom that you are feeling.

AirPlay

Step 1- The AirPlay feature has been started specifically for those who want to watch movies online on their TV. You can use the wireless system to watch Commercial flicks as well as the videos you shot and the other rented movies from iPad to an Apple TV box. There is need that you have an HDTV for the same.

Step 2- Once you start watching any movie on the iPad, you can tap the AirPlay button which you will be able to find in the setting sections of the video controls. Though you will be able to watch only one screen at one go, you will still be able to stream in any of the movies that you have been watching to the Apple TV box and then you have to refer to the steps that concern the Apple TV section.

Step 3- The best part about this method is that while your movie is streaming on the TV you can multitask on you tablet and continue working if your times is not totally free. Your kids can continue watching a movie and entertaining themselves while you finish your pending work. It must be said that rented movies show trouble when being fixed up to a TV.

AV Adapter cables

You can buy an adapter cable and join them to the TV do get brilliant picture quality. These cables are often supplied by Apple itself but you might not want to go in for expensive cables and by them off locally in the market. This will also save you a pretty penny when considering the overall cost for watching movies on a TV. 
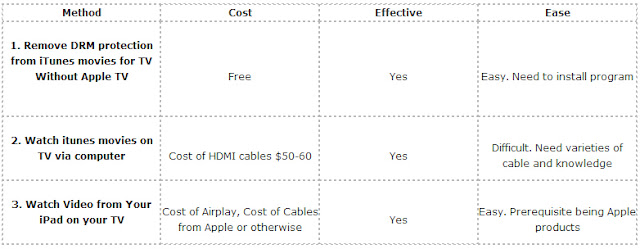


Comparison Chart


Now, just choose the way you like for enjoy iTunes Movies on TV. Have fun!

Read More:

Monday, March 14, 2016

Solved - Does the Xbox 360 support MKV files through USB drive

Editor Notes: 

“Surely Xbox 360 is a perfect platform to playback HD video. However, great many people are also fond of listening to music , enjoying photo and pictures, watching movies and video clips in WMV HD format off their computers' hard drive but on the Xbox 360. Getting MKV files to play on Xbox 360 can be a frustrating experience. Trust me, I've been there, and I have spent many hours racking my brain to figure out how to play MKV files on Xbox 360 successfully. Now I think I should write this tutorial to save everyone's time and their sanity.”


Top Solution: Surely Xbox 360 is a perfect platform to playback HD video. In fact, Xbox 360 has strict requirement for the input formats and only WMV, AVI, H.264 and MPEG-4 are compatible with Xbox 360. In other words, it's impossible to directly play MKV on Xbox 360. It is pity since MKV is an open standard free container format and very popular so far. 
   
Luckily, the following article will introduce two ways of how to successfully play MKV on Xbox 360. 

Method One - How Can I Play an MKV File on My Xbox 360? From eHow

Download a free video converter program, like Koyote Free Video Converter, to the computer's desktop. Double-click the file when it has downloaded. Follow the menu commands to install the video converter program. Restart the PC after the installation is done.

Double-click on the video converter's icon to launch it.

Drag the MKV video file onto the icon of the video converter on the desktop.

Highlight the MKV file in the top column of the video converter program’s main screen.

Select “AVI” from the list presented in the “Output format” tab.

Select “AVI - 28fps” from the “Video” drop-down menu in the upper right corner of the video converter program’s main screen. Select “Stereo” from the “Audio" drop-down menu in the video converter program’s main screen.

Click on the “Browse” button next to the “Save To” tab. In the window that appears, navigate to the computer's desktop . Click “OK” to close the window.

Press the “Convert” button at the top of the video converter program’s main screen. Wait for the progress bar that appears at the bottom of the main screen to reach 100 percent. Quit the video converter program once the conversion is finished.

Insert the USB flash drive into a USB port on the computer. Wait for the USB drive's icon to appear on the desktop.

Drag the AVI video file that was made from the MKV video file onto the USB drive's icon. Wait for the AVI video file to be copied to the USB flash drive.

Right-click on the USB flash drive’s icon. Select “Eject” from the pop-up menu. Remove the USB flash drive from the computer's USB port.

Insert the USB flash drive into one of the Xbox 360’s USB ports. Turn on the Xbox 360.

Navigate to the “Video” tab from the Home menu. Select the USB flash drive's icon beneath the “Video” tab.

Select the AVI video file from the list of choices presented to the right of the icon of the USB flash drive. Press the “X” button on the Xbox 360 game controller to play the video. 

Source:http://www.ehow.com/how_6527938_can-mkv-file-xbox-360_.html

Method Two - Get the Top MKV to Xbox 360 Converter - From Pavtube

Just like the dilemma aroused in the beginning of this passage, converting MKV to Xbox 360 attracts much attention. In order to achieve converted MKV compatible to Xbox 360, we recommend a powerful MKV to Xbox 360 converter -Pavtube Video Converter Ultimate, it has the optimized preset for Xbox One and Xbox 360. With it, you can do batch conversion from MKV to Xbox friendly video files in simple clicks of mouse. Here is review

Besides, It applied as a professional video and audio converter as well as editor, this free app will make MKV to Xbox 360 process easy and efficient. If you are a Mac user, you can turn to Pavtube iMedia Converter for Mac (including El Capitan), which has the same function as the Windows version. Now download the right version and follow the tips below to finish your task. 

Advantage 1: Derect and simply convert MKV to Xbox. In others' MKV to Xbox guide page, majority is on the assumption that your source MKV is H.264/MPEG-4 AVC video and AAC audio. If not, you need to learn other lessons like convert Divx, Xvid, MKV to MP4, MPEG-2 to H.264, AC3 to AAC, etc. With MKV to Xbox converter, you just need one single click.

Advantage 2: If you finish the whole readings from VideoHelp/Quora forum, it may take you at least half an hour. Then if you follow with them trying to convert MKV to Xbox, it will take you twice or triple times. But using Pavtube Video Converter Ultimate, with one-click and a cup of coffee time (depends on movie length and quality), you can play watch MKV on Xbox.

In-depth Tutorial: Convert MKV to Xbox 360 Compatible Formats

Step 1: Download the NO. 1 fast MKV to Xbox 360 converter:

Free download and install
          

Other Download:

- Pavtube old official address: http://www.pavtube.cn/blu-ray-video-converter-ultimate/
- Cnet Download: http://download.cnet.com/Pavtube-Video-Converter-Ultimate/3000-2194_4-75938564.html

Step 2: Import MKV video

Click "File" button to open MKV file that you want to convert. Or simply drag and drop MKV to the main interface of the MKV to Xbox 360 Converter. 


Step 2. Choose a proper format for Xbox 360.

Click "Format" drop-down list and choose " Zune/Xbox 360 Device >> Xbox 360 Video - Windows Media Video(*.wmv)" as the compatible MP4 preset with best video quality.


Step 3. Customize video specs for Xbox 360 (Optional).

For people who want to further customizing output video size and quality, you can click “Settings” on the bottom to enter Profile Settings Window, and customize video size, frame rate, bitrate, codec and sample rate(Hz). In general, the higher bit rate, the bigger output file size.


Step 4. Start MKV to Xbox 360 Conversion.

You can hit the big red "Convert" to start converting MKV to MP4 with best video settings for Xbox 360. After the conversion, click "Open output folder" in the conversion window, or "Open" in main interface to quick locate the converted video.

Now, you can use Windows Media Center, Windows Media Player, Windows Home Server or Zune Software to stream the converted media files to Xbox 360 for enjoyment without any problem. 

When you achieved MKV playback on Xbox 360, don’t you think Pavtube Video Converter Ultimate is fantastic? Is that all of the Ultimate Converter features? Of course Not! Highly acclaimed as Swiss Army Knife, this versatile video converter for Xbox 360 also functions as a strong performer for Blu-ray and DVD to Xbox conversion or playing MKV movies anywhere including MKV to iPhone, MKV to Zune, MKV to iMovie, MKV to PowerPoint, MKV to PS3MKV to iPad ProMKV to Samsung TVMKV to AndroidMKV to QuickTimeMKV to BlackBerry, and MKV to Nokia etc. 

Special Offer: 

ByteCopy($42) + Video Converter Ultimate($65) = Only $79.9, Save $27.1 
Video Converter Ultimate($65) + DVD Creater($35) = Only $64.9, Save $35.1
Video Converter Ultimate($65) + ChewTune($29) = Only $74.9, Save $19.1

Read More:

Thursday, March 10, 2016

AnyDVD Alternatives to Copy Protected Blu-ray/DVD in Windows/Mac

Slysoft, makers of the popular DVD and Blu-Ray copying software AnyDVD has closed shop effectively immediately. If you’re willing to pay to a certain point and want to simplify the Blu-ray/DVD ripping and copying process, here an reliable alternative to AnyDVD HD to decrypt Blu-ray copy protection and backup protected Blu-ray movies is recommended. Here, we have listed Top 8 AnyDVD Alternatives for Blu-ray/DVD Movie Fans. 

AnyDVD users are probably wondering how this is going to affect their version of the software when it comes to its functionality. While it should work fine with current and past releases, it may not support future releases due to a lack of updates.

Note: DVD or Blu-Ray ripping, copying or converting, or the circumvention of copy protection methods, is illegal in some countries. Other countries allow you to copy or convert discs that you have purchased.

Update: It appears that AnyDVD is back, sort of. The software is now called RedFox, and hosted on a site in Belize. A new version of the software has been released for existing customers who can upgrade their version of AnyDVD to it to regain connections to the key server.AnyDVD alternatives

The following selection lists AnyDVD alternatives that you may want to try as they may replace the program on your system fully or partially.

Option 1: Pavtube BDMagic


Pavtube BDMagic is highly recommended as one of the best BD/DVD disc handling tools on the market, integrates disc backing up and ripping skills to make it standout.
Features:
  • Rip latest copy-protected  Blu-ray and DVD to Android/Apple/Windows Device
  • Convert BD/DVD to  formats like MP4, MOV, FLV, AVI, etc
  • Full Disc Copy Blu-ray/DVD and Directly Copy BD/DVD main movie
  • Convert 3D/2D Blu-ray discs to 3D files in format of MP4, AVI, MKV, MOV, WMV, etc
  • Customize Blu-ray/DVD with built-in video editor
Requires: Windows XP/2003/Vista/Windows 7/Windows 8/Windows 8.1/Windows 10


Other Download:

- Pavtube old official address: http://www.pavtube.cn/blu-ray-ripper/
- Cnet Download: http://download.cnet.com/Pavtube-BDMagic/3000-7970_4-75922877.html 

Option 2: Pavtube ByteCopy


Pavtube ByteCopy is the best solution for Lossless MKV backup and ripping Blu-ray/DVD to almost all popular video formats. More than lossless output, it is possible to recode the source movie into MKV/MP4/MOV/M4V video with certain video/audio codecs.
Features:
  • Backup BD/DVD to MKV with preservation of all audio tracks, subtitles and chapter markers
  • Convert and rip latest Blu-ray/DVD movies for Android/iOS/Windows devices
  • Create 3D movie from 2D/3D Blu-ray and standard DVD
  • Remove unwanted subs streams and audio tracks at will
Requires: Windows 2003/XP/Vista/Windows 7/Windows 8/Windows 8.1/Windows 10 


Other Download:

- Pavtube old official address: http://www.pavtube.cn/bytecopy/
- Cnet Download: http://download.cnet.com/Pavtube-ByteCopy/3000-7970_4-76158512.html

Option 3: bitRipper


BitRipper converts DVD discs to the AVI video format. It is an easy to use program that requires less than five clicks to convert DVDs to the AVI format.

Put a disc into the drive, pick a track (usually the default is what you want), pick an output path if you don't like the default, and hit "start ripping".

Experienced users can modify conversion parameters under settings if they so desire. The program supports CSS protected DVDs.

Option 4: DVDFab HD Decrypter


The program supports older DVD and Blu-Ray formats only. If supported, you may copy the full disc or the main movie to the local computer system

Option 5: DVDFab Passkey Lite


The free version of Passkey comes with a handful of limitations. While you can use it to watch Blu-Ray movies on your PC, it cannot be used to backup these movies to the hard drive like the commercial versions of Passkey can be used for.

Option 6: MakeMKV


MakeMKV is a free cross-platform (Windows, Linux and Mac) DVD and Blu-Ray conversion software that converts the video clips found on discs to MKV files.

While that is not the same as creating a copy of a DVD or Blu-Ray disc, it opens up options to do that later on by using software that burns any video format to DVD or Blu-Ray.

MakeMKV reads protected and unprotected DVD and Blu-Ray discs, preserves chapter information, video and auto tracks, and meta information, and requires no additional software to convert the media.

The program itself is dead easy to use. Pop in a DVD or Blu-Ray, wait for it to be loaded and click on the "open disk" button that is displayed in the interface.

MakeMKV displays the content of the disc to you giving you options to check or uncheck individual items as you see fit.

Once done, set an output folder and hit the "make mkv" button to start the conversion.

Other free alternatives

These alternatives may be worth a try. While they may work well, they may not have received updates in a long while.
  • DVD 43 - This is a plugin only that other programs can use to decrypt encrypted DVD discs.
  • DVD Decrypter - A DVD backup software supporting free and CSS protected discs.
Commercial AnyDVD alternatives

Option 7: DVDFab Software


DVDFab had its run-in with the authorities as well as several company domains were seized in the past.

The company operates out of China currently where all of its programs are available for international buyers as well.

The company has created six commercial programs that copy or convert DVD or Blu-Ray videos.

They are:
  • DVD Copy - The program can copy the DVD to another blank DVD, create a DVD folder or an ISO image on the hard drive, or compress the content found on the DVD so that it fits on smaller discs.
  • DVD Ripper - Convert DVDs to popular video formats or for playback on devices you own.
  • Blu-Ray Copy - The program copies Blu-Ray discs to Blu-Ray/DVD/AVCHD discs, or to the computer hard drive.
  • Blu-Ray Ripper - Converts Blu-Ray movies to 2D or 3D video formats.
  • Passkey for DVD - This driver for Windows removes protection from encrypted DVD discs. In addition, it may be used to rip DVDs to the hard drive.
  • Passkey for BluRay -  This driver removes protection from encrypted Blu-Ray discs instead. It too enables you to copy the contents of a Blu-Ray disc to the hard drive.
Option 8: WinX DVD Ripper Platinum


The program supports DVD discs only. It reads free and copy protected DVDs, and can convert them easily in different formats based on your specification.

Apart from creating video files directly, it ships with profiles that you can make use of to create videos for Android, iPhone and other devices that you own so that you can play them on said devices without having to worry about formats and other technical information.

Other commercial alternatives

The following programs may be suitable alternatives to AnyDVD and AnyDVD HD.
  • Leawo DVD Ripper - The company's Blu-Ray ripper has been removed from the homepage, but the DVD Ripper is still available. It converts DVDs to more than 180 different formats and devices.
  • Magic Blu-Ray Ripper - Rip Blu-Ray discs and ISO images to video formats, or convert them directly for select devices.
Read More:

Tuesday, March 8, 2016

Top Solution on MP4 Video Not Playing on VLC Player

Thousands of people download VLC every day. Are you ready to join them in the best user experience a media player can offer? Why struggle with your media player when you could be watching MP4 Videos the easy way? Failed to play MP4 video on VLC Media Player? Asking this question from anyone might make you a fool as of course VLC does play MP4. 

List VLC Supported Video/Audio Formats:

- Video Codecs - MPEG-1, 2, A, B, 4, H.261, H.264, H.262 and more
- Audio Codecs - WMA, HE-AAC, QCELP, AAC, MP3, MPEG-Audio 1 Layer-1/2 and etc.
- Subtitles - ASF, AVI, FLV, MP4, MOV, 3GP, AIFF, AU, OGG, DMF and etc.

Hot Search: VLC to MP4 | AVCHD Files to VLC Player | Youtube Videos to VLC | VLC No Sound Problem |

If you check out the above VLC supported Video/Audio format of the media player then you will find out that it supports MP4 file formats. But still there are certain conditions in which VLC fails to play MP4 formats. For example: the MP4 file maybe corrupt, the output selected might be incorrect, the video codec might be wrong, and another reason might be that the MP4 file may have a number of video, audio and subtitle streams. Then, what to do if you want to open and play all MP4 files with VLC? 

Well, here gives a simple solution to solve this issue. Just cast aside VLC and turn to Pavtube Video Converter Ultimate which is specially designed for solving the VLC MP4 issues like “the MP4 file maybe corrupt”, “the video codec might be wrong”. (Here is review). 

Besides H.264 MP4/MKV, it also can help you to encode MP4 to H.265 MP4, MOV, AVI, FLV, M3U8, etc. And you can add watermarks, effects, subtitles to you own customized videos or trim, crop them to make them more amazing than ever. Now just download it and follow the steps below to finish the conversion. For Mac users, you can turn to iMedia Converter for Mac to encode videos for further usage (including El Capitan). 

Why Convert MP4 Video Formats for VLC Media Player?

- To reduce size of the videos while maintaining the quality.
- For use of standard formats which are widely popular.
- For use in special devices like television and video players that support certain formats only.
- For ease of sharing with others.
- To import in video editing software which only supports a limited number of formats.
- For support in mobile devices like iPhone, iPod, Android devices, Windows phone and others.

Step by Step Guide on How to Convert MP4 to VLC Support Format

Step 1: Load MP4 Files

Click the "Add File" button to add MP4 files which are not playable in VLC player to this VLC Converter app. Batch conversion is also supported. 


Tip: You can add multiple files to the queue and transcode them all at one time.

Step 2: Set output format

Click format you choose MP4/MKV from "Common Video" or "HD Video" as target format. To convert MP4 to VLC supported audio format, select VLC compatible audio from "Common Audio" Category.


Tips: Surely in the “Settings”button, you can adjust video and audio settings, including codec, bitrates, frame rate, sample rate, and audio channel. You can adjust video size to 1920*1080.

Step 3. Convert MP4 to VLC friendly format

Now, simply click the big green arrow Start Conversion button to start and finish MP4 to VLC conversion with fast speed and high output quality.

Then just load the converted files to VLC, just enjoy freely. 
 
TIPS For iOS Users: How to Put Your MP4 Files on an iPad for a VLC

Due to its portability and light-weight construction, the Apple iPad can serve as a handy tool for presenting informational reels and product demos to business clients. But if you have an MP4 video that you want to play on an iPad during a meeting, there are some essential steps you must take. Although the iPad supports playback for MP4 video, the media needs to be especially compressed before you can upload it onto the device. Nonetheless, the VLC media player is equipped with advanced file conversion capabilities that can optimize any loaded MP4 video for performance on the iPad.

Step 1. Launch VLC. Click the “Media” tab and select “Convert/Save” to open the Open Media window.

Step 2. Click the “Add” button under the File tab. Search for the MP4 video in the file browser window. Select the item and click “Open” to load the media into the program.

Step 3. Click the “Convert/Save” button to open the Convert window. Click the “Browse” button in the Destination file section to open the Save File window.

Step 4. Choose a storage directory for the iPad-optimized MP4 video. Enter a filename using the MP4 file extension and click “Save.”

Step 5. Click the “Edit Selected Profile” button (a tools icon) in the Settings section of the Convert window. In the Form window, select the “MP4/MOV” option under the Encapsulation tab.

Step 6. Click the “Video Codec” tab. Open the “Codec” pull-down menu and choose “H-264.” Enter a value of “30.00 fps” in the Frame Rate field.

Step 7. Click the “Audio Codec” tab. Open the “Codec” pull-down menu and choose “MPEG-4 Audio (AAC).” Enter a value of “160.00 kb/s” in the Bitrate field. Open the “Sample Rate” pull-down menu and choose “48000.” Click “Save.”

Step 8. Click the “Start” button on the Convert window to encode the output file. When the Streaming file conversion progress window closes, the iPad-optimized MP4 video is ready for use.
Step 9. Launch iTunes. Go to the “File” tab on the application menu and choose “Add File to Library…” Search for the iPad-optimized MP4 video in the file browser window. Select the item and click “Open” to load the media into the program.

Step 10. Connect your iPad to your computer with the USB transfer cable. When iTunes recognizes the tablet, an entry for the connected iPad appears under the Devices pane.

Step 11. Click the icon for the connected iPad and the device’s storage information loads in the main window.

Step 12. Click the “Movies” tab and select “Sync.” ITunes shows a confirmation message when the device’s media library is updated with the iPad-optimized MP4 video.

Step 13. Tap the “Videos” app on your iPad screen and browse for the recently transferred video. Tap the entry for the media and it plays on the device.

Tips: How to Solve the VLC "Video Output Modes Error" on Linux?

First of all open VLC media player and go to the "Tools" section. From there choose preferences. From the video tab, you can check out what options it displays for you. According to that you can choose the one that suits your situation the right way. The video output modes error is supposed to be handled with great care and see that it does not ruin the system running.


Read More:

Monday, March 7, 2016

Top 5 Video Players for Mac 2016 –With Mac/Apple TV Remote Control App

Summary:This is a list of 2016 top 5 best video player for Mac with suggested Mac/Apple TV remote control app on iPhone for the use of best Mac media player, if you plan to buy or have got a Mac, MacBook Air, MacBook Pro, etc. 

For those who are passionate about watching movies or videos you should need a powerful video player. If you are Mac owner, Mac has the problem of being lack of support for video players. If you'd like to have a best Mac video player for your video needs, like fluid playback of all video file formats, support of SRT file, etc, on a Mac computer or laptop which might be connected with HDMI to your Apple TV, you've come to the right place. Here we go.

Top 1. VLC Media Player

VLC Media Player comes first on our list. VLC is an absolutely free open-source software for watching movies, other kinds of videos. VLC is much popular because its ease of use and simple interface. VLC is compatible with Mac OS X, Windows, Linux, Android, iOS, etc. You can download latest VLC for Mac OS X 10.6 and later from VLC’s official site. You can also download previous versions of VLC for legacy versions of Mac OS X.

Top 2. QuickTime

QuickTime Player, developed by Apple, is the default video player on any Mac OS system and apparently a good free option for Mac users. This best media player for Mac supports most common video audio and image formats, works great with HD videos, and enables you to record, edit and stream Internet videos and HD movie trailers. One exception is that Mac QuickTime video player does not support WMV and DivX. 

Note: Be advised that OS upgrade may lead to your QuickTime player crashing on Mac sometimes. Be sure to research pros and cons of your Mac OS upgrading move, check out if your computer is better enough to run QT and prepare for Mac video player issues in advance.

Top 3. Elmedia Player

Free media player, which supports playback of almost any video or audio files. It offers numerous options to enhance viewing experience: 10-band audio Equalizer, video tuner to change brightness, saturation, contrast, etc., changing video aspect ratio, fitting image to screen, etc.

Handy URL option enables accessing YouTube videos from the app directly without opening a web browser with its noisy ads.

Top 4. MPlayerX

Many Mac users take MPlayerX media player as a standard part of their toolbox simply because it works properly and all most popular codecs are in it. No fuss or headache of codec installing or updating. Seriously, you will not be frustrated with such practical video player on your Mac OS. Problem like disappearing of title bar in QuickTime never happens. When playing AVI file on Mac/MacBook, this best Mac media player performs great without stuttering while Divx player cannot recognize the file sometimes. Well, system crash things happen randomly, which should be tackled properly. 

Top 5. DivX

DivX player for Mac is a powerful movie video player for Mac especially for HD videos playback, such as all native DivX videos, MKV and HEVC up to 4K movies. QuickTime files are included as well. With an easy-to-use interface, DivX player also plays as a video converter. But, this Mac video player seems to eat up too much space with its big installation file. So enough space matters to it.

All of them are powerful video players for Mac. You can choose anyone based on your own needs. If you want to playing MOV, AVI, MP4, FLV, MKV, 3GP, MP3, FLAC Video/Auido files on MacBook/MacBook Air/MacBook Pro/iMac/5K Retina iMac With Mac OS X El Capitan? You may need to the below tips.  

Additional Tips: Top Video Converter for Mac - Pavtube iMedia Converter for Mac OS X El Capitan

With Pavtube iMedia Converter for Mac, you can convert various video files, such as MOV, AVI, MP4, FLV, MKV, 3GP, MP3, FLAC, etc. Let you able to enjoy them on your Mac OS X El Capitan, as well as other portable devices such as iPhone, iPad, Apple TV, Android, Windows Phones, PSP, PS3, and so on. Meanwhile, you can also use it for some simple editing before conversion (splitting, trimming and combining, rotating and cropping, quality improvement, etc.). There will be no loss of image quality, and conversion itself is swift and effective.


More feature:
  • Decode and Encode H.265/HEVC files
  • Transcode Sony XAVC files with MXF container
  • Backup BD/DVD with original structure
  • Convert 2D/3D BD, DVD, SD/HD video with ease
  • Convert to all popular video and audio formats
  • Popular 2D/3D BD to 3D video conversion
  • Provide native codec for iMovie, Final Cut Pro and much more
Don’t hesitate to download the free trial version:


Other Download:

- Pavtube old official address: http://www.pavtube.cn/imedia-converter-mac/
- Cnet Download: http://download.cnet.com/Pavtube-iMedia-Converter/3000-2194_4-76177788.html 

Special Offer: 

ByteCopy($42) + Video Converter Ultimate($65) = Only $79.9, Save $27.1 
Video Converter Ultimate($65) + DVD Creater($35) = Only $64.9, Save $35.1
Video Converter Ultimate($65) + ChewTune($29) = Only $74.9, Save $19.1

Read More: