Tuesday, March 8, 2016

Top Solution on MP4 Video Not Playing on VLC Player

Thousands of people download VLC every day. Are you ready to join them in the best user experience a media player can offer? Why struggle with your media player when you could be watching MP4 Videos the easy way? Failed to play MP4 video on VLC Media Player? Asking this question from anyone might make you a fool as of course VLC does play MP4. 

List VLC Supported Video/Audio Formats:

- Video Codecs - MPEG-1, 2, A, B, 4, H.261, H.264, H.262 and more
- Audio Codecs - WMA, HE-AAC, QCELP, AAC, MP3, MPEG-Audio 1 Layer-1/2 and etc.
- Subtitles - ASF, AVI, FLV, MP4, MOV, 3GP, AIFF, AU, OGG, DMF and etc.

Hot Search: VLC to MP4 | AVCHD Files to VLC Player | Youtube Videos to VLC | VLC No Sound Problem |

If you check out the above VLC supported Video/Audio format of the media player then you will find out that it supports MP4 file formats. But still there are certain conditions in which VLC fails to play MP4 formats. For example: the MP4 file maybe corrupt, the output selected might be incorrect, the video codec might be wrong, and another reason might be that the MP4 file may have a number of video, audio and subtitle streams. Then, what to do if you want to open and play all MP4 files with VLC? 

Well, here gives a simple solution to solve this issue. Just cast aside VLC and turn to Pavtube Video Converter Ultimate which is specially designed for solving the VLC MP4 issues like “the MP4 file maybe corrupt”, “the video codec might be wrong”. (Here is review). 

Besides H.264 MP4/MKV, it also can help you to encode MP4 to H.265 MP4, MOV, AVI, FLV, M3U8, etc. And you can add watermarks, effects, subtitles to you own customized videos or trim, crop them to make them more amazing than ever. Now just download it and follow the steps below to finish the conversion. For Mac users, you can turn to iMedia Converter for Mac to encode videos for further usage (including El Capitan). 

Why Convert MP4 Video Formats for VLC Media Player?

- To reduce size of the videos while maintaining the quality.
- For use of standard formats which are widely popular.
- For use in special devices like television and video players that support certain formats only.
- For ease of sharing with others.
- To import in video editing software which only supports a limited number of formats.
- For support in mobile devices like iPhone, iPod, Android devices, Windows phone and others.

Step by Step Guide on How to Convert MP4 to VLC Support Format

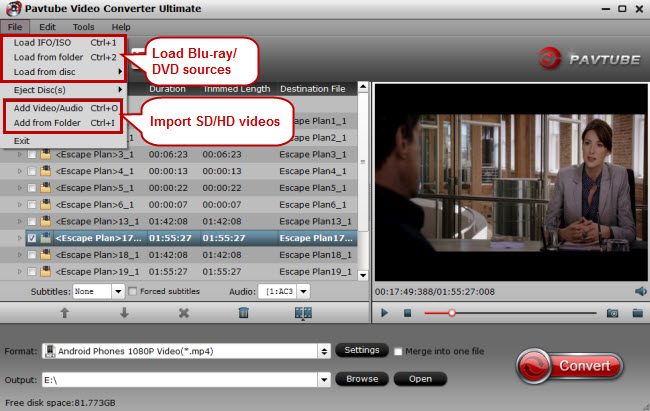
Step 1: Load MP4 Files

Click the "Add File" button to add MP4 files which are not playable in VLC player to this VLC Converter app. Batch conversion is also supported. 


Tip: You can add multiple files to the queue and transcode them all at one time.

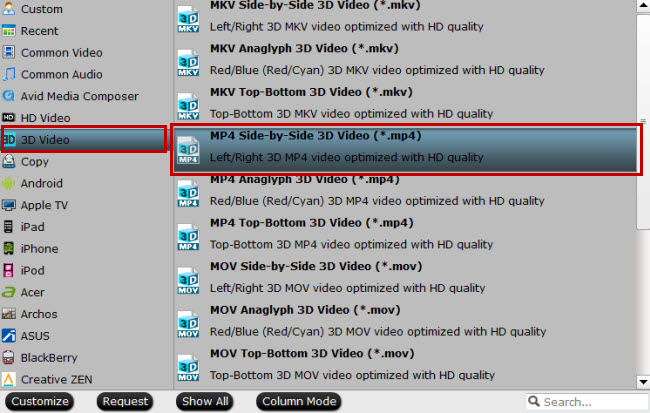
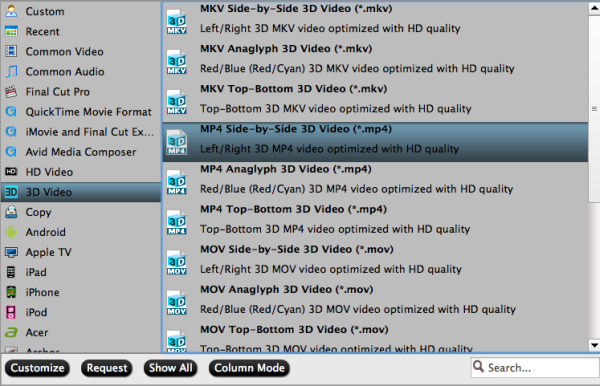
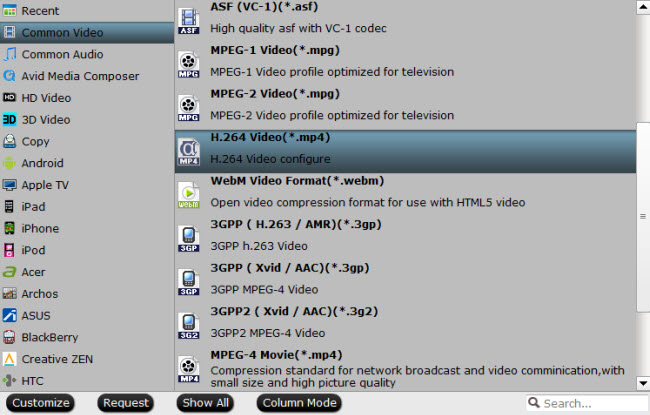
Step 2: Set output format

Click format you choose MP4/MKV from "Common Video" or "HD Video" as target format. To convert MP4 to VLC supported audio format, select VLC compatible audio from "Common Audio" Category.


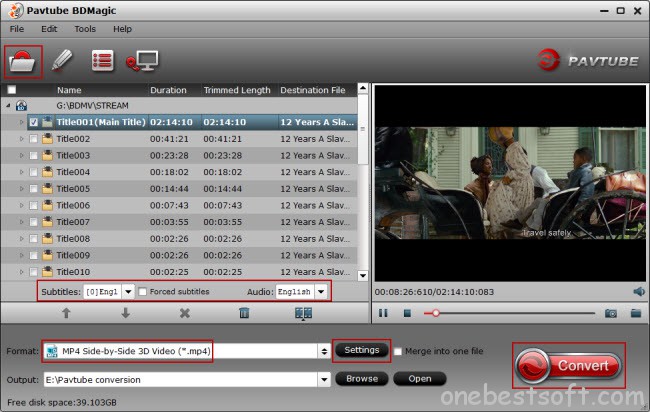
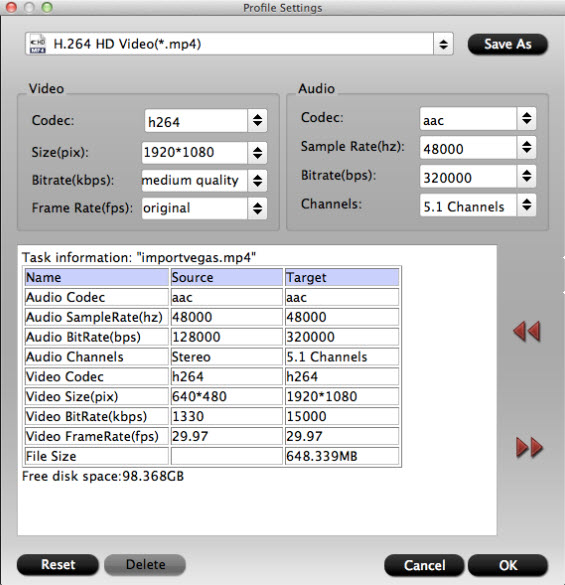
Tips: Surely in the “Settings”button, you can adjust video and audio settings, including codec, bitrates, frame rate, sample rate, and audio channel. You can adjust video size to 1920*1080.

Step 3. Convert MP4 to VLC friendly format

Now, simply click the big green arrow Start Conversion button to start and finish MP4 to VLC conversion with fast speed and high output quality.

Then just load the converted files to VLC, just enjoy freely. 
 
TIPS For iOS Users: How to Put Your MP4 Files on an iPad for a VLC

Due to its portability and light-weight construction, the Apple iPad can serve as a handy tool for presenting informational reels and product demos to business clients. But if you have an MP4 video that you want to play on an iPad during a meeting, there are some essential steps you must take. Although the iPad supports playback for MP4 video, the media needs to be especially compressed before you can upload it onto the device. Nonetheless, the VLC media player is equipped with advanced file conversion capabilities that can optimize any loaded MP4 video for performance on the iPad.

Step 1. Launch VLC. Click the “Media” tab and select “Convert/Save” to open the Open Media window.

Step 2. Click the “Add” button under the File tab. Search for the MP4 video in the file browser window. Select the item and click “Open” to load the media into the program.

Step 3. Click the “Convert/Save” button to open the Convert window. Click the “Browse” button in the Destination file section to open the Save File window.

Step 4. Choose a storage directory for the iPad-optimized MP4 video. Enter a filename using the MP4 file extension and click “Save.”

Step 5. Click the “Edit Selected Profile” button (a tools icon) in the Settings section of the Convert window. In the Form window, select the “MP4/MOV” option under the Encapsulation tab.

Step 6. Click the “Video Codec” tab. Open the “Codec” pull-down menu and choose “H-264.” Enter a value of “30.00 fps” in the Frame Rate field.

Step 7. Click the “Audio Codec” tab. Open the “Codec” pull-down menu and choose “MPEG-4 Audio (AAC).” Enter a value of “160.00 kb/s” in the Bitrate field. Open the “Sample Rate” pull-down menu and choose “48000.” Click “Save.”

Step 8. Click the “Start” button on the Convert window to encode the output file. When the Streaming file conversion progress window closes, the iPad-optimized MP4 video is ready for use.
Step 9. Launch iTunes. Go to the “File” tab on the application menu and choose “Add File to Library…” Search for the iPad-optimized MP4 video in the file browser window. Select the item and click “Open” to load the media into the program.

Step 10. Connect your iPad to your computer with the USB transfer cable. When iTunes recognizes the tablet, an entry for the connected iPad appears under the Devices pane.

Step 11. Click the icon for the connected iPad and the device’s storage information loads in the main window.

Step 12. Click the “Movies” tab and select “Sync.” ITunes shows a confirmation message when the device’s media library is updated with the iPad-optimized MP4 video.

Step 13. Tap the “Videos” app on your iPad screen and browse for the recently transferred video. Tap the entry for the media and it plays on the device.

Tips: How to Solve the VLC "Video Output Modes Error" on Linux?

First of all open VLC media player and go to the "Tools" section. From there choose preferences. From the video tab, you can check out what options it displays for you. According to that you can choose the one that suits your situation the right way. The video output modes error is supposed to be handled with great care and see that it does not ruin the system running.


Read More:

Monday, March 7, 2016

Top 5 Video Players for Mac 2016 –With Mac/Apple TV Remote Control App

Summary:This is a list of 2016 top 5 best video player for Mac with suggested Mac/Apple TV remote control app on iPhone for the use of best Mac media player, if you plan to buy or have got a Mac, MacBook Air, MacBook Pro, etc. 

For those who are passionate about watching movies or videos you should need a powerful video player. If you are Mac owner, Mac has the problem of being lack of support for video players. If you'd like to have a best Mac video player for your video needs, like fluid playback of all video file formats, support of SRT file, etc, on a Mac computer or laptop which might be connected with HDMI to your Apple TV, you've come to the right place. Here we go.

Top 1. VLC Media Player

VLC Media Player comes first on our list. VLC is an absolutely free open-source software for watching movies, other kinds of videos. VLC is much popular because its ease of use and simple interface. VLC is compatible with Mac OS X, Windows, Linux, Android, iOS, etc. You can download latest VLC for Mac OS X 10.6 and later from VLC’s official site. You can also download previous versions of VLC for legacy versions of Mac OS X.

Top 2. QuickTime

QuickTime Player, developed by Apple, is the default video player on any Mac OS system and apparently a good free option for Mac users. This best media player for Mac supports most common video audio and image formats, works great with HD videos, and enables you to record, edit and stream Internet videos and HD movie trailers. One exception is that Mac QuickTime video player does not support WMV and DivX. 

Note: Be advised that OS upgrade may lead to your QuickTime player crashing on Mac sometimes. Be sure to research pros and cons of your Mac OS upgrading move, check out if your computer is better enough to run QT and prepare for Mac video player issues in advance.

Top 3. Elmedia Player

Free media player, which supports playback of almost any video or audio files. It offers numerous options to enhance viewing experience: 10-band audio Equalizer, video tuner to change brightness, saturation, contrast, etc., changing video aspect ratio, fitting image to screen, etc.

Handy URL option enables accessing YouTube videos from the app directly without opening a web browser with its noisy ads.

Top 4. MPlayerX

Many Mac users take MPlayerX media player as a standard part of their toolbox simply because it works properly and all most popular codecs are in it. No fuss or headache of codec installing or updating. Seriously, you will not be frustrated with such practical video player on your Mac OS. Problem like disappearing of title bar in QuickTime never happens. When playing AVI file on Mac/MacBook, this best Mac media player performs great without stuttering while Divx player cannot recognize the file sometimes. Well, system crash things happen randomly, which should be tackled properly. 

Top 5. DivX

DivX player for Mac is a powerful movie video player for Mac especially for HD videos playback, such as all native DivX videos, MKV and HEVC up to 4K movies. QuickTime files are included as well. With an easy-to-use interface, DivX player also plays as a video converter. But, this Mac video player seems to eat up too much space with its big installation file. So enough space matters to it.

All of them are powerful video players for Mac. You can choose anyone based on your own needs. If you want to playing MOV, AVI, MP4, FLV, MKV, 3GP, MP3, FLAC Video/Auido files on MacBook/MacBook Air/MacBook Pro/iMac/5K Retina iMac With Mac OS X El Capitan? You may need to the below tips.  

Additional Tips: Top Video Converter for Mac - Pavtube iMedia Converter for Mac OS X El Capitan

With Pavtube iMedia Converter for Mac, you can convert various video files, such as MOV, AVI, MP4, FLV, MKV, 3GP, MP3, FLAC, etc. Let you able to enjoy them on your Mac OS X El Capitan, as well as other portable devices such as iPhone, iPad, Apple TV, Android, Windows Phones, PSP, PS3, and so on. Meanwhile, you can also use it for some simple editing before conversion (splitting, trimming and combining, rotating and cropping, quality improvement, etc.). There will be no loss of image quality, and conversion itself is swift and effective.


More feature:
  • Decode and Encode H.265/HEVC files
  • Transcode Sony XAVC files with MXF container
  • Backup BD/DVD with original structure
  • Convert 2D/3D BD, DVD, SD/HD video with ease
  • Convert to all popular video and audio formats
  • Popular 2D/3D BD to 3D video conversion
  • Provide native codec for iMovie, Final Cut Pro and much more
Don’t hesitate to download the free trial version:


Other Download:

- Pavtube old official address: http://www.pavtube.cn/imedia-converter-mac/
- Cnet Download: http://download.cnet.com/Pavtube-iMedia-Converter/3000-2194_4-76177788.html 

Special Offer: 

ByteCopy($42) + Video Converter Ultimate($65) = Only $79.9, Save $27.1 
Video Converter Ultimate($65) + DVD Creater($35) = Only $64.9, Save $35.1
Video Converter Ultimate($65) + ChewTune($29) = Only $74.9, Save $19.1

Read More:

Friday, March 4, 2016

How to Play 3D movies on Sharp TV from USB Flash Drive?

Sharp TV 3D movie playback question:

“ I want to stream 3D with my new Sharp TV -- that's why I bought it! Since I still need a Bluray Player, can I buy a Bluray player that can stream Vudu 3D movies that I can view on my Sharp TV? Any recommendations? I've read the reviews on the LG BD670 and they are not good. Any other compatible Blurays that are better?”

Are you trying to find out the answer? Self-help is better than help from others. So, if you have purchased 3D Blu-ray, 2D Blu-ray, or downloaded MKV, AVI, WMV, MOV, M4V, FLV, MPG, etc. videos, you can follow the guide below to convert videos to 3D videos, and then play 3D movies on Sharp TV from USB or NAS.  

- First you will need to know that Sharp Aquos TV supported best 3D compatible format is 3D MP4 format, other formats are not well supported, so you are recommended to play all kinds of 3D movies on Sharp TV with MP4 format.

- Second, you need to convert 3D movies to 3D MP4, or to convert 2D movies to 3D MP4, and then you can watch 3D on Sharp Aquos TV without problems.

Now you can follow the easy steps below to convert 2D/3D to 3D compatible format for Sharp TV for playback.

Thanks to a variety of very cool Pavtube 3D Video Converter Ultimate, it helped lots of 3D movie fans and very easy to use. It not only for Create 3D movies out of 2D sources, but also can create 3D movies out of source 3D Blu-ray content in 5 different 3D video formats: MKV, MP4, MOV, WMV and AVI for multiple 3D media players like HTC EVO 3D, LG Optimus 3D P920, 3D HDTV, 3D game consoles, etc.

What’s more, this app is regarded as a great Blu-ray ripping program to help users to convert 2D/3D Blu-ray collections for various HDTVs including but not limited to Sharp TV, Samsung HDTV, Sony Bravia HDTV, LG Smart TV, Toshiba TV, Hisense HDTV, Seiki TV, VIZIO TV and so forth. For Mac users, iMedia Converter for Mac is a helpful app to encode videos for further usage. Here is the review

Step 1. Load the downloaded 3D video files.
  
Launch the 3D movies Converter on PC, and click “Add Video” button to load your favorite 3D movies(MKV, MOV, AVI, ISO, MTS, M4V, FLV, etc). Mac users can try a Mac 3D Video Converter. Besides,It allows you complete 3D to 3D Blu-ray conversion by ripping 3D Blu-ray discs and DVD discs to different brands of TVs, mobile devices, media players, editing software, etc. 


Step 2. Set Sharp TV Blu-ray Player friendly format. 

Click Format and select “MP4 Side-by-Side 3D Video(*.mp4)” under 3D Video. In general, MP4 is a well-accepted file format for Sharp TV, media players or 3DTV and keep up the video quality. Of course, 3D video in .mp4, 3D video in .avi are supported as well. Differences Between Anaglyph 3D and Side-by-Side 3D


Tips: You can also Click “Format” drop-down option. You are directly select TV optimized file format under “TVS” menu, select the suitable TV format according to your TV brand. 


Step 3. Start converter 3D Movies.  

Hit on the “Convert” button and 2D/3D Blu-ray to Sharp TV conversion begins. After the conversion completes, open output folder and you will find the copied or ripped movies. Now you could store ripped 3D Blu-ray movies on NAS, USB, HDD, and Plex media server, then stream to USB/NAS for watching on Sharp TV. 

How wonderful it will be if we can enjoy 3D movies on Sharp TV by ourselves. After you read this article you will get the best 3D movie converter, which can help you convert 2D/3D movies to 3D movies in any formats you need, and then you can play 3D movies on Sharp TV from USB or NAS smoothly. 

Read More:

Tuesday, March 1, 2016

3D Blu-ray to 2D - Can I play 3D blu-ray discs on a 2D TV?

3D Blu-ray is becoming the most sought-after thing. Well, if you've collected a pile of 3D Blu-ray discs, how to make full use of them? The most favorable way is to rip 3D Blu-rays to videos with 2D or 3D effect for playing, sharing widely. This guide will help you do the “3D Blu-ray to 2D TV” conversion. 

Q1: I have 3D glasses and a 3D blu-ray system connected to my TV via HDMI cable and optical cord, but I just have a normal 2D TV (not sure if it's plasma or LCD). If I play 3D blu-rays on this, will they work? Will I be able to view it in 3D with the glasses?

Update: The answers so far, while appreciated, aren't clear. Does No mean the discs won't work AT ALL, or just not in 3D? 

Q2: Can 3D Blu Rays be watched in 2D? So basically from now on I might as well start buying 3D blu ray movies for when I eventually get a 3DTV rather than having to go and rebuy the same movies again when I finally do get a 3DTV. But as of now I only have a 2D HDTV, so if I start buying 3D blu rays, will the PS3 be able to switch to 2D or will I have to buy both 2D and 3D movies?

For those who are still looking for some software to rip 3D-BDs, here we highly recommend Pavtube BDMagic<review>, which is a yet professional 3D Blu-ray Ripping software. With it you can easily convert 2016 3D Blu-ray movies to MKV, AVI, WMV, MOV, MP4, etc HD media formats with 2D or 3D (Red-Blue, Red-Green two modes) effect. Plus, the original Blu-ray 3D in 1080p can be output just in the same definition, or compressed to 720p video; the choice is yours. For Mac users, get  3D Blu-ray Ripper for Mac, which can help rip 3D Blu-ray on Mac. Download the tool and follow the full guide on ripping 3D Blu-ray below. 

Download the excellent 3D Blu-ray Ripper: 


Other Download:

- Pavtube old official address: http://www.pavtube.cn/blu-ray-ripper/
- Cnet Download: http://download.cnet.com/Pavtube-BDMagic/3000-7970_4-75922877.html

Good News! To thanks for your continuous support, Pavtube Official Website and Pavtube Facebook are now holding the biggest sale for this 88th Academy Awards with fantastic 50% off discounts and giveaway. Pay less to get powerful Blu-ray/DVD/Video Converter to build your own home media center on this Week of Feb.22~Feb.29 2016!

How to Rip 3D Blu-ray movie to 2D/3D MKV, AVI, MP4, FLV, MOV for 2D TV

Step 1: Load 3D Blu-ray movies

Install and launch Pavtube 3D Blu-ray Ripper, and then load your source movies Kung Fu Panda 3, Zootopia, OBatman v Superman: Dawn of Justice 3D, etc to this program.


Step 2. Set output format

To convert 3D Blu-ray to your needed file types, you need specify a format as output format. Click on the dropdown menu of "Format", and then choose your needed one from the multiple output format presets. Besides, if you do have a traditional 2D TV, you also can get a 3D effect in movies on your TV, All you need are choosing the Anaglyph type (Red/Cyan) and wearing 3D glasses


Note: There are have three types of 3D effect: Anaglyph 3D, Side-by-Side 3D and Top-Bottom 3D. Here, you are suggested to choose the presets from “3D Video” option for 3D TV. 

Tip: Click “Settings” button, then you are able to adjust all the settings in the following window to customize the output file quality, including codec, size, bit rate, frame rate, sample rate and audio channel. 

Step 3: Start 3D Blu-ray to 2D conversion.

Now hit the big red “Start Conversion” to start converting videos to start converting 3D Blu-ray to 2D/3D video for 2D TV. After the conversion, click “open output folder” to quick locate the generated media file and play 3D Blu-rays as you wish. Have a nice time.

Read More:

Monday, February 29, 2016

Top Solution - Solve Handbrake Video/Audio out of Sync Problem

Outline:When you convert a movie with Handbrake and find it has Video/Audio out of sync problem, what should you do? Read on this article and get the solution. 

Feel annoying that the video is out of sync audio in Handbrake when you rip DVD and convert video on Pc/Mac with it? Don't worry, this tutorial will give you reasons and tell you how to solve Handbrake audio/video out of sync problem on your Mac and PC to ensure you a consistent and synchronous video and audio playback. 

This is a question on a forum.:“So I first noticed the audio desynchrony problem was when I played Jurassic World. I ripped it from DVD that borrowed from my friend with Handbrake on my Mac. But when I started to play the movie, the audio would be way ahead of the video by a few seconds. It really grinded my ears. I tried to reboot my media player and the problem also existed. I really don’t know how to then. Please help!”

Actually, Video/Audio out of sync problem is common on many video help forums. People response that after they used Handbrake to rip their Blu-ray/DVD movies on Mac computer, the output movies often appear audio and video out of sync problem. Here, this article will explain to you the reason and show you the solution to solve Handbrake video/audio out of sync problem. 

What factors result in Handbrake output video and audio out of sync

As a matter of fact, it is not Handbrake but the following cases that makes output audio not match up with video:

The media player

Many media players, such as Windows Media Player, VLC and QuickTime, sometimes have a hiccup. Take QuickTime for instance, it may have timescale issues when bringing MPEG source into Avid or Final Cut Pro, which may make audio go out of sync with video.

Encoding video with intense features

When you encode video with high references, CABAC Entropy coding, 8*8 transform, Pyramidal B-Frames on a slow computer with low configuration, your audio and video will be synced in a wrong way.

Restart your Mac system

If many apps are running at the same time on Mac, the intensive use of CPU maybe lead your system go abnormal. So the processes like video encoding, editing or downloading will not go smooth. This is where the audio/video out of sync happens.

Be careful of Xvid

When you rip Blu-ray/DVD on Mac and are selective in the codecs, you are not suggested to choose  DivX and Xvid for them are regularly regarded as the crime culprit of audio/video sync issues.

How to solve Handbrake video/audio out of sync problem on Mac

Solution A: Reset the framerate in Handbrake

To make output audio match up with video, you can adjust the output framerate to match the source file’s framerate. 

Open Handbrake on Mac; click "Source" to load the file that has an Audio/Video syncing issue. Click the drop-down menu Framerate to select an appropriate frame rate for your video. Then hit "Preview" button to check whether the syncing problem is fixed. If so, you can go on the encoding process with Handbrake. Or else, try another frame rate till the problem is solved.


Solution B: Backward or forward audio to match up with video in players

Some media players support adjust audio timescale on Mac, like VLC. Choose this media player with backward or forward functions to make audio keep pace with video in order to solve audio and video out of sync problem. 

In fact, there is simple way to solve Handbrake audio/video out of sync problem. 

Solution C: With Handbrake Alternative on Mac to rip and backup Blu-ray/DVD with syncing audio and video

Using Pavtube iMedia Converter for Mac will be fix this problem with ease. This app not only can fix Handbrake audio/video desynchrony problem, but also can directly rip and backup Blu-ray/DVD/HD/4K video on Mac. In this app, you can choose any popular codec to avoid audio/video out of sync problem. And in profile settings, you can reset video and audio size, bitrate,etc to get better video quality. You can preserve 5.1 sound with it when outputting video. If you make full disc coy, it even can keep 7.1 sound.
This Handbrake Mac Alternative can easily rip Blu-ray/DVD/HD/4K video to H.265, M3U8, AVI, MOV, MP4, etc to provide compatibility with various devices, like iPadPlex ServeriMovie and so on. And this programme for Mac is very easy to use:

Step 1: Download and install this Handbrake Mac Alternative:

Free download and install


Other Download:

- Pavtube old official address: http://www.pavtube.cn/imedia-converter-mac/
- Cnet Download: http://download.cnet.com/Pavtube-iMedia-Converter/3000-2194_4-76177788.html 
Step 2: Load video to app and select format

Load the Handbrake file with audio/video out of sync problem from “File” icon. Or you can directly import Blu-ray/DVD movies into it to rip and backup for avoiding audio and video desynchrony problem. In “Format’ bar, select the output video format you want. This app offers you plenty of video/audio formats.

Step 3: Adjust video/audio parameters and start conversion

This is the most important step to fix or avoid Handbrake audio/video out of sync problem. Open “Profile Settings”, you can adjust video framerate, bitate and audio sample rate, bitrate as the source movie. Finally, click “Convert” to start fix Handbrake audio/video out of sync problem.


Now, you can enjoy your movie smoothly. With Handbrake Mac Alternative, you can optionally convert the newest Oscars Best Winner movies in 2016 and get a video with syncing audio and video. 

Related Article: