Thursday, November 6, 2014

Download YouTube Videos to Windows Media Player for Enjoyment

You said you got a hobby of watching YouTube videos? Read the article below and know how to watch them on Windows Media Player.


Surely if you indeed have the hobby of watching YouTube videos on Windows Media Player, it is possible after installing some basic packages. It will bring some incompatibility issues if not sorted out in advance. For smoothly watching YouTube videos on Windows, all you need to do is turn to a good YouTube to Windows Media Player Converter.

This article has all the information you need to know about that and will be a proper guideline to use. If you already have some YouTube videos in your hard drive and want to watch them in Windows Media Player. There is theYouTube Video Converter will do all that right from the browser. It will convert to popular formats like 3GP, MOV, MP4, AVI, RM, WMV, M2TS, MPEG, TS and ASF in a quick and easy way. Now click the Download button below to get the program.

Some Steps you may know for watching YouTube videos in Windows Media Player.

The first thing will be adding all the files to the converter and you will have to browse them from the right folder. You can achieve the goal by clicking the ‘Add from folder’ on the bottom left corner. Alternatively, you can also drag and drop the files to the program. The added files will be listed in the video library as thumbnails. Next, just go to the output list to get the ‘HD Video’>>’H.264 HD Video (*.mp4) as the best output one.


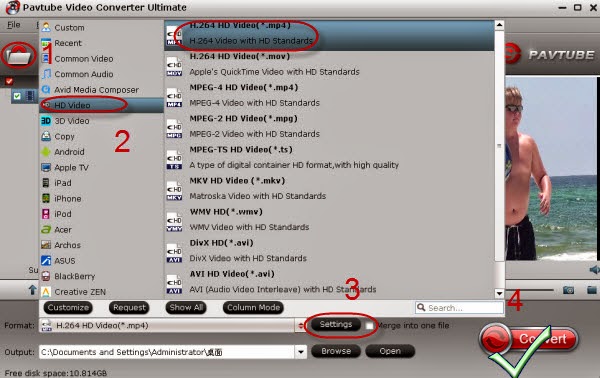
For some advanced users, ‘Settings’ or ‘Editor’ will be a better place before you planed to click the ‘Convert’ button to start your work. Make some personal adjustments for a nice enjoyment on Windows Media Player, so we also called the program as ‘tiny editor’, is that awesome?

Expires on November 10th, in last several days, all you guys can enjoy a 50% off discount on this ‘Promotion Page’. The first one is what you need! Hurry up!

Tips: Also five common problems you may get when working Windows Media Player. Take them for a reference?
1) Poor internet connection is one of the problems encountered with Windows Media Player. It is always smart but can fail to connect automatically in a few cases and will send a notification to that effect.
2) The second problem is corrupt Windows Media Player library. If this happens, you will be unable to access your stored files or even add new ones.
3) Thirdly, you are likely to experience interrupted playback especially when you are streaming videos with Windows Media Player. The performance of the media player will be greatly affected leading to slowed video buffering.
4) The fourth problem that you need to know about is CD ripping error which makes it impossible to extract audio files from the disc. Generally, it is a trouble-free mission when ripping CDs using the Windows Media Player and this problem occurs in selected instances.
5) Lastly, you can have the Windows Media Player freeze out when playing on a full screen mode. This will be nagging to those people who like enjoying their videos on full screen mode. The problem is majorly caused by incompatibility between the video format and the player which can be prevented by converting the files in advance.

More:

Wednesday, November 5, 2014

Again Celebration of Halloween Converters Promotion by Pavtube Studio!

This paper mainly tells us the introduction of several popular video converters on Pavtube studio which also has the Halloween discount!


Searched online, you guys may know so many popular videos converters that can especially meet most photographers or video editor’s requirements. With different functions or prices, it is hesitating for us to make some decisions, right? Follow the 2014 Halloween which past only several days, here we introduce some Pavtube Video Converters with special Halloween discounts. More details on Halloween Topic Page?

Pavtube MTS/M2TS Converter for Windows/Mac, especially for converting MTS/M2TS/M2T/TS/AVCHD/MOD/TOD footage to almost all video formats. What’s more, so many popular editing tools or media devices you can find listed on output items in this program. What else we also call it as a simple editor because you can adjust your files in ‘Editor’, like trim, crop, subtitles, etc. Let’s just make our MTS/M2TS compatible with everything.

Pavtube Video Converter for Windows/Mac, which is a functional assistant that can handle almost all HD/SD audio/video formats. For another way, it’s the best one for Tivo/DVR recordings. So other items you can have a try on main interface such as ‘Settings’, ‘Editor’, ‘Merge into one’, etc. All Windows operation it can work well. Also, GPU acceleration technology is available. For example,  iPad Air 2, iPad Mini 3, iPhone 6 plus, iPhone 6, Galaxy Note 4, Galaxy Note Edge, Nexus 6, Nexus 9, Kindle Fire HDX, Surface Pro 3, etc are offered there.


Pavtube HD Video Converter for Windows/Mac, the biggest highlight this one can handle HD digital camcorder footages such as AVCHD (MTS, M2TS), MXF, MOV, etc. Others? Deinterlace to get the better video, advanced adjustments for some professional video editors, wide range of outputs and supported devices, etc.

Pavtube MXF Converter for Windows/Mac, especially designed for MXF footages which shot by MXF cameras. For example, it can convert MXF files for free playback on iDevices, Android devices and media players. Furthermore, MXF files batch conversion can be also supported. Is that cool?

Pavtube MXF MultiMixer/iMixMXF, do you know the biggest characteristic of this program? Keep multiple audio tracks/channels in multi-track MKV/MP4/MOV formats, surely with rich editing functions. On the output list, you can find the item ‘Multi-track Video’ that other products don’t have. Others for example, batch conversion, merging and splitting. 
For Blu-ray or DVD rippers, you can also see here. Pavtube DVDAid for Windows/Mac or BDMagic for Windows/Mac. I’m sure it can meet your needs such as ‘Copy’ files, rip DVDs or Blu-rays, etc.


Whatever video formats shot by cameras you wanna edit for a nice enjoyment or upload on websites, the programs we mentioned above can do you a big favor. For now, I have to mention here is to celebrate the 2014 Halloween, such a big discount on this paper! 50% OFF on all BD/DVD or Video tools! Only 5 days left! What are you waiting for?

Monday, November 3, 2014

What Are 10 Easy Steps for Editing Sony F3 XDCAM Videos in FCP 7?

This guide can generally tell you 10 easy steps for editing Sony F3 XDCAM videos in FCP 7 and the introduction of another converter.


‘XDCAM Transfer’---an efficient and simple tool provided by Sony.
Cause XDCAM footage recorded to SxS cards which shot by Sony PMW-F3 camera can’t work well with these files natively. Sony has provided an efficient and simple tool called ‘XDCAM Transfer’ that addresses this exact problem. Now let’s see together how to get XDCAM videos accepted by FCP 7 with this transfer.


1. Install required software (listed below) and reboot as needed.
2. Open XDCAM Transfer.  
3. From the XDCAM Transfer menu, select “Preferences”.
4. On the Import tab, set the folder that the transferred material will be saved to, and close the Preferences menu.
5. In the main XDCAM Transfer interface, click the Add button in the bottom-left corner.  
6. Browse to either a mounted SxS card in a card reader, or a copy of the “BPAV” folder that was saved to a hard drive on-location.
7. Click on the new item in the left “Source” pane, then select “Import All Clips” from the File menu.
8. Open Final Cut Pro 7.
9. From the File menu, select “Import”.
10. Select the clips from the import folder you specified in your XDCAM Transfer Preferences menu.  Now you’re ready to edit!


Tips: This workflow is only for Intel based Macs (MacBook Pro Laptops and MacPro Towers) with OS X v10.5 or later and Final Cut Pro 7 installed.  This procedure will not work for PowerMac systems or Final Cut Pro 6 users.

Due to the disadvantages we saw above, any other methods we can easily import Sony XDCAM files in FCP 7? Fortunately, here we introduce you the Sony XDCAM to FCP Converter for Mac to do you a big favor. To celebrate the 2014 Halloween , you may now get the big discount on Halloween Topic page. Buy one Get one Free? You can get another DVD Creator for Mac free if you buy this product with one offer only expires on November 10.

Convenient steps are followed here with the screenshots, download the program and load your files in with two items called ‘Add video ‘or ‘Add from folder’. Especially for FCP, there are several types on the format list like ‘Final Cut Pro’>>’Apple ProRes Codec 422’, etc. If you get the preparation done, you can click the ‘Convert; button to start the conversion. Otherwise, ‘Settings’ or Editor’ items you can walk in for a further exploration. 


Additionally, this program has been already tested for the new operation Mac OS X 10.10 and it works well. Any opinions or suggestions you can leave the comments below.

Related:

Saturday, November 1, 2014

Five Alternatives---Just Say Goodbye to the Optical Disc

With more storage tools nowadays, it’s time to say goodbye to the traditional optical discs.

With computers growing smaller and lifestyles going mobile, less and less devices offer sufficient space for internal optical drives. Presently, the market is kept afloat by Blu-ray consumer home video sales, but in terms of data storage, optical discs are slowly becoming obsolete.

How much do you know about optical disc?
Optical discs have a storage capacity of up to 50GB (Blu-ray) and at around $0.08 per GB they remain one of the cheapest ways to store data. Under optimal conditions in terms of temperature, humidity, and handling, Blu-ray discs can last over 50 years, an impressive number. The question is whether those drives will still be available in a decade or two from now and at what point it is smart to switch to another storage medium.

Five options to say goodbye with optical discs?

No.1 USB Stick
Since lifetime depends less on climate and storage conditions, but primarily on the amount of times data are written to or erased from the drive, flash drives theoretically could have a longer lifetime than DVDs or Blu-ray discs.  However, flash drives are significantly more expensive per GB.


No.2 SD(HC) Card
This is the most portable alternative to optical discs. With regular storage sizes between 16 and 64GB, SD cards are also comparable in size. Moreover, SD / SDHC cards require an SD / SDHC card reader or an adapter.


No.3 (HDD) External Hard Drive
They cost less, offer a much higher storage capacity, and are essentially compatible with any device that sports a USB port so external hard drives are the cheapest alternative to optical discs. The biggest issue, however, is the vulnerability of HDDs. They are easily damaged by physical shock, which makes them suboptimal for transporting data. Moreover, their operation relies on moving parts, meaning each use increases the likelihood of hardware failure.


No.4 External Solid State Drive (SSD)
In terms of price and durability, SSDs are similar to thumb drives or SD cards: expensive, but potentially long lifetime. SSDs are available with larger storage capacities than other flash-based storage devices, however, this also comes at a higher price.


No.5 Cloud Storage
Storing your data in the cloud is the most convenient way to backup, share, and keep your data with you, provided you have access to the internet. However, this is only practical for small amounts of data. If you have more than a few GB, it can get very expensive as fees are due monthly or yearly, for as long as the storage space is needed.


However, how could we rip our DVD or Blu-rays to common videos if we have already got some discs which cannot be store with convenience? Here, we may also provide you a professional DVD or Blu-ray ripper called Pavtueb ByteCopy for Windows/Mac for you.

Advantages: Such as copy Blu-ray/DVD with 1:1 quality, directly copy the main movies to save the storage, rip compressed movies without limited, with multi-track converted, etc. It’s just a functional BD/DVD ripper that can meet almost each user’s needs. Additional surprise here! To celebrate the 2014 Halloween expires on November 10, Pavtube studio held the promotion discount called ‘Buy one Get one Free’, you can get more details on Halloween Topic page. 

What are you waiting for? Just enjoy your discs in some different ways, is that awesome?

More?

Friday, October 31, 2014

How to Install OS X Yosemite & Save the Installer

With the hot wave of Apple’s release of iOS 8 and the latest release of OS X Yosemite, here we may teach you how to correctly install it on your Mac.

With the latest iPhone and iPad released by Apple company, all the Apple fans are fond of the new devices. Hot on the heels if iOS 8 and a couple of new iPhones comes Apple’s latest release of OS X 10.10, codename “Yosemite”. However, how much do you know about the OS X Yosemite?

According to the announcement by Apple, this new system is free, comes with a brand new look, and is packed with features and security improvements over its predecessor, Mavericks. Here’s how to install it right now, as well as a look at the latest changes in Cupertino’s hardware line-up. Here maybe you can know more.

What noticeable changes you can see in the OS X Yosemite?
Comparing to the Apple’s iOS 7, it contains a brand new look that more closely resembles the bleeding transparency seen in former. Continuity, which allows you to seamlessly switch from mobile to desktop use; and iCloud Drive, which is a long overdue way of managing the cloud data you have stored with Apple.


OS X Yosemite is compatible with the following ones:
  •  iMac (mid-2007 or later)
  •  MacBook (13-inch aluminium, late 2008; 13-inch, early 2009 or later)
  •  MacBook Pro (13-inch, mid 2009 or later; 15-inch, mid 2007 or later; 17-inch, late 2007 or later)
  •  MacBook Air (late 2008 or later)
  •  Mac Mini (early 2009 or later)
  •  Mac Pro (early 2008 or later)

How to download it & save the installer?
The free update can be found in the Mac App Store, simply launch it on your Mac and head to the Updates tab. Hit Free Upgrade, enter your Apple ID password, and Yosemite will download its installer to your Applications folder. When the download is complete, the installer will automatically launch, but you can close (or ignore) it.


Tip: If you have multiple Mac computers in your household, you will probably want to make a copy of the installer. You can do this by holding the option (also known as alt) key and dragging “Install Yosemite” from the Applications folder to another location so you can install it on your other computers without having to download it all over again.

Installing Yosemite?
You should back up your Mac with Time Machine before you perform any major upgrades, just in case. Once downloaded, you can install OS X Yosemite by running the “Install Yosemite” application, which will delete itself on completion. The whole process takes somewhere around 20 minutes, and when your Mac restarts, you’ll be able to start setting up Yosemite.

Something you should do next:
When you are be able to agree to some updated terms and conditions and begin using OS X Yosemite. Check out the new look and feel and the just follow the options.


Additionally, If you have an iPhone running iOS 8, you’ll now be able to take phone calls on your Mac or respond to text messages from any of your contacts using your keyboard.Don’t forget to check out the full list of changes in OS X Yosemite, and catch the full iOS 8 low-down too if you’re iPhone- or iPad-inclined.

How to transfer files from iTunes to iPhone? You may check it out here! So what are you waiting for? Just upgrade the OS X Yosemite and enjoy the fun!