Wednesday, December 25, 2013

Create 3D & Multiple Audio tracks Videos for Videographers With Latest Update to Pavtube iMixMXF


The latest upgrade to Pavtube's MXF MultiMixer and iMixMXF software allows users to now create 3D videos and still support multi-track audio preservation. The latest upgrade also allows MXF videos to be played on websites, tablets, smartphones, HD Media Players and TVs.

Photographers and videographers can now convert 2D videos to 3D and preserve or mix MXF multi audio tracks with the latest upgrade to Pavtube's Video Converter Ultimate and its Mac version, iMedia Converter for Mac.


The MXF video format is familiar to most professional videographers and enthusiasts if they use any sort of professional camera or camcorder. However the MXF format is not supported by major editing software(Convert Canon MXF to multiple audio tracks ProRes 422 for FCP 6/7), most websites, tablets, smart phones and TVs, and people cannot play MXF video on them directly.

The Pavtube MXF MultiMixer software is designed to help those video-graphing fans to be able to edit or play videos on these platforms and also do much more with their videos.

"I get numerous customer requests everyday asking for ways to convert MXF video for all usable formats. A lot of users shoot videos with camcorders in HD quality and then want to upload the videos online, to websites like YouTube and others," said Sally Lee, one of Pavtube's customer support professionals.

Sally continued, "Many people converting MXF multi-track videos have tried to have all audio tracks in one video, but weren't able to do so. They simply mix them up into one, or lose one or two tracks. Some customers also have the need to output 3D videos. With the recent upgrade to our software, we found a way to help them."

Many professional cameras and camcorders now record videos with multiple audio tracks in MXF format. Canon XF series cameras, for example, are the most typical and widely used models which include two audio tracks, one is recorded by the microphone and the other recorded by headset. Of course, more audio tracks options come with more professional devices, such as Panasonic P2 MXF, and Sony XDCAM MXF.

Pavtube's developers found ways to meet customers' needs with some advanced technology in the first version of MXF MultiMixer/iMixMXF and helped users retain the original audio tracks in .MKV, .MP4 and .MOV. With this latest upgraded version they were able to add 3D output.
Sally continued "Some customers also found it helps fix some Cannon C300 clips that were corrupt, and can merge several clips into one bigger clip. These 2 features are also frequently mentioned and favored by other Pavtube users."

"With this latest update with 3D video output feature, Pavtube MXF MultiMixer/iMixer becomes unique among MXF converters. It is really good news for video editing hobbyists. They are now able to convert their current 2D videos to 3D in MKV, MOV, AVI, MP4, WMV formats so that they can play 3D video on various portable devices, and make 3D Stereoscopic editing with Premiere Pro CS5 etc. And it's still a perfect multi-track MXF mixer and preserver," concluded Sally. (How to Mix multiple audio tracks into one track on Mac?)

From Videographers Can Now Create 3D & Multi-track Videos With the Latest Update to Pavtube MXF MultiMixer
  

Tuesday, December 24, 2013

Best Video File Playback Formats For Microsoft Surface Family (Surface 2/Pro 2, Surface RT/Pro)

Description: This article listed all the file types that playable on Microsoft Surface family(Surface 2/Pro 2, Surface RT/Pro), and offer the best solution to watch Blu-ray/DVD/Video to Surface in one go.

For people who newly got a Surface(Surface RT/Pro, Surface 2/Pro 2), it could be not easy to figure out what’s the best format that Surface work with. Having no ideas about media file types or video specification? No worries, it’s will be all explained in this guide.

Part 1. Supported Video Audio Formats for Surface tablets

Here is the all the files types that Surface support from Microsoft. According to this table, we can find most media types are excluded and some of the supported formats ate depend on your device model&hardware. 

See also: File types that Microsoft Surface tablets can play and display


In order to put Blu-ray/DVD discs, media files like MOV/MPG/MKV/TS/M2T/AVCHD(MTS, M2TS)/MOD/TOD/MXF/TP/Tivo/M4V/DIVX to Surface, here are some suggested solutions for you.

Part 2. Recommended tool to put media files to Surface with best settings

Best Blu-ray to Surface Converter
For people who want to transfer Blu-ray movies to Surface, you may need to roll off disc protection, choose target video format and adjust the best video size/bitrate/frame rate for Surface. 

Not tech-savvy? Now we have this Blu-ray to Surface Converter and you can finish your task within a few simple clicks. (See also: Top 5 Best Blu-ray Ripping Program Review)

Guide for you: How to watch Blu-ray movies (Folder and ISO files) on Surface tablet?


Best DVD to Surface Converter
You cannot miss this DVD to Surface Converter if you want to move DVD to your new Surface. (See also: Top 3 Best DVD Ripping Program Review)

Check this page to get more details: How to rip and move DVD to Surface tablets


Best Surface Video Converter
This program will allow you to convert MOV/MPG/MKV/TS/M2T/AVCHD(MTS, M2TS)/MOD/TOD/MXF/TP/Tivo/M4V/DIVX and other video files to best MP4 video for Surface (Surface RT/Pro, Surface 2/Pro 2). 

Guide for you: How to Paly MKV, AVI, VOB, Tivo, WMV, MPG, MTS, Flash videos on Surface tablets?


All-in-one Blu-ray/DVD/Video to Surface Converter
If you are looking for a tool to do all the jobs above, this Pavtube Video Converter Ultimate should meet your requirements. It integrates all the features of Blu-ray to Surface Converter, DVD to Surface Converter and Video to Surface Converter. (See also: Top 5 Best Video Converter Ultimate Programs Review)

Related Articles:

Blu-ray to Apple TV 3 workflow: Sync Blu-ray to iTunes 11 for ATV 3 with AC3 5.1 on Mac

This article shows you a brief guide to convert Blu-ray movies to iTunes 11 for streaming to Apple TV 3 with Dolby Digital Copy 5.1 surround sound on Mac with ease.
I owned 5 iDevices, and I often use them for entertainment like email, music, video, ebooks. Now I have some Blu-ray collections, to get these Blu-rays played on my Apple TV 3, iPhone 5C, iPad 3 with AC3 5.1 audio. I have used Aiseesoft Blu-ray Ripper for Mac, but my current Blu-Ray Ripper was not good for some disks and 5.1 output formats. I'm looking for the best Blu-ray Ripper for Mac to do 5.1 conversion to my Apple device mainly on my Apple TV 3? Is there any way?
As you know, Blu-ray disc or even the decrypted Blu-ray rips can't be supported by Apple TV 3. You may also meet the similar problems as above. So in this tutorial, I will introduce and share an easy way to rip Blu-ray to iTunes format for streaming to Apple TV 3 for full HD enjoyment with AC3 5.1 channel on Mac, 10.9 Mavericks and Mountain Lion included.

To get more solutions, view Apple TV 3 Column and iPad 3 Column.

Free download and install it:

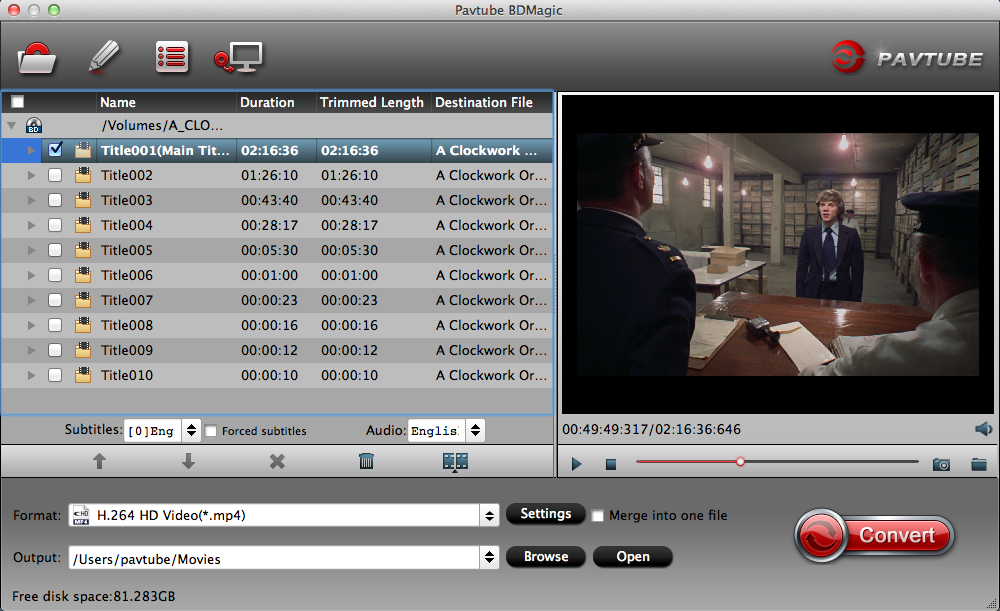
Pavtube BDMagic for Mac (Review) which can help you convert Blu-ray to iTunes compatible format then sync to ATV 3 for playback without any limitation. I've found the quality to be excellent, and see no difference when compared to playing the discs themselves. The sound can be kept with the original Dolby Digital 5.1 surround sound. For ripping Blu-ray to iTunes for ATV 3 on Windows, please turn to BDMagic (Guide for Windows).

Both the two programs are 20% off at Pavtube New Site Release and Product Name Change Specials.

Now download the program and follow the steps below to transfer your Blu-ray movies to iTunes 11 and Apple TV 3 h.264-compliant videos with AC3 5.1 audio.

How to Rip Blu-ray to iTunes 11 for streaming to Apple TV 3 with AC3 5.1 audio?

1. Load Blu-ray source.

First of all, insert your Blu-ray to Blu-ray drive and keep networked. Now it's time to open the best Blu-ray to Apple TV 3 Converter for Mac and click "Load files" icon to load Blu-ray source.

Pavtube BDMagic for Mac

2. Choose output format for Apple TV 3.

In the dropdown list of Format menu, you can find several Apple TV options for output. This Blu-ray to iTunes Conveter has a number of presets for Apple TV, Apple TV 2, and Apple TV 3rd Generation, to export a Apple TV 3 1080p video with ac3 5.1 pass-through for AV receiver decoding, "Apple TV 3 Dolby Digital Pass-through (*.m4v)" preset is highly recommended.


3. Convert Blu-ray to iTunes 11/Apple TV 3 video.

Click "Convert" button to rip Blu-ray to iTunes 11 recognized video for playing on Apple TV 3 generation with Dolby Digital 5.1 surround sound pass-through. Afterwards, transfer the Blu-ray to iTunes 11 and import to Apple TV 3 for watching with ease. There you have it! Now it is time to enjoy your favorite Blu-ray movies with Apple TV 3.

If you're new to Apple TV, the below guide will help you get started with Apple TV setup: How to set up Apple TV for streaming HD videos with Dolby Digital 5.1 sounds?

Read more:

Monday, December 23, 2013

Flash for Surface: How To Play Flash (FLV/F4V) Videos on Surface 2

Summary: Follow this article, you will know how to easily watch Flash (FLV/F4V) videos on Surface 2 and Surface Pro 2.


Apple's iOS doesn't support Flash, something that has helped Android gains a foothold with visitors of sites using the popular video platform. As a Windows-8.1 powered device, Microsoft Surface 2 and Surface Pro 2 will support Flash. But it's a known issue as Surface 2 and Surface Pro 2 will only play Flash from sites that are whitelisted by Microsoft. If you have patience you have to wait till a fully functional app is released via Store. In the mean time you may try this tweak. This article is mainly to show the way to transfer Flash video in FLV/F4V to Surface 2 and Surface Pro 2.

See Also: Which file types are supported on Surface 2, Surface Pro 2?

Flash Video is a container file format used to deliver video over the Internet using Adobe Flash Player versions 6–11. Flash Video content may also be embedded within files. There are two different video file formats known as Flash Video: FLV and F4V. The audio and video data within FLV files are encoded in the same manner as they are within files. The latter F4V file format is based on the ISO base media file format and is starting with Flash Player 9 update 3.

As many users get FLV/F4V videos from YouTube or other online websites, problems are coming up, some of them have the need to copy FLV/F4V files to Surface 2 and Surface Pro 2 for playback, but they always have get the error message as the unsupported video format. In that case, you have to use a flash video converter to do format conversion.

The top choice is the Pavtube Video Converter Ultimate. It's a professional video conversion program. It supports a wide range of video formats for converting. Of course, including Flash flv f4v video files. Moreover, the software takes advantage of GPU computing to accelerate conversion speed up to 3-5 faster. With this app, all your downloaded flash videos can be turned into Surface 2/Pro 2 naturally supported formats as ease. The guide below shows the basic steps on how to convert FLV/F4V flash videos to Surface 2/Pro 2 friendly MP4 format. If you using a Mac, please turn to the iMedia Converter for Mac.

Good news! You can get 20% off on both the two programs at Summer Holiday Hot Deals, don't miss it!

Change the file extension from flash ".flv" or ".f4v" to ".mp4″

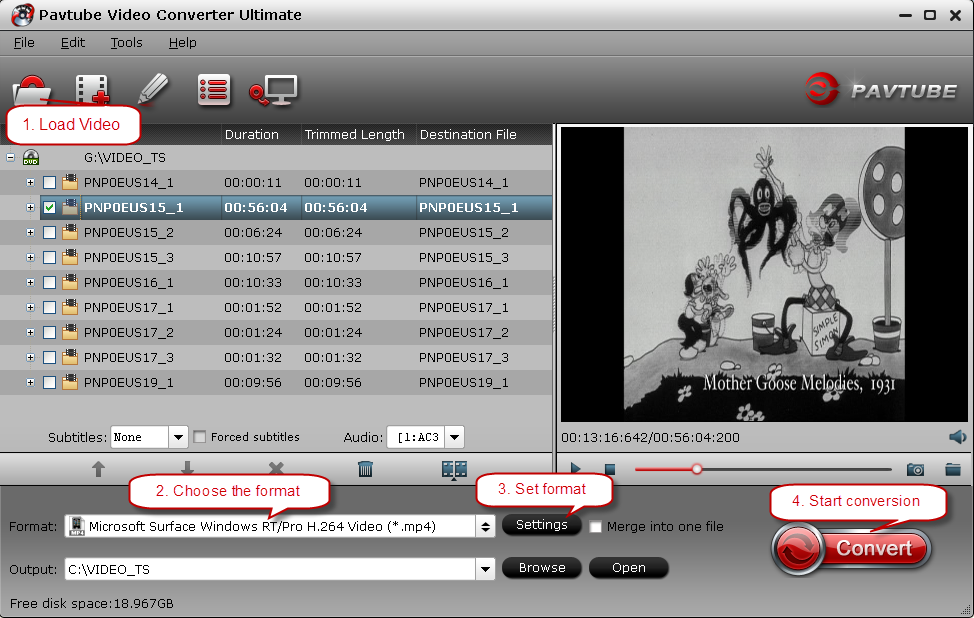
1. Download and Install Pavtube Video Converter.

Import Flash Videos into the program by clicking "Add video" or "Add from folder" icon to browse and load source flash files stored on your hard disk drive.


2. Click on "Format" menu, and choose "Microsoft Surface Windows RT/Pro H.264 Video (*.mp4)" as target format from "Windows" profile option.


3. In the mean time, you can click "Settings" button to custom video and audio settings for well playback performance on your Surface tablet. Actually, the default settings can generate files that basically satisfy your general watching needs, so this step is optional.

4. Start the conversion.

Once the conversion is done, you can click "Open" button to get generated MP4 files for viewing on Surface 2 and Surface Pro 2.

P.S. If you have no idea about Surface file transfer, you can check out the post 'The Ways Transferring Files to Your Surface 2' to learn more. You can also click 'here' to get known the basic tips for watching movies on Microsoft Surface.

Related Articles:

From: http://daisy.peaksmaker.com/2013/11/22/play-flash-video-on-surface-2-pro-2/
    

Friday, December 20, 2013

Download and Sync Music, Photo and Video Files to Kindle Fire HDX with Three Ways

Have no idea about the new Kindle Fire HDX Media File Transfer? Here, you will find three ways to download & transfer media files (music, photos and videos) to Kindle Fire HDX 7/8.9 for using. Plus, you will get some small tips when synchronizing videos/movies to your new Amazon Tablets.

Kindle Fire HDX. Generation 3 tablets are here. New Kindle Fires with Collections, Downloads of Prime Instant Video, Kindle Support Co-pilot access on your tablet 24/7. 34% lighter, much faster. Scroll lyrics to songs, identify and jump to songs when watching enabled tv shows or movies. Switch between multiple apps and books. Enterprise features + new accessibility capabilities. Control TV with the tablet and sync video and X-ray features + much more. In this article, we will provide the info about "How to get music, photos and videos onto the Kindle Fire HDX". You can take this informative posting about transferring media files onto the Kindle Fire HDX 7/8.9 for reference.

(Also see Amazon's help section to get more "Kindle Fire HDX Online Help".)

Method 1: USB Transfer- Transfer Content from a Computer to Your Kindle Fire HDX

To transfer Kindle content from your computer to your Kindle Fire HDX, use the micro-USB cable that was included with your device.


Note:

EPUB eBooks and Mobipocket files with Digital Rights Management (DRM) can't be transferred to your Kindle Fire.
Personal videos transferred to your Kindle Fire will appear in the Photos content library.
Apps from the Amazon Appstore for Android and movies and TV shows from Amazon Instant Video can't be downloaded from the Manage Your Kindle page to your computer.

From your computer, locate the content you want to transfer from your computer to your Kindle Fire.

Tip: You can use Manage Your Kindle to deliver Kindle books, magazines, and newspapers to your computer. Visit Manage Your Kindle and locate your Kindle content. From the Actions drop-down, select Download&Transfer via USB. From the drop-down, select your Kindle Fire, and then clickDownload to download the content to a folder on your computer.

Connect your Kindle Fire to your computer with the micro-USB cable. If you've set a lock screen password on your Kindle Fire, you may need to unlock your device before it can be opened on your computer.

Windows: Your Kindle Fire HDX will appear in the Computer or My Computer folder.


Mac: Your Kindle Fire will appear on the desktop.


Important: If you own a Mac computer with OSX 10.5 or above or a Windows XP computer, your Kindle Fire HDX will not be detected by your computer until you download new software for your computer.

To download the software, go to http://www.kindle.com/support/downloads, and then select your country from the list.

Open the Kindle Fire folder (titled Kindle) on your computer, and then open the Internal storage folder.

Locate the downloaded file on your computer, and then drag and drop the compatible file you want to transfer into the applicable folder:
  • Audiobooks: AA, AAXBooks: AZW (.azw3), MOBI (non-DRM), KF8
  • Documents: TXT, PDF, PRC, DOC, DOCX
  • Music: MP3, non-DRM AAC (.m4a), MIDI, PCM/WAVE, OGG, WAV
  • Pictures: JPEG, GIF, PNG, BMP
  • Movies: MP4, 3GP, VP8 (.webm)
  • Disconnect your Kindle Fire from your computer.

From your Kindle Fire, tap a content library (for example, Books) in the top navigation, and then tap On Device to view your Kindle content.

Method 2: Wireless cloud service - Downloading Content from the Cloud

After you purchase Kindle content, it is saved to the Cloud. When you connect to a wireless network, you can download items from the Cloud to your Kindle Fire.

From Home, tap a Kindle content library (for example, Books) in the top navigation bar.
Tap the item to download it to your device. Items that have been downloaded to your Kindle Fire display a check mark in the lower right corner of the cover image. Items that are stored in theCloud do not display a check mark.


Tap the item to open it.

Having trouble?

Remove Content from Your Kindle Fire HDX

If you need additional device storage space, or you have content that you no longer use, you can remove items from your Kindle Fire.

Swipe down from the top of the screen to open Quick Settings, and then tap Settings.
Tap Device, and then tap Storage.
Tap any of the content categories to see the file names and sizes..
Tap the checkbox of any items you want to remove, and then tap Remove.

Tip: To permanently remove apps or games from the Cloud, go to the Apps or Games library on your device, tapCloud, and then press and hold the item you want to remove. Tap Delete from Cloud.

If you'd like to permanently remove a book, magazine, or newspaper from the Cloud, you can do so from Manage Your Kindle .

Method 3: Wireless network - Sync On Your Kindle Fire HDX

After you connect to a wireless network, you can sync your Kindle Fire HDX to receive content from the Amazon Cloud, synchronize book, audiobook, game, and video progress across devices, and download any app updates.

Swipe down from the top of the screen to open Quick Settings, and then tap Settings.
Tap Sync All Content.

Related Help Topics

Tips for synchronizing unsupported videos/movies to Kindle Fire HDX

1.  How to put copy-protected contents onto the Kindle Fire HDX Tablet? In fact, Movies purchased or downloaded from online (e.g. iTunes, BBC iPlayer, Amazon) are restricted to specific computers and devices only. Unfortunately the Android devices have not get a license to play DRM contents which means Kindle Fire HDX is not granted to play DRM-protected videos. To have the device play these DRM videos (iTunes movies, TV shows, Amzon Instant videos and Digital Copies), get yourself a DRM removal tool first.

2. If you want to copy videos to Kindle Fire HDX in other formats like MKV, WMV, AVI, FLV, MTS, M2TS, MOV, MPEG, MPG, MOD, TiVo, VOB, etc, you will need reformat these video files first. You can try this professional Kindle Fire HDX Video Converter to batch convert videos in various formats up to 1080p to the Fire HDX playable format (e.g. MP4).