Adobe Premiere pro CS6 comes with Encore already integrated into the system to ease the process of creating a DVD or Blue-ray media disc. There must be some occasions when you want to edit your favorite DVD movies to make some modifications. Adobe Premiere Pro is widely used by video professionals. However, you will discover nothing happened when you try to import DVD into Adobe Premiere Pro. And this article discusses the details to tell you two ways of edit DVD videos into Premiere Pro CS6 for sharing.
Though Adobe Premiere supports lots of video and audio format, such as 3GP, 3G2, ASF, DV-AVI, DV, FLV/F4V, M4V, MOV, MP4, MPEG, MPE, MPG, WMV, etc. etc. it doesn’t support DVD importing like most video editing software. To add DVD movies to Premiere Pro CS6, you’ll need to convert DVD files to Premiere compatible video format.
In order to solve the issues, two possible solutions are provided for you.
Solution 1: Put the DVD into your computer player, open the DVD in Explorer, copy the folder Video_TS to your computer. Open the folder and rename all the files with the extension VOB to MPG. That’s it. Premiere will now import them.
Important note: This way seems to work only for non-protected DVDs. If have some commercial DVDs, you may need another solution. By the way, we searched the issues online, some guys give the feedback renaming the files didn’t work; the files would import but then was unusable in Premiere Pro.
Solution 2: The alternative trick is to rip the video files out of the DVDs, transcode them to a format that Adobe Premier Pro does support then import. You best bet is to use a DVD to Adobe Premiere Pro Converter to rip DVD and convert video to MPG format, which can be easily recognized by APP.
To rip DVD to Premiere Pro CS6, you will need a DVD ripping software, here you can try Pavtube BDMagic for Mac, (See other options), this is top Mac Blu-ray Ripper software on the market, which can convert Blu-ray and DVD to MPEG-2/MOV for Adobe Premiere Pro native editing, or rip BD/DVD to MKV, AVI, WMV, MP4, M4V, FLV for playback.
In the program, there are many output formats have been optimized, they are for portable devices and editing software, so you just need to click and choose as you want. Below are the detail steps for ripping Blu-ray and DVD on Mac to use in Premiere Pro CC, CS6, CS5.Rip Blu-ray/DVD to Premiere Pro CC, CS6, CS5 with Best Blu-ray Ripper for Mac.
Rip DVD to Premiere Pro CS6 with Best Blu-ray Ripper for Mac
Get this Best Mac Blu-ray Ripper for Premiere Pro installed;


Other Download:
- Pavtube old official address: http://www.pavtube.cn/blu-ray-ripper-mac/
- Cnet Download: http://download.cnet.com/Pavtube-BDMagic/3000-7970_4-76177782.html
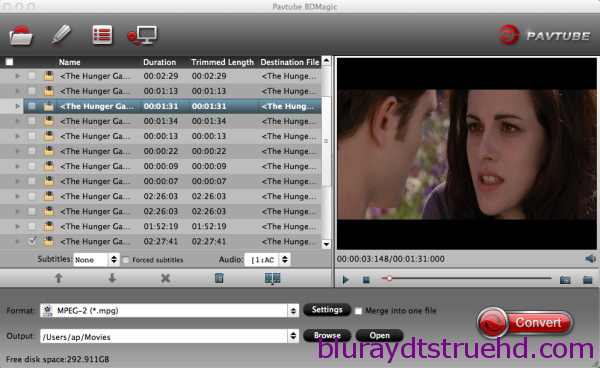
There is a disc icon on the top left which let you load from disc, folder or ISO/IFO respectively.

Step 2. Choose your Output directory down.
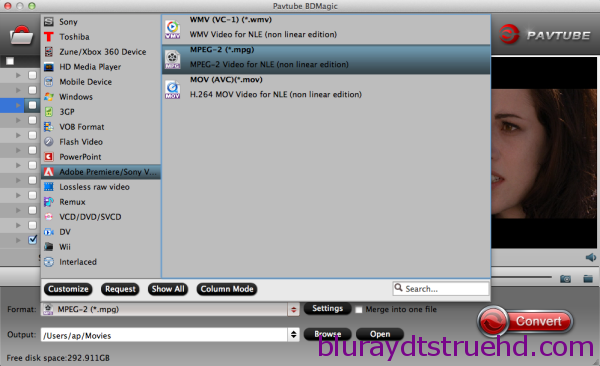
For editing DVD movies in Premiere Pro CS6, the MOV is preferred. Click “Format” and choose “MOV (AVC)(*.mov)” or “MPEG-2 (*.mpg)” from “Adobe Premiere/Sony Vegas” option.

PS: It has various profiles and formats so that you can rip DVD to various formats according to your needs.
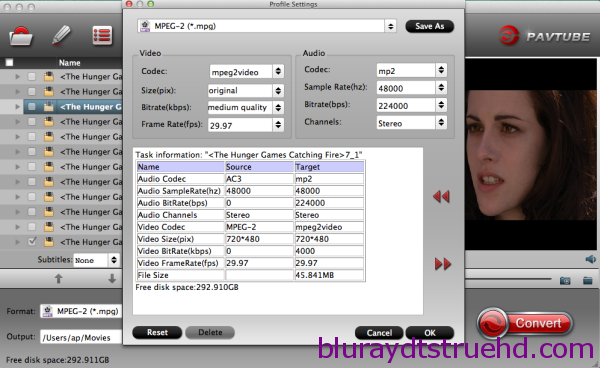
Step 3. Set up frame rate, bitrate and other output settings.
Click Settings, you can find file details including codec, size, bitrate and frame rate. You are able to fix them according to your needs.Pls rember: the higher bitrate you choose, the better video quality it outputs.

Step 4. Start ripping.
Now just press the big circular “Convert” button to convert DVD to Premiere Pro CS6 and let it do its magic. Then, you can learn how to import video files into Premiere Pro.Wait for moments and you will get the fresh hot converted videos for Premiere Pro.
Read More:
Though Adobe Premiere supports lots of video and audio format, such as 3GP, 3G2, ASF, DV-AVI, DV, FLV/F4V, M4V, MOV, MP4, MPEG, MPE, MPG, WMV, etc. etc. it doesn’t support DVD importing like most video editing software. To add DVD movies to Premiere Pro CS6, you’ll need to convert DVD files to Premiere compatible video format.
In order to solve the issues, two possible solutions are provided for you.
Solution 1: Put the DVD into your computer player, open the DVD in Explorer, copy the folder Video_TS to your computer. Open the folder and rename all the files with the extension VOB to MPG. That’s it. Premiere will now import them.
Important note: This way seems to work only for non-protected DVDs. If have some commercial DVDs, you may need another solution. By the way, we searched the issues online, some guys give the feedback renaming the files didn’t work; the files would import but then was unusable in Premiere Pro.
Solution 2: The alternative trick is to rip the video files out of the DVDs, transcode them to a format that Adobe Premier Pro does support then import. You best bet is to use a DVD to Adobe Premiere Pro Converter to rip DVD and convert video to MPG format, which can be easily recognized by APP.
To rip DVD to Premiere Pro CS6, you will need a DVD ripping software, here you can try Pavtube BDMagic for Mac, (See other options), this is top Mac Blu-ray Ripper software on the market, which can convert Blu-ray and DVD to MPEG-2/MOV for Adobe Premiere Pro native editing, or rip BD/DVD to MKV, AVI, WMV, MP4, M4V, FLV for playback.
In the program, there are many output formats have been optimized, they are for portable devices and editing software, so you just need to click and choose as you want. Below are the detail steps for ripping Blu-ray and DVD on Mac to use in Premiere Pro CC, CS6, CS5.Rip Blu-ray/DVD to Premiere Pro CC, CS6, CS5 with Best Blu-ray Ripper for Mac.
Rip DVD to Premiere Pro CS6 with Best Blu-ray Ripper for Mac
Get this Best Mac Blu-ray Ripper for Premiere Pro installed;


Other Download:
- Pavtube old official address: http://www.pavtube.cn/blu-ray-ripper-mac/
- Cnet Download: http://download.cnet.com/Pavtube-BDMagic/3000-7970_4-76177782.html
There is a disc icon on the top left which let you load from disc, folder or ISO/IFO respectively.

Step 2. Choose your Output directory down.
For editing DVD movies in Premiere Pro CS6, the MOV is preferred. Click “Format” and choose “MOV (AVC)(*.mov)” or “MPEG-2 (*.mpg)” from “Adobe Premiere/Sony Vegas” option.

PS: It has various profiles and formats so that you can rip DVD to various formats according to your needs.
Step 3. Set up frame rate, bitrate and other output settings.
Click Settings, you can find file details including codec, size, bitrate and frame rate. You are able to fix them according to your needs.Pls rember: the higher bitrate you choose, the better video quality it outputs.

Step 4. Start ripping.
Now just press the big circular “Convert” button to convert DVD to Premiere Pro CS6 and let it do its magic. Then, you can learn how to import video files into Premiere Pro.Wait for moments and you will get the fresh hot converted videos for Premiere Pro.
Read More: