Thursday, October 26, 2017

Top 5 DSLR 4K Cameras

When you go on a trip with your family or friends, you can take the camera and record the unforgettable moments, at this condition, one 4K camera is the best option which can capture the perfect 4K video. No doubt, with the advanced 4K technology, there are many different 4K camera brands on the market, like the Panasonic, Sony, Canon, etc. Which 4K camera brand do you want to buy? Do you care the price? Size? Resolution? or other factors? We have chosen out the best 4K DSLR cameras for you, we collect the detailed information about them, you can refer to these information and make the final decision.

  Product Price Low light ability Sensor Video resolution Digital image stabilization
DSLR

Panasonic HC-X1 4K UHD Camcorder

$3,199.99 1"-Type MOS Sensor 4k at up to 60 fps

Blackmagic Design URSA Mini 4.6K Digital Cinema Camera

$4,995.00 X 4.6K Super-35mm Sensor 4k at up to 60 fps X

Nikon D500

$1,996.95 20.9MP DX-Format CMOS Sensor 4k at up to 30 fps X

Canon EOS 5D Mark IV

$3,299.00 30.4MP Full-Frame CMOS Sensor 4k at up to 30 fps X

Sony PXW-Z100 4K Handheld XDCAM Camcorder

$4,499.00 1/2.3" Exmore R CMOS Sensor 4k at up to 60 fps

Best DSLR 4K Cameras

Top 1. Panasonic HC-X1 4K UHD Camcorder

Review: There is no doubt that Panasonic HC-X1 4K UHD Camcorder will help you take your video productions to another level. It can create footage in DCI and UHD quality and you can capture scenes in MOV, MP4, and AVCHD file formats. The camera has 1"-Type MOS Sensor which creates the background blur that is a trademark of professional film cameras. However, HC-X1 is a camcorder and for those who are used to interchangeable lens cameras, it may not be the right choice. On the other hand, its features guarantee that you will be able to produce footage of the highest standard.

Top 2. Blackmagic Design URSA Mini 4.6K Digital Cinema Camera

This is a camera that can be used to shoot full-feature or indie films. One of its many advantages over the cameras with similar capabilities is its size. The combinations of size and the EF lens mount that allows you to use a large number of different lenses enables you to shoot a wide range of different cinematic styles with this camera. Super-35mm CMOS Sensor, Compressed Raw Recording, and a maximum video resolution of 4608 x 2592 are just a few reasons why this camera is a great choice, but its downsides include the below average performance in low light conditions and no ND filters.

Top 3.Nikon D500

Nikon fans may argue that Nikon D500 is one of the best cameras for less than perfect conditions. Camera's weather sealed body along with the maximum ISO value at 1640000 speak volumes about what it can do in difficult light and weather conditions. Needless to say, Nikon D500 supports 4K UHD video recording at 30, 25 and 24 FPS frame rates. Perhaps the biggest flaw of this camera is its price because at $1,996.95 it is one of the most expensive APS-C DSLR cameras on the market. On the other hand, it is one of the most feature-packed DSLRs and it is most certainly worth investing in.

Top 4. Canon EOS 5D Mark IV

Over the years Canon cameras have been the best choice a photographer can make when buying a new camera. EOS 5D Mark IV isn't just an excellent choice for photographers, but for videographers as well. The video options are enhanced by the addition of Dual Pixel CMOS AF and Movie Servo AF that help shooter control focus with ease. The camera can shoot 4K videos at 30FPS and it can capture still frames at an amazing 8.8MP. The biggest downside of this model is that HDMI output is limited to 1080p, which can hardly be counted as a flaw, considering the possibilities this camera provides.

Top 5. Sony PXW-Z100 4K Handheld XDCAM Camcorder

Sony PXW-Z100 is a perfect choice for someone who wants to shoot a documentary style video in 4K. The camcorder creates true 4K footage at up to 60FPS or 50FPS and it has a maximum resolution of 4096X2160 pixels. The 1/2.3" Exmore R CMOS Sensor and XAVC 4:2:2 10-bit Intra Frame Codec vouch that this is indeed one of the best pieces of equipment on the current market. The G Lens with 20X optical zoom is optimized for shooting in 4K and it provides a 30mm wide angle view. For those used to using more than just one lens, this is probably PXW-Z100's greatest flaw.

Take Full Use of the 4K Camera Recordings with Best 4K Video Converter

No matter which cameras you choose, you have to handle those 4k footage, right? When you watch the 4k video on TV, you may meet some troubles, for example: The TV screen is black or you get the error message shows that your TV can't recognize your 4K videos. Or you fail to upload those 4k footages to Youtube, Facebook, or Vimeo. Since many sharing websites or media players, devices have many limitations on video codec, video frame, video bitarte, video size, video length, etc. How to take full use of those 4k video by passing all those obstacles?

Pavtube Video Converter Ultimate/ for Mac comes as an all-in-one 4k video converter. It grants you to upload any 4k video recordings you like. It offers you hundreds of video formats including, MP4, MOV, WMV, AVI,VOB, FLV, and more with adjusting video and audio bitrate, frame rate, resolution, channel and more parameters to make the outputed video more fit in your video player, multimedia devices, non-linear editing software. You also can directly choose iPhone, iPad, Samsung, Android, PS4 and more devices optimized presets. Moreover, you can do some video edition on your 4k footage, like trimming, cropping, splitting, adding watermark/video effect. More function in this guide for you.

Quick Guide to Take Full Use of 4k Camera Recordings

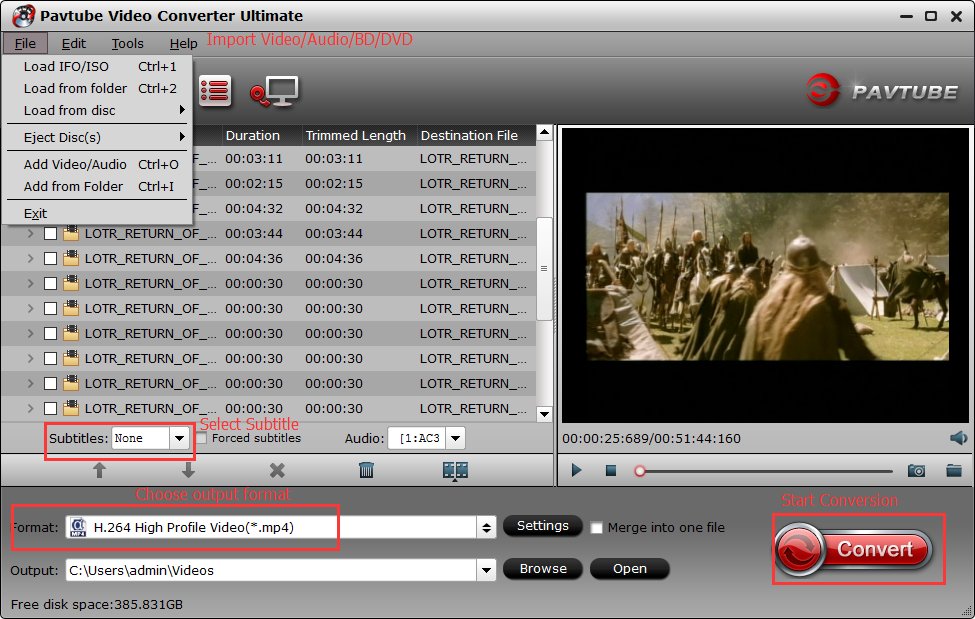
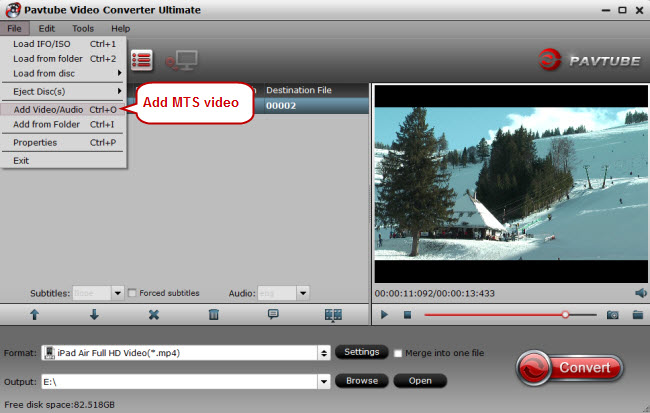
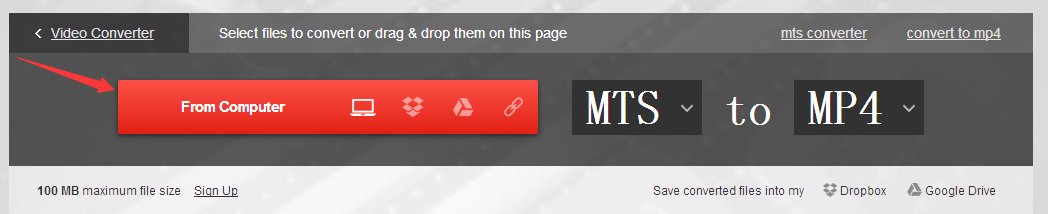
Step 1. First, you need to transfer the 4K video to your PC. Then launch the video converter on your PC, then click the "Folder" or "Video" icon to load source video files from your local computer to the program.

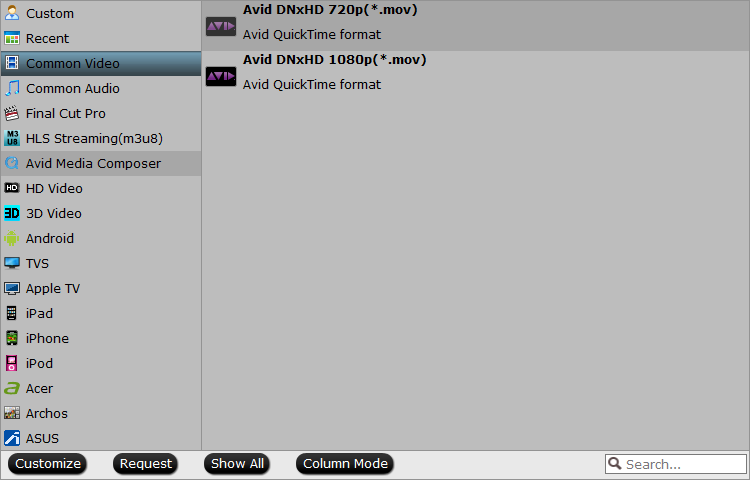
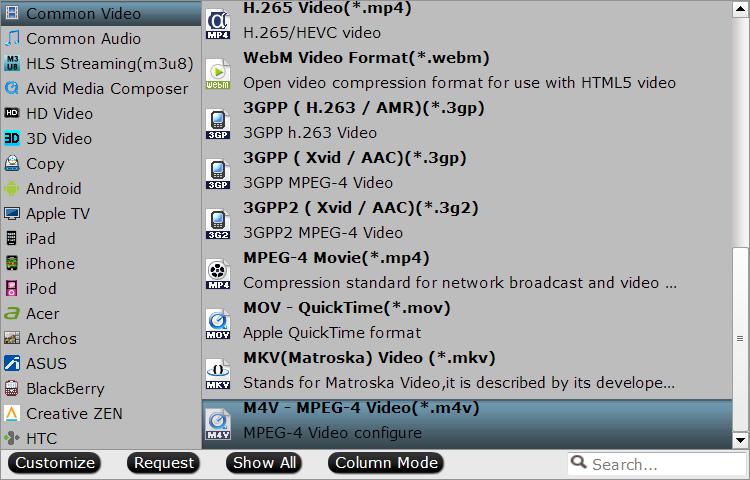
Step 2. Click the "Format" bar and open the drop-down list, select one video format you want. You can choose one video from the "HD Video" main category. You also can choose video format from the Common Video, TVs, Apple TV, NLE software, Android devices, etc.

Load Blu-ray/DVD/video source files

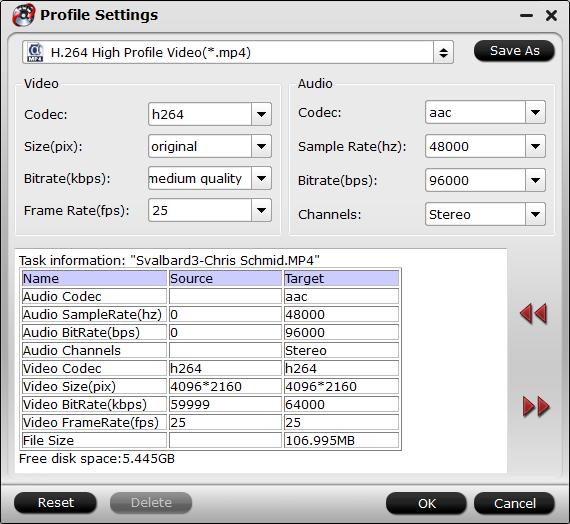
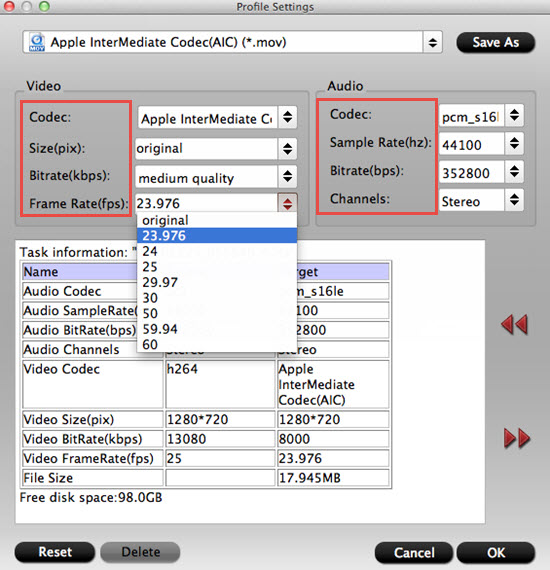
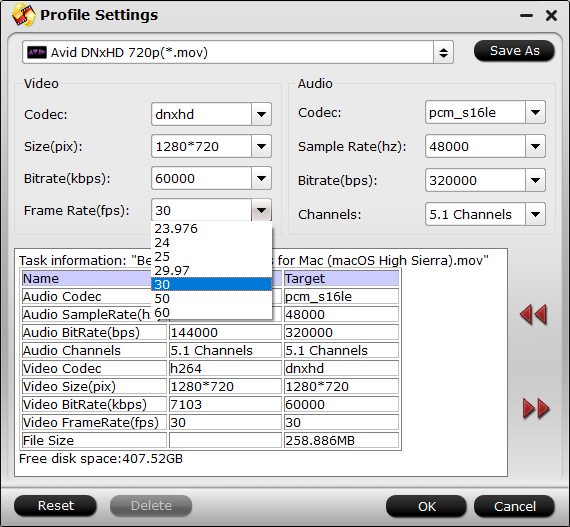
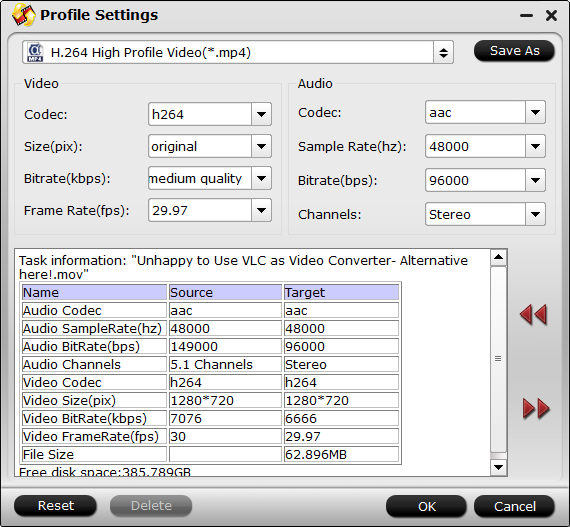
Optional Step: Click “Settings” to open “Profile Settings” window, here you can choose or specify the video parameters such as video/audio codecs, file size, bit rates, frame rates, etc as you like. You also can compress the 4K video to HD video by adjusting the 4K video resolution, gframe, etc without much quaity loss. Or you can change fps from 60 to 30 for smooth playback on any devices.

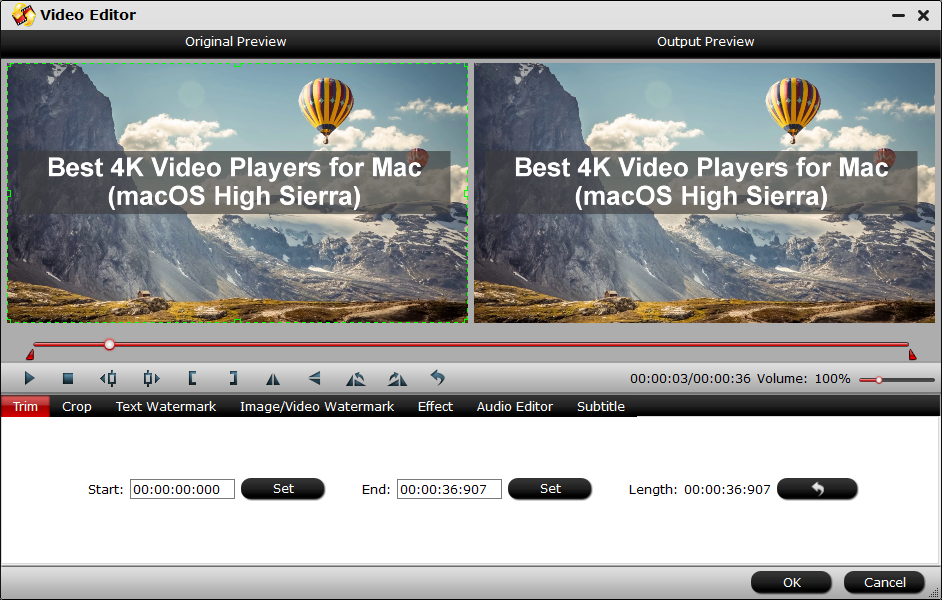
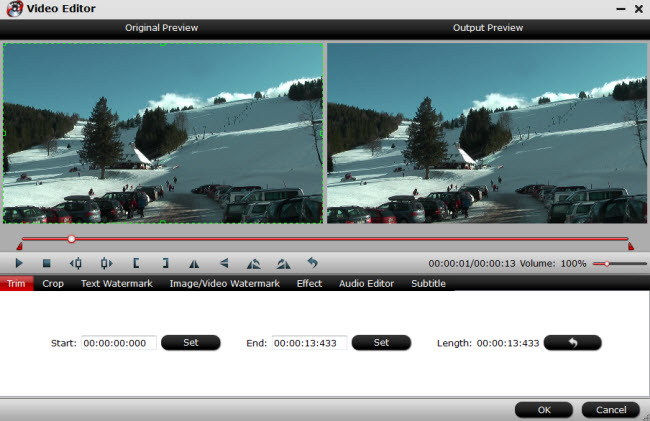
Step 3. Find the pen icon on the main interface and enter "Video Editor" windows. here are 7 main tabs for you. You can trim to cut unwanted parts of the 4k video, or adjust video aspect ratio.

edit video

Step 4. Press the Convert button to begin the video conversion, Just wait for a while, this software will finish the complicated video conversion.

Conclusion: You can choose one 4K camera you like, when you play, edit the 4K video and meet some troubles, you can use this best 4K video converter. Best 4K Camera and Best 4K video converter, I believe you can get the best 4K experience.

Thursday, October 19, 2017

Top 5 Free Online MTS to MOV Converter

iMovie comes as an easy-to-use editing software for Mac users. An MTS file is a video file saved in the high-definition (HD) MPEG Transport Stream video format, commonly called "AVCHD." You will get MTS files from Blu-ray Disc, JVC, Canon, Panasonic, Sony Camcorders, etc. Sometimes, you may want to edit MTS files in iMovies, however, iMovie can't recognize MTS well, in this case, the best method is to convert the MTS fiels to a Mac native format, MOV. Then you can easily edit the converted file in iMovie. This article aims to tell you top 5 free MTS to MOV online video converters and one professional alternative desktop converter. What are you waiting for? Go check!


Part 1: Best and Free Online MTS to MOV Converter

Part 2: Best Online MTS to MOV Converter Alternative


Part 1: Best and Free Online MTS to MOV Converter

Convertio

Convertio is an easy tool to convert files online. More than 223 different document, image, spreadsheet, ebook, archive, presentation, audio and video formats supported invluding MTS files. You can choose to upload the MTS video from your computer, Dropbox etc. for your convenience. Maximum file size is 100 MB, while there are advanced tools to make use of. It helps convert MTS to MOV, FLV, MKV, MP4,VOB and more.

convertio

Convertfiles

Convertfiles supports converting video, audio, image, document, presentation, and etc. For converting mts to mov online, your source video should be less than 250 MB. It allows for more than 330 combinations of input and output file formats. With this free online mts to mov converter, you can convert almost any video.

convertfiles

Apowersoft Video Converter

Apowersoft is absolutely a free online mts to mov video converter. It is a free web-based tool that provides many audio and video formats for converting. It can convert MTS files into MOV, MP3, WMA, AVI, MP4, WMV, etc. Also, this program comes with a quick editor that provides some options to customize resolution, trim video clips, adjust channel and stereo rate.

APOWESOFT

Online Convert

In this page, you can see 17 choices about MTS online converters:

  1. MTS to 3G2
  2. MTS to 3GP
  3. MTS to AVI
  4. MTS to FLV
  5. MTS to MKV
  6. MTS to MOV
  7. MTS to MP4
  8. MTS to WEBM
  9. MTS to WMV
  10. MTS to MP3
  11. MTS to MPG
  12. MTS to M4A
  13. MTS to PNG
  14. MTS to WMA
  15. MTS to ZIP
  16. MTS to GIF
  17. MTS to WAV

See, there are so many choices for you. When you select MTS to MP4 online converter,  you can upload MTS files into the online MTS converter or paste a URL address to convert MTS to MOV. It also  provides additional features like subtitle conversion (subtitles are preserved during conversion) or the conversion from a presentation format like Powerpoint to MP4.

online video converter

BenderConverter

Benderconverter supports the conversion of MP3, Avi, Mpeg, Flash video, iPod / iPhone, iPad, Gif, Jpeg and other popular formats. This free online mts to mov converter lets you convert videos less than 100 MB. If your mts file is beyond the limitation, you will need to register it to get more benefits. Then the max file size would be 500 MB.

benderconverter


Part 2: Best Online MTS to MOV Converter Alternative

As we all know, there is no free lunch in this world. Free means that those online video converters have many flaws. For many online video covnerter users, they always ask many questions on some forums. Such as, their online vdieo converter doesn't work anymore, jerky conversion online, and more. If you have the same problem, Pavtube Video Converter Ultimate/ For Mac will be your best choice.

This program is specially designed for Sony, Canon, JVC and Panasonic AVCHD Camcorder/camera owners to convert recorded AVCHD MTS videos to MOV, like DVCPRO HD (*.mov), HDV (*.mov), Avid DNxHD(*.mov) for easily editing in editing software, like iMovie, Final Cut Pro, Adobe Premiere, Sony Vegas, Windows Movie Maker and so on. Moreover, here are 200+ video output formats for you to select, so that you can get your desired target format for playback on iDevice, Android devies, TVs, tablets, and more.

Quick Guide to Convert MTS to MOV with Best Alternative on Windows

Step 1: Import MTS videos

Click "Add File" button to open the file browser window and navigate to the MTS files you would like to convert. Or drag-and-drop files stored on your computer to the interface of this MTS converter. It supports batch conversion, which allows you to import and convert multiple video files at a time.

load mts

Step 2: Choose output format

Click "Format" and navigate "iMovie and Final Cut Express", here is the best output format for you to output for editing in iMovie and Final Cut Express. Moreover, just click "Settings" on the main interface to open "Profile Settings" window, here all the profile parameters including video codec, resolution, bit rate, frame rate, audio codec, bit rate, sample rate, channels, etc are adjustable to facilitate you to get the best output video and audio quality.

Image result for pavtube video converter h.264 mov imovie

Otherwise, you are free to choose any video format to fit in your devices and Video players. Just click "Format" bar, from its drop-down list, select H.264 file format by following "HD Video" > "H.264 HD Video(*.mp4)" or you can choose HD MOV, HD WMV, H.265 video. 

Output format for HD TV

Step 3: Edit MTS video before conversion

If there is a need, you can edit your MTS video files by clicking the "Edit" image button. You can trim, crop, add effect, watermark and subtitle to your videos.

TrimDrag the two sliders to select the segment you want, and then click scissor icon and OK button. In this way, you can cut off any clip you don't want.
Crop: Drag and drop a dotted rectangular box to choose any screen area of the video. Immediately, the selected video area will be enlarged in the preview window.
EffectOffer you a lot of cool effects that you can apply to the video.
Watermark: Add image or text watermarks to personalize your video.
SubtitleAdding subtitle files is available in this program.

edit mts

Step 3: Convert MTS to MOV with high quality 

After all the settings, now, just click the "Convert" button to start converting .mts to .mov file. After the conversion, you can locate the generated files in the output folder.

Now, you can play your AVCHD MTS files on VLC, KMPlayer, iPhone, iPad or edit your MTS files in iMovie, Final Cut Pro, Premiere Pro, Sony Vegas Pro, etc.

Thursday, October 12, 2017

3 Professional Methods to Solve "DJI 4K Don't Play on VLC"

DJI drones has claimed a market share of half or more rescently. Some models of drones such as DJI Phantom 4 Pro, DJI Inspire, can shoots DCI 4K (4096 X 2160) video and UHD 4K (3480 X 2160) video compressed with MPEG-4 AVC/H.264 codec in MOV wrapper, however finding a proper media player to play is a head-scratching task and turn into an agony when you lack a super computer. Here you will find the way to solve this problem, read on.

When we search on Google, we found that "DJI 4K vdieo don't play on VLC" would be a common problem. Even quite powerful i7 SSD PC don't play DJI Inspire / Phantom 4K 100Mbps bitrate video properly. A practicable way is to slow speed to 0.67, Media Player Classic (k-lite codecs) runs and play those 4k footage smoothly. However, for VLC fans, they give up this way.


Why VLC Can't Play DJI 4K Footage?

3 Method to Play DJI 4K Footage on VLC Smoothly

Method 1: Update VLC to 2.2.6 version

Method 2: Enable Hardware Acceleration in VLC to Play DJI 4K Video

Method 3: Downscale DJI 4K Video to 1080p for VLC Smooth Playback


Why VLC Can't Play DJI 4K Footage?

In fact, the 4K video playback including DJI 4K recordings with VLC has strict requirements on the computer's processor and graphics chip. Sometimes, even if your computer meets the requirements, you may find that DJI 4K video plays back choppy. This is due to the immense processing power required to play 4K. You can try the below 3 methods to handle the problems.

3 Method to Play DJI 4K Footage on VLC Smoothly

Method 1: Update VLC to 2.2.6 Version

With preparation for Ultra-HD video and a special care to support more formats, 2.2 is a major upgrade for VLC. Download it here and re-open your DJI Phantom 4 4K videos in VLC Player for 4K video playback.

Note: Although version 2.2.6 of VLC offers 4K playback support, it still does not support 4K video from DJI Phantom 4 playback perfectly: there is stutters, not showing audio, etc issues.

Method 2: Enable Hardware Acceleration in VLC to Play DJI 4K Video

If you ungrade VLC verison but still fail to play DJI 4k on VLC, you can try the second method. You can fix this issue by enabling the GPU accelerated decoding feature in VLC, this feature in theory uses the processing power of the graphic card to lighten the load on the processor of the system.

However, according to VLC's GPU decoding page, this feature is only available for H.264 streams. In addition, as the data is decoded in the GPU at the decoding stage and then transferred back to the player so that the other stages, filtering and streaming for instance, can be processed, this process can under under circumstances be slower than without GPU acceleration enabled. What's more, the VLC GPU decoding is only available for select operating systems. While Windows Vista and newer versions of the Microsoft operating system are supported, Windows XP is not at this point in time. The majority of graphic cards should support hardware acceleration just fine. Make sure you have installed the latest drivers though.

How to enable hardware acceleration in VLC?

Open VLC Media Player and click on Tools > Preferences or press Ctrl-P to open the settings window of the program. If you are using the simple settings interface, click on Input & Codecs on the left sidebar and check the Use GPU accelerated decoding box there.

VLC Enable GPU Acceleration

If you are using the "all" interface select Input/Codecs > Video Codecs > FFmpeg > Hardware decoding instead to enable acceleration this way.

Click on the save button afterwards and restart the media player to work with the new setting. Try playing several video files to see if hardware acceleration makes a difference in terms of playback. If it does, keep the setting enabled. If it does not, just go back to the settings to uncheck the option again.

Method 3: Downscale DJI 4K Video to 1080p for VLC Smooth Playback

It will be GPU consuming and very jerky if you play DJI 4k footage on VLC media player, and if you don't possess a powerful computer, that will be worse. So how about compressing your DJI 4k to 1080p that will be compatible with most devices, like smartphone, tablets, labtops, or game console. By the way, this way has lower requirements on the computer's processor and graphics chip than 4K video.

To downscale DJI 4k to 1080p, what you need is to get a professional 4k to 1080p compressor. Pavtube Video Converter Ultimate/ For Mac stands out from it calss just like it name. It can convert DJI Phantom 4 Pro 4K video, DJI Mavic 4K video, DJI Phantom 4K video, DJI Phantom Professional 4K video, DJI Inspire 2/1 4K video to 4K H.264 MP4 or compress DJI 4K video to 1080p for VLC. 

Moreover, based on testing and VLC playback feedback, we found 1080p MKV, AVI, MOV, MP4 are more compatible with VLC and can be played by VLC more simply. All those container, you can find by click "Settings" button.

To get a better virtual experience, you can edit video with this smart assistant. You can flexible to adjust vdieo parameters, including video and audio bitrate, frame rate, resolution, channel and more. With it, you can merge separate video clips into one, insert external subtitles to video, add transparent text watermark/image watermark to video, crop black bars around the video frame, adjust video color brightness, remove audio from a video or replace audio in video, trim video footage, crop unwanted area from video, etc. More funtions here.

Step By Step to Convert DJI 4K Video to VLC

Step 1: Add 4K videos

Open the 4K video converter program, click “File” menu, from its drop-down option, select “Add Video/Audio” to load DJI 4K video to the program. If you have Blu-ray and DVD that want to playback on VLC, you also can load them to rip to VLC.

load 4K video

Step 2: Choose output file format

From “Format” bar drop-down list, choose the formats that you want to output for later use. For compatibility consideration, it is idea for you to choose “HD Video” > “H.264 HD Video (*.mp4)” as output file format.

output mp4

Open “Profile Settings” window, click “Size(pix)” to select 1920*1080 as the final resolution for output video. In this way, the DJI 4K video can be downscaled to 1080p then you can play it with VLC smoothly.

mp4 settings

Step 3: Convert DJI 4K video to VLC

After all the settings is completed, hit right-bottom “Convert” button to start to convert and downscale DJI 4K video to 1080p format videos. When the conversion is finished, click “Open Output Folder” icon on the main interface to open the folder with generated HD DJI video files. 

Now, try to play DJI video files with VLC on your computer. It should be smooth now. 

Wednesday, October 4, 2017

Useful Tips for Uploading DJI Phantom 4 Pro 4k to Youtube

DJI Phantom 4 Pro+ stands out from its class, which is capable of shooting H.264 videos at 60fps or H.265 4K video at 30fps, both recorded in a 100 Mbps bitrate. When the shooting is completed, you may want to upload the 4k video to Youtube and share with thousands audiences. It easy to get this goal, cause Youtube has already added 4K video streaming support. However, what really matter here is how to smoothly upload DJI Phatom 4 Pro+ 4K video to YouTube with the best quality. Before you get start, you have to know the  best 4K format and settings for YouTube as folllowing.

Best 4K upload format and settings for YouTube

Container: MP4 


Video codec: H.264 
Progressive scan not interlacing 
High Profile 
2 consecutive B frames 
Closed GOP. GOP of half the frame rate. 
CABAC 
Variable bitrate, no bit rate limit required, though we offer recommended bit rates below for reference, 
Chroma subsampling: 4:2:0


Audio codec: AAC-LC 
Channels: Stereo or Stereo + 5.1 
Sample rate 96khz or 48khz


Frame rate and bit rate to view 4K uploads on 4K TV with YouTube

SDR uploads

24/25/30 fps standard frame rate - 35-45 Mbps 
48/50/60fps High Frame Rate - 53-68 Mbps

HDR uploads

24/25/30 fps standard frame rate - 44-56 Mbps 
48/50/60fps High Frame Rate - 66-85 Mbps


Resolution and aspect ratio 

YouTube uses 16:9 aspect ratio players. If you're uploading a non-16:9 file, it will be processed and displayed correctly as well, with pillar boxes (black bars on the left and right) or letter boxes (black bars at the top and bottom) provided by the player.


Time and file size limitations for YouTube video upload

Size: Up to 2GB 
Length: By default, you can upload videos that are up to 15 minutes long, but you can upload longer videos by following the steps below to verify your account. 
1. go to the upload page at youtube.com/upload
2. At the bottom of the page, click Increase your limit. You can also go directly to https://www.youtube.com/verify
3. Follow the steps to verify your account. You can choose to receive a verification code through a text message on a mobile phone or an automated voice call. 
4. Once you've verified your account, you can upload videos that are longer than 15 minutes long.

How to Convert DJI Phantom 4 Pro+ 4K for YouTube

From above official information, we know that to upload DJI Phantom 4 Pro+ 4k H.264 at 60 fps with 100Mbps video to Youtube, you have to adjust uploaded 4k video bit rate to 66-85 Mbps which is more suitable for Youtube. And if you are uploading DJI Phantom 4 Pro+ 4k H.265 at 30fps with 100Mbps video to Youtube, transcoding the H.265 to H.264 High Profile video codec and adjut 100Mbps to 66-85 Mbps could be better for Youtube.

Pavtube Video Converter Ultimate for Windows/Mac enables you to convert DJI Phantom 4 Pro+ 4k H.265 to H.264, with adjusting bit rate to 66-85. Furthermore, for those people, who want to transfer the 4k video to iPhone X, Samsung Galaxy Note 8, or other tablets, you can downscale 4k to 1080p, in fact, you will not see the difference between 4k and 1080p, so to save more storage space, you can compress 4k for massive devices.

Moreover, this program also works as a professional video editor, which enables you to trim the 4k vdieo to cut your unwanted part. With it, you can merge separate video clips into one, insert external subtitles to video, add transparent text watermark/image watermark to video, crop black bars around the video frame, split large video files into small parts, adjust video color brightness, contrast, saturation, remove audio from a video or replace audio in video, trim video footage, crop unwanted area from video, etc. More functions in this guide.

Quick Guide to Upload DJI Phantom 4 Pro+ to Youtube

Step 1: Load DJI Phantom 4 Pro+ 4K video into the program.

Start the program on your computer, click "File" menu and select "Add Video/Audio" or "Add from folder" to import DJI Phantom 4 Pro+ 4K video.

Load DJI Phantom 4 Pro+ 4K video

Step 2: Output Youtube best uploading format for 4K video.

Click "Format" bar, from its drop-down options, choose YouTube best compatible uploading format from "Common VIdeo" > "H.264 High Profile Video(*.mp4)".

Output YouTube best uploading 4k formats

Step 3: Tweak encoding settings for YouTube upload.

Click "Hit "Settings" to open the "Profile Settings" window, here you can adjust the output video codec, resolution, bit rate, frame rate and audio codec, bit rate, sample rate and channels to let them fit them YouTube.

Tip: Video size are based more on bit rate than resolution.

Output YouTube best uploading settings

Step 4: Trim video file.

If the 4K video is longer than 15 minutes, you can shorten the video length with the trimming function to set the start time and end time to remove unwanted clips from the video.

Trim video

Step 5: Start the conversion.

Start DJI Phantom 4 Pro+ 4K video to YouTube best format conversion by hitting the right bottom convert button, when the conversion is over, you will have no limitation to upload and share DJI Phantom 4 Pro+ 4K video on YouTube with fast speed and perfect quality.

Thursday, September 28, 2017

Jerky DJI Spark Video in iMovie? Fixed!

DJI Spark, a mini drone that features all of DJI's signature technologies, allowing you to seize the moment whenever you feel inspired. With intelligent flight control options, a mechanical gimbal, and a camera with incredible image quality, Spark empowers you to push your creative boundaries. Many people would like to transfer DJI Spark footage from SDcard to iMovie for editing then upload to Youtube, Twitter, Facebook and share with thousands of audiences. But the feedback unveiled that when it would be smooth to play the videos in QuickTime Player and VLC while it is choppy using the DJI Spark videos in iMovie.

When we are visiting DJI forums, we found that this problem is not unique. But few people can know the exact reason. One speculation is that whether DJI is reporting the frame rate incorrectly in its files or it a software issue on the desktop cause while importing video clips in Final Cut Pro, if you change the default frame-rate of 29.97 to 30fps, the video plays smoothly. Using the 'mediainfo' utility, the only difference we can see between DJI videos and videos from other cameras is the following:

DJI: Frame rate : 29.970 (30000/1001) fps
iPhone: Frame rate : 30.000 fps

Some people tried to adjust 29.97fps to 30fps when importing DJI Spark video to iMovie and succeeded, but others got failure. To play DJI Spark vdieo in iMovie choopy, you can convert DJI Spark video to iMovie most compatible AIC codec MOV video in that MP4 video is not a friendly video format to NLE software with a video converter.

Here we highly recommend you Pavtube iMedia Converter for Mac which can convert DJI Spark 1080p MP4 video to iMovie best editing codec Apple Intermediate Codec video in MOV format with most compatible video and audio settings. It not only works for DJI Spark, but also for DJI Phantom 4/4 Pro, DJI Mavic Pro, DJI Inspire. It can transcode DJI 4k video/HD video to iMovie and Final Cut Pro and other NLE software friendly video formats for editing without any issues.

By the way, this program also performs as a video editor, which offers professional editing functions. You can trim video length to remove unwanted parts from DJI Spark video, crop video file size, adjust output file aspect ratio, add text/image/video watermark to DJI video, apply special rendering effect, insert external ASS/SSA/SRT subtitles to videos, etc. You can learn more about this video converter in the review.

Quick Guide to Convert DJI Spark Video to iMovie on macOS High Sierra

Step 1. Load Spark Video files

Launch this best Spark Video converter on your Mac. Click "Add Video" or directly drag and drop the Spark video file into the software.This Mac version software also supports batch conversion to encode your Spark Videos. It still has Windows version, its operating procedures are as the same as its Mac version.

load video

Step 2: Select output format for iMovie

When the files are loaded, you can simply choose "iMovie and Final Cut Express"> "Apple InterMediate Codec (AIC) (*.mov)" as the output video format, in this option all the key specs like video resolution, frame rate, bitrate has been optimized for using in iMovie. Then hit "Browse" to decide where to locate the output files. Otherwise, they will be exported to a default folder specified by the application itself.

iMovie

If you are not satisfied with the default settings, click "Settings" button, then you will enter the following interface, on which you are allowed to customize size, bit rate, frame rate, sample rate, and audio channel to your required ones.

settings

Step 3: Start DJI Spark video to iMovie conversion

Click the big red Convert button on the main interface to start to convert your DJI Spark MP4 video to AIC MOV for iMovie.

After the conversion, click "Open" to locate the encoded videos and then launch iMovie, choose File > Import > Movies..., to import the converted video into iMovie; prepare for editing. You will find that it's just a piece of cake to edit DJI Spark files in iMovie.

Thursday, September 21, 2017

Tips for Importing Nikon D850 Footage to Davinci Resolve for Editing

Whether you're shooting weddings, landscapes, portraits, action or wildlife, the D850 won't leave you wanting. A much more versatile proposition than the D810 (and its closest rivals for that matter), the D850 is a brilliant DSLR, and perhaps the most well-rounded camera we've ever tested. For those photography enthusiast, second thing they have to do is to edit their works. So here comes the DaVinc Resolve, which stands out from professional editing software class and combines professional video editing with the world's most advanced color corrector and incredible new effects to allow you to edit, correct color, add effects and deliver projects from start to finish. DaVinc Resolve could be the best partner for Nikon D850.

DaVinc Resolve can support several different resolution: SD, HD. From its official formats website, we know this program covers a wide range of import/ouput formats as the list below.

Davinci Resolve supported file formats

DaVinci Resolve allows full unlimited editing and grading of anything in real time.
Video codec: QuickTime, Prores, DNxHD, MXF, DPX, CIN, EXR
Image format: TIFF, JPEG, MOV, TGA, BMP
Camera raw format: Blackmagic CinemaDNG RAW, ARRI Alexa RAW and Amira. RED One, EPIC , Scarlet and Dragon R3D files including +5K, monochrome and HDRx images, Cineform , Cineform 3D, Phantom Raw, GoPro, Nikon, Canon C300, C500 and 1D, 5D, 7D, Sony F65/F55/F5 RAW, Sony XAVC variants

Nevertheless, we still get some issues about importing Nikon D850 footage to DaVinc Resolve from some forums. As we all know, we can get MP4 with H.264 codec and MOV movies files from Nikon D850. You also can shoot 4k at 30 fps, Full HD at 60 fps and other HD files via this smart camera. However, MP4, MOV are just container which covers a lot of codec, so it is common that you meet formats incompatibility issues when editing footage on DaVinc Resolve. In this article, we have list several cases for you when you meet the same issues you can know something.

Option 1: When you get Full HD at 60 fps video but it is very choppy when you editing via DaVinc Resolve. To solve this problem, we strongly recommend you a powerful assistant - Pavtube Video Converter/For Mac, which could help you downscale 60 frames video to 30p, or 25p for smooth editing on Davinci Resolve.

Option 2: For getting H.264 MP4 footage then importing into Davinci Resolve, if you don't care about the output formats after edititng on Davinci Resolve, you can skip this. Cause Davinci Resolve could decode H.264 MP4, but can't encode H.264 MP4 on Windows and Mac. For those people who care about the output format, you can take measures as following I will show you. To be frank, MP4 is not friendly to non-linear editing program, no matter Davinci Resolve, or other editing programs. To solve the video format incompatibility issues, we highly recommend you to convert H.264 MP4 to DNxHD MOV, which could be the best video format for non-linear editing program. You must want to know how to convert H.264 MP4 to DNxHD MOV, keep reading.

Option 3: For those people who are crazy about getting 4k UHD video and want to bring your works to a higher visual level via non-linear editing program, like Davinci Resolve, After Effects, Adobe Premiere, however, if your computer is not powerful enough to editing those footage, Pavtube Vider covnerter also can help you solve those problem easily by downscaling 4k to 1080p.

Key Features about Pavtube Video Converter

  • Convert almost all Nikon HD audio/video to 200+ audio/video formats like, MP4, MOV, MKV, AVI, WMV, etc.
  • Convert Nikon 4k/HD footage to massive non-linear editing programs, like iMovie, Adobe Promeire Pro, After Effects,Final Cut Pro and more.
  • Get footages of Nikon/Canon/Sony/Panasonic series footage for free playback on popular devices like, Samsung Galaxy Note 8, iPhone 8, iPhone X, iPad, PS4 Pro, and more.
  • Powerful editing functions enables you to trim or cut unwanted parts of recorings, insert subtitles, add creator's watermark, etc.
  • GPU acceleration technology available .

How to transcode Nikon D850 H.264 MP4 to Davinci Resolve for Editing?

Step 1: Add Nikon D850 H.264 MP4 with 30 frame video files.

Launch this assistant on your Windows, click the “Load file” or “Add Video” icon on the main interface to import Nikon D850 H.264 MP4 video into the program.

load H.264 mp4

Step 2: Choose DNxHD MOV as output file format.

Click "Format" bar, from its drop-down option, choose "Avid DNxHD 720p/1080p(*.mov)" best editing codec by selecting "Avid Media Composer".

ouput setting dnchd mov

Step 3: Downscale 60p to 30p(Optional).

If you worry about footage with 60p which can't be played on Davinci Resolve smoothly, you can click "Settings" on the main interface, and change "Frame Rate" from 60 to 30. you also can flexibly tweak video Codec, Size, Bitrate, Frame Rate, Audio Codec, Sample Rate as you like.

Tip 1: Generally, the higher the bitrate is, the bigger file size it will be.

Tip 2: For those people who has a weak computer but get 4k footage, you can downscale resolution form 3840*2160 to 1920*1080

60 to 30

Step 4: Edit video.

This program also supplies simple edition features, please click pen icon on the main interface, and enter the "Video Editor" interface, there are seven edit tabs: Trim, Crop, Text Watermark, Image/Video Watermark, Effect, Audio Editor and Subtitle for you to select. More feature you can check this review.

video editor

Step 5: Start the conversion process.

After all the setting is over, go back to the main interface and hit right-bottom "Convert" button to start Nikon D850 H.264 MP4 to Avid DNxHD 720p/1080p(*.mov) conversion process.

You can click "Open" and pop up the folder with converted file, then launch Davinci Resolve on your Windows/Mac to import Nikon D850 H.264 MP4 video to Davinci Resolve for editing.

Thursday, September 14, 2017

Convert MTS to M4V for Playback on iPhone 8/ iPhone X

MTS is a file extension for an AVCHD video clip format for high-definition video which is used by Sony, Panasonic, and other HD camcorders; based on the MPEG-2 transport stream and supports 720p and 1080i HD video formats. When you record video footage on an AVCHD digital camcorder, the captured footage appears as an MTS video file, a format most media players and video-editing programs don't recognize.

mts to m4v

When you try to play or watch .mts files on iPhone 8 or iPhone X, changing it to M4V would be a good idea as  M4V is a standard file format for videos for iPhone 8/X and other devices developed by Apple. M4V is based on the MPEG-4 AVC video codec, and it is also used by QuickTime. You could use M4V file freely in the Apple world, even from iPad, iPhone, to its apps. To convert MTS to M4V, Pavtube Video Converter Ultimate plays a leading role in ripping camera MTS video files to video formats natively supported by Apple devices.

Pavtube Video Converter Ultimate/Mac works as a professional MTS to M4V converter, which not only could convert MTS to M4V, MOV for playing on iPhone 8 or iPhone X, but also convert MTS to 200+ formats, MP4, AVI, MKV, WMV, etc for almost all devices, like Android smartphone, tablets, laptops, game consoles, TV box, NAS, and more. You also could convert captured footage to M4V for editing with iMovie, after that, upload to Instagram, Youtube, Facebook and share with thousands of audiences. By the way, Pavtube Video Converter Ultimate offers you 7 main editing functions, you can trim to remove unwanted parts, add your own watermark, crop video aspect ratio, more features you can explore by yourself.

How to convert MTS videos to M4V for iPhone 8/X?

Step 1. Import captured MTS videos

Download and open up recorded HD MTS videos to this MTS to M4V converter by clicking “File” > “Add Video/Aideo.”

add mts video to mts converter

Step 2. Choose M4V as output video format

Just click "Format" bar, navigate to "Common Video", then select "M4V MPEG 4 Video(*.m4v)".

output iTunes M4V format

Step 3. Edit recorded HD MTS videos (Optional)

Go to “Video Editor” window to create your personal videos by trimming, cropping, adding watermarks and special effects.

edit mts video

Step 4. Convert MTS to M4V for iPhone 8 / iPhone X

One click on the red button “Convert” to start to convert recorded HD MTS videos to iPhone 8/iPhone X compatible video format - M4V.

After conversion, transfer the converted MTS videos to your devices for playback or editing at will without worring about video format issues.

Thursday, September 7, 2017

Convert MTS to MP4 with Ultimate Assistant

The MTS/M2TS video format, commonly known as "AVCHD", is a High-Definition (HD) video format produced by HD camcorders, like, Panasonic and Sony, which usually ship software with the cameras that lets you view video clips from the devices on your PC. MTS file shot by HD camcoder supports 1080p high definition and it is difficult to play cause few video player on your PC support to play MTS files. So if you want to play them on most devices like iPhone 8, Galaxy Note 8, Gear VR, or share them on Youtube, you have to convert MTS to MP4, which is more recognizable and compatible with virtually all media player and operating systems.

There are many ways to convert MTS file to MP4 file, in this article we gonna show you how to convert MTS to MP4 online in some websites, and how to use desktop MTS to MP4 software to get this goal.

Method 1: Convert MTS to MP4 Online

Method 2: Transcode MTS to MP4 with Desktop Software

Method 1: Convert MTS to MP4 Online

Just searching "Online Video Converter" on Google, then you can get many online video converter which can help you convert MTS to MP4. The popular and safe online converter websites includes:

www.onlineconverter.com

www.zamzar.com

convertfiles.com

convertio.co

Here, we choose to use the MTS to MP4 converter in convertio.co site to show the steps to change MTS file to MP4. Firstly, open the site: https://convertio.co/mts-mp4/

STEP 1: Upload MTS-file(s) Select files from Computer, Google Drive, Dropbox, URL or by dragging it on the page

load MTS

STEP 2: Choose "to MP4" Choose MP4 or any other format you need as a result (more than 200 formats supported)

MP4 format

STEP 3: Download your MP4 Let the file convert and you can download your MP4 file right afterwards

download MP4 video

Pros: Easy to use, convenient, free source for users.

Cons: Not safe enough, users should sign up and supply email address or other personal information to this website.


Method 2: Transcode MTS to MP4 with Desktop Software

To convert videos saved as an AVCHD (MTS) to MP4 on Mac, getting a great media conversion tool would be a smart choice. There are tons of video converters in this world, Pavtube Video Converter Ultimate stands out from its class, as a ultimate desktop video converter which should turn .mts to .mp4 easily with zero video quality.

This MTS to MP4 converter allows you convert MTS files in batches, there are hundreds of ouput formats for you to select. You can convert MTS to H.264/MPEG-4 MP4, H.265/HEVC MP4, DivX MP4 with 4K, HD, SD resolution and also can convert 3D MTS to 3D MP4 or convert 2D MTS to 3D MP4 for your VR Headsets and 3D TVs.

Moreover, this converter not only helps you convert MTS to MP4, but also could work for other devices. It could convert MTS to AVI, MKV, WMV, MP4, MOV, and more. It allows you import files in MP4, ISO, AVI, MKV, even Blu ray and DVD and convert them to video/audio formats you desired. Besides, it is equipped with professional video editing functions. You can merge several files into one, split one file into several parts, trim or crop your videos, add watermark, or video effects, more features are waiting for your exploration.

By the way, it has both Windows and Mac version, below we gonna go with Windows version to show you simple guide of converting MTS to MP4.


Step-by-Step to Convert MTS to MP4 with Desktop Video Converter

Step 1: Import MTS/M2TS videos

Click "Add File" button to open the file browser window and navigate to the MTS/ M2TS files you would like to convert. Or drag-and-drop files stored on your computer to the interface of this MTS converter. It supports batch conversion, which allows you to import and convert multiple video files at once.

load mts

Step 2: Choose MP4 output format

Just click "Format" bar, from its drop-down list, select H.264 file format by following "HD Video" > "H.264 HD Video(*.mp4)" or you can choose H.265 MP4.  

Tip:

Click "Settings" on the main interface to open "Profile Settings" window, here all the profile parameters including video codec, resolution, bit rate, frame rate, audio codec, bit rate, sample rate, channels, etc are adjustable to facilitate you to get the best output video and audio quality.

Output format for HD TV

Edit MTS Files Before Conversion(Optional)

Click pen icon on the main interface, and enter "Video Editor" window, here are manys video editing functions for you to select. You can trim, crop, add effect, watermark and subtitle to your videos.

edit mts

Step 3: Convert MTS keeping HD-quality to MP4

After all the settings, now, just click the "Convert" button to start converting .mts to mp4 file. After the conversion, you can locate the generated files in the output folder. Now, you can play your converted MTS file with normal video player on PC cause nearly all video players support to play MP4 video.

Thursday, August 31, 2017

How to Watch 4K video on PS4 Pro via Netflix, Amazon, Youtube and USB

We all want to see the crisp, hyper-detailed glory of 4K from the comfort of our own home, but there’s a few twiddly things you need to do beforehand. As the PS4 Pro doesn’t support some 4k Blu ray discs you’ll be restricted to streaming 4K mainly via Netflix, Amazon Prime video, YouTube or USB.

First you need a 4K/UltraHD TV. If you haven’t got one of them, you might as well stop reading now... 

Still with us? Good! In this article, we will go through 4 parts to make you more clear with this question "how to watch 4k videos on PS4 Pro".


Part1: Stream Youtube 4K Videos on PS4 Pro

Part2: Play Netflix/Amazon 4K Videos on PS4 Pro

Part3: Watch 4K Videos on PS4 Pro via USB

Part4: Convert Local 4K Videos to PS4 Pro


Part1: Stream Youtube 4K Videos on PS4 Pro

If you want to stream YouTube videos in 4K you need:

  • A PS4 Pro set up for 4K image quality.
  • An Ultra HD or 4K display device (TV, projector, etc.).
  • A steady internet connection of at least 25 Mbps.

Once a 4K video is selected, the PS4 Pro will automatically stream the content in 4K resolution.

If you want to make sure you’re streaming in 4K, in the You Tube app go to [Settings] > [Show Video Info] > [Enabled].

ps4 pro youtube 4k

A 4K video normally has 3840 x 2160 resolution, so if you see these values, you are streaming in 4K quality.

On the Youtube app in the console you will need to search for video with 4K. For example – game trailers 4K, you will get a lot of results in with 4K tag at the bottom. Just select it to play. 

get 4k on youtube


Part2: Play Netflix/Amazon 4K Videos on PS4 Pro

You'll obviously also want to make sure you get the full 4K experience, so make sure your in the Video Output Settings your resolution is set to 'Automatic'. There's step-by-step process for each video provider below, so have a glance at these screenshots if you get stuck. 

Getting 4K on PS4 Pro

Step 1: Select the settings toolbox. 

step1

Step 2: Select the 'System' option. 

step2

Step 3: Make sure the HDCP option is ticked. 

step3

Step 4: Make sure your resolution is set to Automatic in the Video Output Settings. 

step4

Getting 4K on Netflix

All you need to do is find the UltraHD 4K category and you're good to go!

netflix

Getting 4K on Amazon Prime Video

Select the Ultra HD Movies and TV category. Yup, that's all you need to do. 

amazon prime video


Part3: Watch 4K Videos on PS4 Pro via USB

In this part, we gonna show you how to play local 4k video on PS4 Pro. Before you get started with it, two thing you need to prepare. One is to download the Media Player from PlayStation®Store, the other is to make clear with the Media Player on PS4 Pro Supported 4k video Format. Below is the information to make you to understand in depth.

Media Player on PS4 Pro Supported Format:

MKV

Video: H.264/MPEG-4 AVC High Profile Level 4.2

Audio: MP3, AAC LC, AC-3 (Dolby Digital)

AVI

Video: MPEG4 ASP, H.264/MPEG-4 AVC High Profile Level 4.2

Audio: MP3, AAC LC, AC-3 (Dolby Digital)

MP4

Video: H.264/MPEG-4 AVC High Profile Level 4.2

Audio: AAC LC, AC-3 (Dolby Digital)

After downloading the meida player, then you may go with the procedures below with us to start play video on PS4 Pro via USB.

Step 1. Select  (Media Player) from the content area. Connected USB storage devices or media servers that are on the same network as your system will be detected and automatically displayed.

Play Video on PS4

Step 2. Select the USB storage device or media server.

Step 3. Select the 4K video that you want to play.


Part4: Convert Local 4K Videos to PS4 Pro

As we all know, MP4, AVI, MKV, are just a container which could include various codec. From PS4 Pro supported formats, obviously, 4k video formats mustn't be limited in those several containers. In this case, you may find that most videos can't be played by PS4 Pro directly, such as Blu-ray disc, DVD disc, Blu-ray ISO, DVD ISO, VOB, MOV, WMV, M4V, FLV, MTS, etc. If your videos are not in the supported format, you will need to use video converter software to convert Blu-ray/DVD, 4k recordings and other 4k videos to PS4 Pro supported format.

On the market, a ton of 4K video converters are waiting for your exploration. After a long time test, finally, we get the ultimate one - Pavtube Video Converter/for Mac, which has the ability to convert any 4k video like 4K H.265/HEVC Video, 4K H.264/MPEG-4 AVC, 4K TS, 4K AVI, Youtube 4K, DJI Phantom 4 Pro 4K and more with 4096 x 2160 or 3840 x 2160 resolution to 4K H.264 MP4, 4K MKV for PS4 Pro.

Moreover, this program is equipped with professional editing functions. With it, you can adjust video effect like brightness, saturation, contrast, and volume. Besides, you also can merge several cllips into one, or just split one video into several parts. Cropping, trimming vdieo, adding watermark, etc, many features, you can click this review to know more.

Step by Step to Convert Local 4K Videos to PS4 Pro

Step 1: Start the program on your computer, click "File" > "Load Video/Audio" or "Load from folder" button to import unsupported 4K video files into the program. 

load 4k video

Step 2: Click "Format" bar, from its drop-down option, select H.264 HD MP4 from "HD Video" for PS4 Pro. PS4 Pro also supports MKV, AVI, so you also can choose HD AVI, HD MKV here.

Tip: After you have selected the output format, click the "Setting" button, here, you can adjust parameters. To make sure the output file is 4k video just need to check pix is 3840 x 2160 or not.

HD MP4

Step 3: To convert unsupported 4k video for PS4 Pro by hitting the "Convert" button on the main interface.

When the conversion is completed, click "Open Output Folder" to popup the folder with converted files, then you can easily transfer and play converted 4K files on PS4 Pro via an external USB drive.

Friday, August 25, 2017

Play Any 4K Video on Plex Media Server

Watch how Plex makes it possible to enjoy all of your media, whether in your living room, the car, or on a boat in the South Pacific! Plex stands out of its class, which has completely overhauled its media streaming software for living room and replaces Plex Home Theater and delivers a host of new features such as 4K playback support. From Plex official website, we get this information:"Plex Media Player automatically detects the resolution of your screen and draws the interface accordingly. The app also supports playback of 4K video files using the H.264 (AVC) codec in most containers, so long as your computer is powerful enough to decode it. "

From above, to play 4k videos on Plex Media Server successfully, the premise is that 4k video must be encoded with H.264/AVC codec, besides that, you must have a powerful computer which can decode 4k smoothly.

In our daily life, there are many ways to get 4k videos, like 4k source from DJI drones, downloaded from YouTube, shot by 4K device recorders. All those 4k video could be in different container file formats such as 4K AVI/WMV/MP4/MOV/MKV/TS/MXF/XAV/ XAVC S or codec like H.264, H.265, Prores, etc. To play any 4k video on Plex Media Server, here we recommend you a shortcut -  transcoding the incompatible 4K video to Plex Media Player readable 4K H.264 codec. Pavtube Video Converter for Windows/Mac is a professional video transcoding software which can solve "play any 4k video on Plex Media Player" problem easily.

Analysis of Playing 4K on Plex Media Server

4K transcoding is a very intensive process, and it will be CPU comsuming when you running Plex Media Server to play 4k video. If your happens to run a slow computer, you can easily suffer video stuttering or lagging issue when using Plex Media Player to view the 4K video, unless you are running a powerful computer.

To solve this problem, it would be essential for you to perform a codec transcoding and format file size compression process. It would be a great hassle for you to do the codec transcoding and another program to do the file size compression process. Pavtube Video Converter could help you to compress video files size in just few clicks. Its all-round features are not limited to here, keep reading.

Features of Pavtube Video Converter

For fast computer with powerful CPU, Pavtube Video Converter has enhanced media compatiblity with all 4K container file formats and codec listed above. You can load 4k video into the program and then efficiently convert them to Plex Media Player readable 4K H.264 file formats for playback. By the way, batch conversion is also available.

For slow computer, the best way is to use Pavtube Video Converter to  compress 4K to 1080p, then you will get a higher level playback experience when wathcing 4k video on computer via Plex.

The place you need to compress 4k is not only on computer, if your TV doesn't support playing 4k video whereas you have shot some wonderful recordings, now you can perform 4k video compressing then play them on TV. Compression features also be applicable to massive device like iPhone, Samsung Galaxy Note8, Eve V, game console, and more.

Moreover, compare with compress, you are also able to upscale video by adjust video settings like changing 720p to 1080p. This program supports you to import 200+ kinds of video files and output hundreds of video/audio files for various devices, like AVI, WAV, MKV, MP4, MOV, etc.

Professional editing function allows you make your personal video by trimming, cropping, adding text/image/video images, inserting SRT/ASS/SSA subtitle into source video, etc.

What is worth mentioning, batch conversion and GPU acceleration can largely save your energy and time.

Step by Step to Convert and Compress 4K for Plex Media Server Smooth Playback

Step 1: Load 4K video.

Download the free trial version of the program. Launch it on your computer. Click "File" menu and select "Add Video/Audio" or click the "Add Video" button on the top tool bar to import 4K video files into the program.

Input 4K video

Step 2: Define the output format.

Clicking the Format bar, from its drop-down list, just output Plex Media Player playable 4K format ""H.264 High Profile Video(*.mp4)" under "Common Video" main category. Or you can select other formats as you like.

high profile h.264

Step 3: Adjust video settings

 Click "Settings" to open "Profile Settings" window, from "Size(pix)" drop-down list, select "1920*1080" to compress 4K to 1080p.

h.264

Step 4: Begin the conversion process.

After all setting is completed, hit the "Convert" button at the right bottom of the main interface to begin to convert and compress 4K to Plex Media Server compatible file codec and file size resolution.

When the conversion is finished, click "Open Output Folder" icon on the main interface to open the folder with generated files. Then add converted files to Plex for playing smoothly.