Friday, March 16, 2018

How to Convert HD MTS to M4V/MOV for Playback on iPad Series

An MTS file is a video file saved in the high-definition (HD) MPEG Transport Stream video format, commonly called "AVCHD". MTS files are often used by Sony, Panasonic, and other HD camcoders. It is worth to say that MTS files can not be played directly by most media player or reconginized by most tablets, smartphones because of its video audio codec. So if you want to sync some MTS files to your iPad with iTunes for sharing with friends, how to do?

convert mts to m4v for ipad air apple tv 3

Converting MTS to iPad supported video formats could solve this problem, for example, converting MTS to M4V/MOV will be a good way. You can search MTS to M4V/MOV converter in Google and pop up hundreds software in the page. The point is how to get the best one. Pavtube Video Converter Ultimate | Mac (review) always stands out from its competitors which could convert HD MTS to M4V, MOV with just 3 steps.

Moreover, apart from converting MTS to M4V/MOV, it also allows you to import Blu-ray/DVD, MOV, AVI, MKV, AVCHD, VOB with resolution of 4K/2K/HD/SD to any formats you need including MOV, M4V, H.264/H.265 MP4, 3GP, M4V and more. For those people who want to do some postproduction to the MTS footage, video editing is also availabe here.

You are able to flip MTS video horizontally or vertically, rotate video clockwise or counterclockwise to get it displayed in the right angle, trim or cut MTS video to remove unwanted parts or segments, crop video to cut off unwanted black borders or area, personalize MTS video with video/image/transparent text watermark, split large video into small parts by file size, count or length, merge separate video clips into one, adjust picture effect like brightness, contrast, saturation or apply special rendering effects like Gray, Flip Color or Aged Flim, etc to your video or add external SRT/ASS/SSA subtitles to videos. To sum up, its features are beyond your imagination. Have a try!

How to upload recorded HD MTS videos to iPad Series

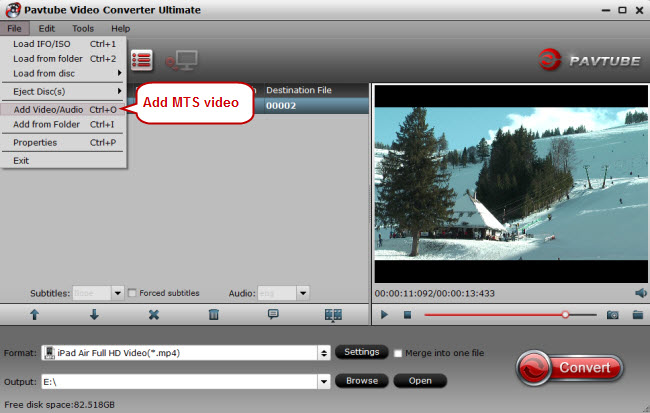
Step 1. Import captured MTS videos

Download and open up recorded HD MTS videos to this MTS to M4V/MOV converter by clicking “File” > “Add Video/Aideo.”

add mts video to mts converter

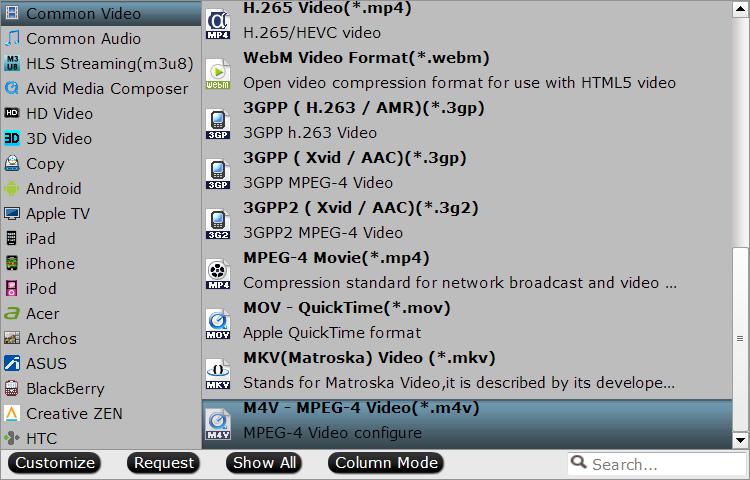
Step 2. Choose M4V as output video format

All models of iPad support M4V/MOV formats, just go to the format list to find M4V option, select "M4V-MPEG-4 Video(*.m4v)" or "MOV-QuickTime(*.mov)"-->"Common Video", or "H.264 HD Video(*.mp4)" from "HD Video" category.

output iTunes M4V format

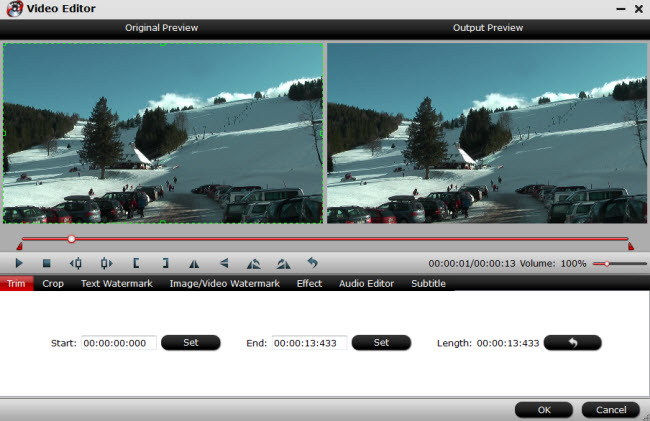
Step 3. Edit recorded HD MTS videos (Optional)

Go to "Video Editor" window to create your personal videos by trimming, cropping, adding watermarks and special effects.

edit mts video

Step 4. Convert MTS to M4V for iPad

One click on the red button “Convert” to start to convert recorded HD MTS videos to iPad compatible video format - M4V. After conversion, transfer the converted MTS videos to iPad .

Thursday, March 8, 2018

Free Way to Decode and Convert H265 (HEVC) to H264 No Quality Loss

What is HEVC/H.265?

HEVC is short for High Efficiency Video Coding, which is also known as H.265. The HEVC/H.265 substantially improves the data compression ratio for videos, thus saving a massive bandwidth and ensuring a 50% bit rate reduction at the same level of video quality. Besides, videos encoded with H.265 take up less space than H.264. Or you can say H.265/HEVC offers greatly improved video quality at the same bit rate compared with H.264. To customers, they can watch high-definition TV shows, 3D Blu Ray and even high-quality 4K/8K videos online smoothly.

However, HEVC/H.265 can't be accepted by most devices, to ensure a smooth H.265 video playback on your devices, you'd better convert H.265 to H.264. How to free convert video from HEVC to H.264 (MP4)? You need a professional HEVC to H.264 converter.

Try Smart Approach: Pavtube Video Converter Ultimate | For Mac

To free convert H265 into H264, Pavtube Video Converter Ultimate can provide you with an effortless solution: drag H265 files, select H264 and run.

* 3 steps to decode and convert H.265 to H.264 without no visual quality change.

* Irrespective of your input MKV H265, AVCHD H265, MP4 H265 or NX1 HEVC footage, it can successfully free convert HEVC to H264 from one container format to another like MP4, MOV, M4V, MKV in resolution of 4K/1080p/720p, as well as ProRes 422, AVI, FLV, WebM, MP3, AAC, etc. 180+ video and 14+ audio formats. 

* This free HEVC video converter makes your HEVC/H265 video file playable on almost any device, be it iPhone, iPad, Samsung Galaxy series, Sony, Google Pixel, Surface Pro 4, Xbox One, etc with best default parameter settings.

How to Decode and Free Convert HEVC/H265 to H264

Step 1: Load H265 Files 
Import H265 files via "Add Video" button or just drag and drop H265 files to this top HEVC video converter. Batch conversion is supported.

load h265

Step 2: Choose H264 
Select H264 from "HD Video" profile. The most popular video MP4 MOV M4V are formatted with H264 or MPEG-4. Choose the one with H264 codec.

choose h264

Tip: If you are familiar with the video parameters, you are lucky here. Click Settings you are able to adjust video audio codec, bit rate, frame rate, channels, and more. Video size is based more on bit rate than resolution. Lower the bit rate to get smaller video size.

Related image

Step 3: Start to Convert H265 to H264 
Press "RUN" button and this free H265 video converter will begin to convert HEVC/H265 to H264 on computer. Now you can play the HEVC file on any device without obstacles.

Thursday, March 1, 2018

How to Reduce Premiere Render File Size

Have you found that most video editing software render files are very large, such as Adobe Premiere render file, Affect Effects render file. Actually, a large file is not convenient for uploading to video sharing website, or sharing with friends. Below is a question from Adobe forum:

I have a series of 5-7 minute training videos that I provide on YouTube and for download. The videos include live footage, imported audio, and image overlay. I haven't implemented any video effects or major transitions, other that 'Cross Dissolve.' I export to mp4/H.264 codec, reducing bitrate and frame size (even though I understand this shouldn't matter as much), but am still ending up with 250-300MB files. While I am able to upload to YouTube, I'm not able to provide these files for download as they are considered too large.

How to reduce the Premiere file size become a common question for most video makers. So today I would not talk about reducing file size by adjusting the output preset in Premiere, cause it doesn't work at all. So today I will recommend you another way to settle this problem with just 3 steps. The premise is that you have to download a professional video compressor - Pavtube Video Converter Ultimate is highly recommended to you which will never let you down.

Pavtube Video Converter Ultimate could reduce Premiere file size by changing video formats for you. Hundreds of video formats for you, MP4, MOV, AVI, M4V, MKV, WMV, etc all those popular formats are available here. Moreover, it offers you tons of optimized devices presets, like Android smartphone, iPhone, iPad, TVs, ASUS, Samsung smartphone, and more, so you need not to do any change.

 If you are familiar with video format, container and codec, you can directly choose video format, then adjust the video and audio bitrate, frame rate, resolution, channel and more parameters to make the outputed video more fit in your video player and multimedia devices. With this feature, you even can compress 4K to 1080p video or upscale lower resolution video to higher resolution video.

Apart from a video compressor, Pavtube Video Converter Ultimate is also a video editor with rich video editing functions. It can fulfill all the needs of making a professional video for public consumption or simple creativity trying. With it, you can merge separate video clips into one, insert external subtitles to video, add transparent text watermark/image watermark to video, crop black bars around the video frame. More features in this guide for you.

Download:

Pavtube Video Converter Ultimate | Pavtube iMedia Converter for Mac

Step by Step to Reduce Premiere Render File Size

Step 1: Launch this assistant on your Windows, click the "Load file" or "Add Video" icon on the main interface to import Premiere render files into the program. Or you can directly drag or drop video into this converter.

load file

Step 2: Click "Format" bar, you will see hundreds of video format here. You can navigate to "Common Video" and select "MOV- QuickTime(*.mov)". If your media player could support HEVC/H.265 file, you can choose H.265 Video (*.mp4) to get a smaller file.

quicktime mov

Step 3: This part is important. After you select desired format, click "Settings" and enter "Profile Settings" window, you can adjust video parameters here. The video size is based more on bit rate than pix, lower bit rate to get smaller video size. I always select medium quality or low quality to reduce Premiere render file size.

h265 setting

Step 4: Go back to main interface, and hit "Convert" button, wait for a second, click "Open" it will pop up a folder with the converted file. Then you can easily to upload to Youtube or other video sharing website.

Tuesday, February 27, 2018

Compress MKV Files with No Quality Loss

Most movies or TV shows especially some high definition sources streamed over the Internet are using the MKV file extension. The problem is that MKV file is usually in large file size and take a lot of your hard drive space, then you may come the need to compress MKV files into smaller file size. Although there are many programs on the market can do the MKV file compressor job for you, however, you may find that some of them are too complicated to operate, others may won't ensure you to produce a high quality smaller video file. following part will introduce you some effective way to reduce MKV file size with our intuitive and simple to use MKV file compressor - Pavtube Video Converter Ultimate, which helps to efficiently shrink MKV file size by adjusting video container, resolution, frame rate, bit rate, frame rate, video length, etc.

Ways to compress MKV file size

Solution 1: Compress MKV to small container file format such as WMV, FLV

Both FLV and WMV files are smaller container file format for compressing files. For those people who wish to send file via email or store the files on your hard drive, WMV can be your best choice. If you have the need to share files over the popular video sharing sites such as YouTube, Vimeo, Facebook, etc, FLV will do the job best.

Solution 2: Change MKV file video resolution, bit rate, frame rate, etc

Adjust MKV file resolution: The higher resolution of a video file, the clearer effect of the video picture. However, you may also get a large file size. You can change the video resolution of a 4K video to 1080p or 720p with the resolution of 1980*1020 or 1080*720 or adjust a high definition video to small file size video with the resolution of 640x480 or 640x360, etc.

Change MKV file bit rate: Lower the MKV video video bit rate will help to decrease the video file size, therefore, always make sure to make a good balance between file size and quality.

Tweak video frame rate: You can reduce your video file size by lowering the frame rate of your video with 10-15 fps. But reducing the frame rate will also effect the smoothness of the video playback. You will need to experience to find the lowest accepted frame rate value.

Solution 3: Trim/Crop MKV file

For those people who don't want to suffer any quality loss, the best way to trim MKV file length by cutting off unwanted parts or segments and leave only your unwanted parts or crop off the unwanted black bars or size area around the video frame.

Related article: Compress Video for Email YouTube Vimeo Facebook | Compress MP4 Files Windows Mac | Top iPhone Android Video Compressor

Shrink MKV file size with Best MKV file compressor

The best MKV file compressor - Pavtube Video Converter Ultimate we mentioned above can better compress MKV files with the different solutions listed above. You can not only change the MKV container to WMV or FLV for convenient email or online sites sharing, but also lower the video resolution, bit rate, frame rate flexibly with accepted value in the program's "Profile Settings" window but also trim the video length or crop the video file size to get a smaller file size video with no quality loss.

For Mac users, you can switch to download Pavtube iMedia Converter for Mac to perform MKV file size shrinking job on macOS High Sierra, Mac OS X El Capitan, Mac OS X Yosemite, Mac OS X Mavericks, etc.

Get Pavtube Video Converter Ultimate with 20% off discount, coupon codec: 45K2D47GJH

Step by Step to Compress MKV File Size with Best Quality

Step 1: Load MKV files into the application.

Download the free trial version of the program. Launch it on your computer. Click "File" menu and select "Add Video/Audio" or click the "Add Video" button on the top tool bar to import source MKV video files into the program.

Load MKV video

Step 2: Output a file format with small file size.

Output a smaller file size

Step 3: Adjust output profile parameters.

Change output profile parameters such as frame rate, bit rate and resolution to reduce mp4 file size. Please bear in mind, excessive reduction of the parameters will bring about quality degradation. This program can keep a good balance between the file size and image quality. You can simply leave the parameter settings unchanged after choose the output format.

Adjust output smaller file size

Step 4: Trim or crop MKV file size.

Select one item on the file list to active the pencil like "Editor" icon on the top tool bar, hit the "Edit" icon to open video editor window.

Trim: Click "Trim" button, you can drag the slider bars to include the segment you want to remain, click the left square bracket to set start point, and click the right square bracket to set end point when previewing the video or directly input specific values to "Start" and "End" box.

Trim MKV video length

Crop: Hit the "Crop" tab, drag the green dash line around the video to remove the black edges in the video frame.

Crop MP4 video file size

Step 5: Start MKV file compression process.

Specify an output folder on your computer for storing the converted files. Then hit right-bottom "Convert" button to start to compress MKV files on your computer.

When the conversion is completed, you will have no problem when do file uploading or emailing with compressed MKV file size.

Tuesday, February 20, 2018

Edit MOV Files in HitFilm Pro 2017

HitFilm Pro 2017 is a unique mix of video editing, visual effects and 3D compositing tools all in one product. It includes 3D object rendering, a powerful particle simulator, over 500 customizable visual effects and presets, professional color grading, industry - standard BorisFX titling and over 150 creative plugins for use in other video software.

Import and edit MOV files with HitFilm Pro 2017

Have some MOV files downloaded from online sites or shot with your camera, camcorder, smartphones and wish to load them into HitFilm Pro 2017. But every time when you try to import a MOV file, it just ask you to install QuickTime player, which you didn't install because I found it is just for Mac.

Related article: Import AVCHD/MTS/MXF/MKV to HitFilm | Import AVI to HitFilm

Why HitFilm Pro 2017 not import MOV files?

After searching for HitFilm supported file formats, we can see that it can native import the following file types:

Video

Audio

AVCHD (M2T, MTS, M2TS)
AVI (including 10-bit and 12-bit GoPro Cineform (Windows only)
DV & HDV
MP4 (AVC/H264 & AAC)
MPEG-1 & MPEG-2 (TS, PS, MPE, MPG, MPEG, M2V)
MXF (DVCPro HD)
QuickTime MOV (including 10-bit and 12-bit Pro-Res (requires that an up to date version of QuickTime is installed on your computer)
WMV

AAC
MP3
M4A
MPA
WAV
WMA

From above list, we can see that HitFilm Pro 2017 only supports to handle QuickTime MOV files, in addition, you will need to install the latest QuickTime player version on your computer. It also means that if you will fail to import other types of QuickTime MOV files into HitFilm Pro 2017.

Transcode unsupported MOV for HitFilm Pro 2017

To fix the format or codec incompatible issue, you can download a third-party video conversion app. If you are looking for a powerful yet simple to use application to get the job easily completed, we highly recommend Pavtube Video Converter to you. The program has full importing support for 4K/2K/HD/SD MOV files encoded with various different video and audio compression codec. Thanks to its batch conversion mode, you can load multiple MOV files into the application for conversion at one time. The tool can assist you to efficiently transcode unsupported MOV to HitFilm editable formats listed above with perfect quality and super-fast conversion speed.

Besides MOV, you can also use this application to convert other unsupported files such as MKV, H.265, XAVC, XAVC S, etc to HitFilm Pro workable editing formats listed above.

For Mac users, please go to download Pavtube Video Converter for Mac to complete the conversion on macOS High Sierra, macOS Sierra, Mac OS X El Capitan, Mac OS X Yosemite and Mac OS X Mavericks, etc.

Step by Step to Convert MOV for HitFilm 2017 Editing

Step 1: Load MOV files into the application.

Download the free trial version of the program. Launch it on your computer. Click "File" menu and select "Add Video/Audio" or click the "Add Video" button on the top tool bar to import unsupported MOV video files into the program.

Load MOV video files into the application

Step 2: Define the output format.

Clicking the Format bar, from its drop-down list, select one of HitFilm Pro 2017 editable file formats such as "Divx AVI - Audio Video Interleaved (Divx)(*.avi)" under "Common Video" main category.

Output HitFilm Pro 2017 supported editing formats

Tip: Before conversion, you can click the "Settings" icon to customize the output video/audio settings Bitrate such as video codec, bit rate, resolution and frame rate or audio codec, bit rate, sample rate and channels, etc.

Step 3: Begin the conversion process.

After all setting is completed, hit the "Convert" button at the right bottom of the main interface to begin the conversion process from MOV to HitFilm supported editing formats conversion process.

When the conversion is finished, click "Open Output Folder" icon on the main interface to open the folder with generated files. You'll then have no problem to work the converted MOV files with HitFilm 2017.