Wednesday, October 21, 2015

Can Surface Book playing 2D/3D Blu-ray on the go?

Summary: Let you transfer or backup regular 2D/3D Blu-rays to side-by-side 3D MP4 for Surface Book, so that you can watch 3D movies on Surface Book on the go.

Hot Search: 3D Blu-ray on ATV 3 | 3D Blu-ray to Stereoscopic Player | Blu-ray to Android

If you a one of the Surface Book users, this article may be helpful on how to put/stream Blu-ray movies to Surface Book for enjoying. As far as we know, Surface Book can play almost any media files that have been transferred to it, including Internet videos, DVR recordings, Camcorder shootings, even DVD and Blu-ray movies that have been ripped are supported.

So, in order to enjoy 2D/3D Blu-ray movies on Surface Book is not a problem any more. The main task you should overcome is how to rip 2D/3D Blu-ray to Surface Book with high video quality and smooth playing experience. All you needed is a powerful 2D/3D Ripper.

I would recommend you a professional Blu-ray Ripper--Pavtube BDMagic. With it you can convert 2D Blu-ray, 3D Blu-ray with High-Definition formats or even create 3D videos with excellent video/audio quality in fast conversion speed. Meanwhile, it provides you easily convert 2D Blu-ray from discs and folders to 3D videos in MKV/MP4/MOV/WMV/AVI formats with Side-by-Side, Top-Bottom, or Anaglyph 3D effect. Besides, you are allowed to set the 3D depth to adjust the 3D effect. If you are a Mac user, please turn to Pavtube BDMagic for Mac. Cut the cackle, download the magically ripper and start to backup 2D/3D Blu-ray to your Surface Book.


Other Download:
- Pavtube old official address: http://www.pavtube.cn/blu-ray-ripper/
- Cnet Download: http://download.cnet.com/Pavtube-BDMagic/3000-7970_4-75922877.html


Other Download:
- Pavtube old official address: http://www.pavtube.cn/blu-ray-ripper-mac/
- Cnet Download: http://download.cnet.com/Pavtube-BDMagic/3000-7970_4-76177782.html

Backup 2D/3D Blu-ray on Surface Book

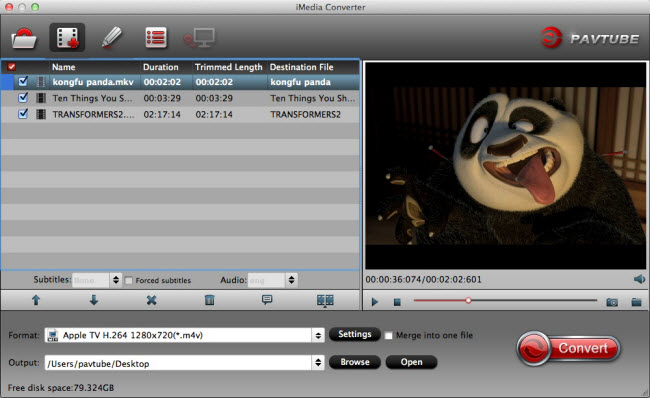
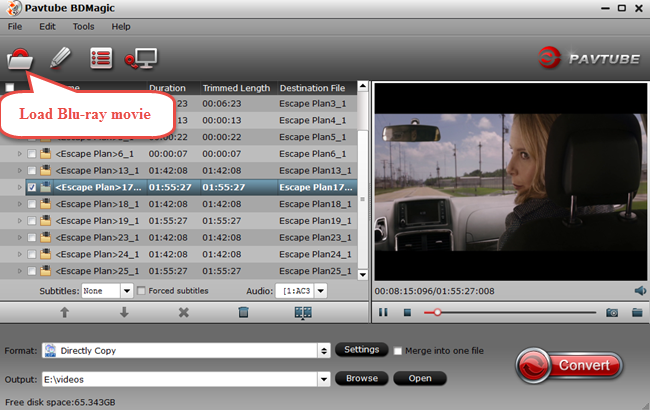
Step 1: Load Blu-ray Movie

Insert your Blu-ray disc into BD drive and launch the BDMgic Converter. Click “file”  to load the source movie from your Blu-ray disc. This converter will choose the target needed to copy automatically. Then look down the bottom of the interface, you can use “browse” to set your output folder.


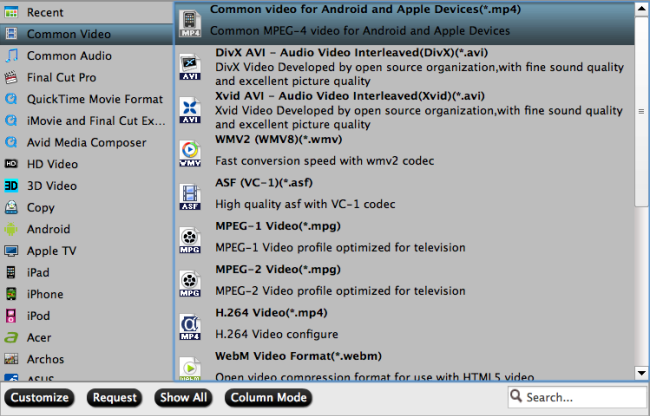
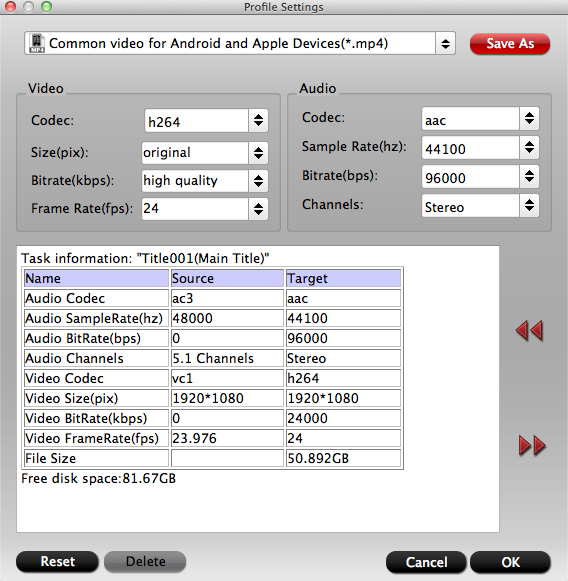
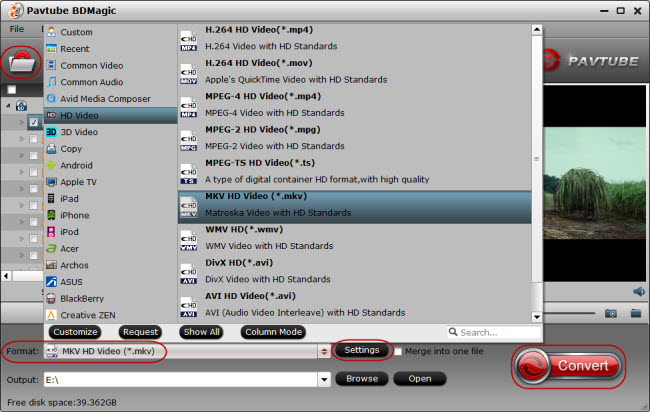
Step 2: Select target output format.

Here you can choose regular Multi-track MKV(*.mkv) or H.265 HEVC MP4(*.mp4) for regular Blu-ray experience. “Muti-track Video” can give you original video and amazing audio effect. 


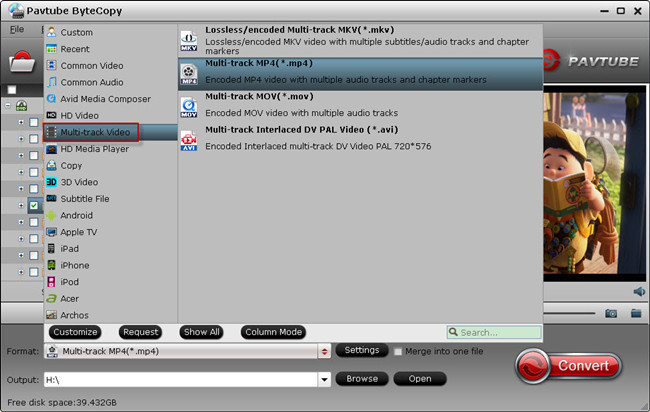
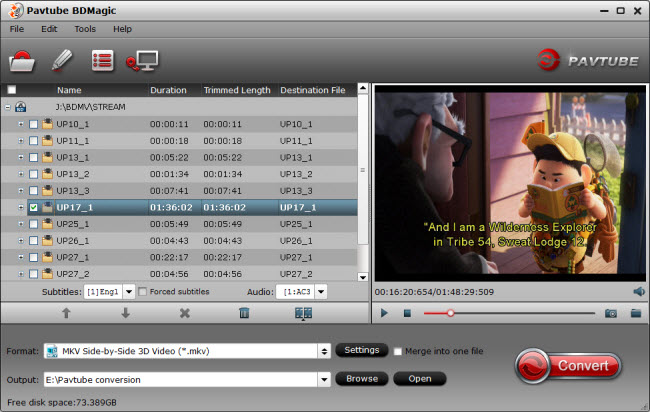
Or you can click 3D Video, then choose MKV side-by-side 3D Video(*.mkv) for 3D Blu-ray. Different effect based on the format you choose.


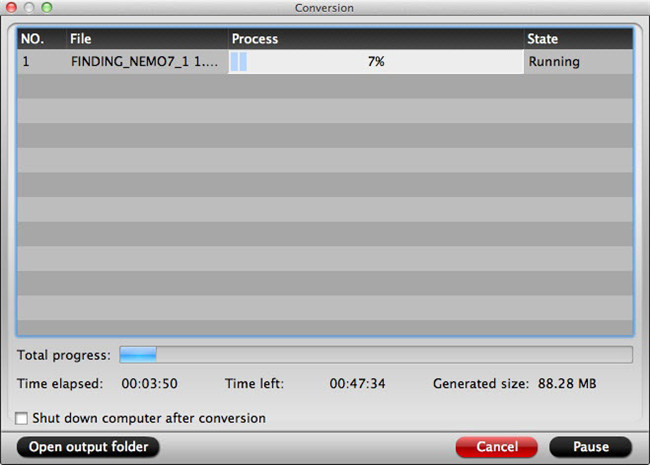
Step 3. Start 2D/3D Blu-ray to Surface conversion.

Click on “Convert” to start 3D Blu-ray to Surface conversion.

Read More:

Monday, October 19, 2015

MP4 vs MPEG: Best MPEG to MP4 Converter for Mac El Capitan

Failed on importing your MPG files to iPad, iPhone or some other devices for playback or to iMovie for editing? Do you want to know what caused the failure of importing MPG files? This article will help you understand what the hell is going on importing MPG files and give you some suggestions of importing MPG smoothly.

Hot Search: HandBrake Alternative for Mac | AnyDVD for Mac alternative | MakeMKV Alternative for Mac | FFmpeg Alternative | DVDFab Alternative for Mac 

As a Mac user, you might need to convert MPG to MP4 on Mac (El Capitan, Yosemite, Mavericks, Mountain Lion, Lion and Snow Leopard included), because MP4 is the video format which is widely supported by Apple devices and iMovie.

Let’s figure out what the difference between MPEG and MP4, and get over why should we have to convert MPEG to MP4?

MPEG, the Moving Picture Experts Group, develops standards for digital video and digital audio compression. The MPEG standards are an evolving series (MPEG-1、MPEG-2、MPEG-4、MPEG-7 and MPEG-21), each designed for a different purpose.

MP4 is digital multimedia format most commonly used to store video, audio, subtitles and images. What's more, it allows streaming over the Internet.

MP4's biggest difference from MPEG formats is its ability to store subtitles, still images and other data along with digital video and audio.

MP4 supports more digital players, various video player programs and hardware devices, like iTunes, iPods, iPhones, iPads (all versions), the Media Player Classic, MPlayer, QuickTime Player, VLC media player, Windows Media Player 12, Microsoft Zune portable media player, XBMC Media Center, etc. What’ more, MP4 files are smaller in size than MPEG files, which can free up much space on your hard drive without declining the quality of your videos files.

So, convert MPEG to MP4 is a best choice, isn’t it?

Now you can keep reading this page to get the best MPEG to MP4 converter for Mac El Capitan.

Pavtube iMedia Converter for Mac is a professional MPEG to MP4 converter for Mac El Capitan. It can complete the task of converting MPEG to MP4 easily and efficiently. It is worth mentioning that Pavtube iMedia Converter for Mac can convert various video files, such as MOV, AVI, MP4, FLV, MKV, 3GP, MP3, FLAC, etc. Let you able to enjoy them on your Mac OS X El Capitan, as well as other portable devices such as iPhone, iPad, Apple TV, Android, Windows Phones, PSP, PS3, and so on. Meanwhile, you can also use it for some simple editing before conversion (splitting, trimming and combining, rotating and cropping, quality improvement, etc.). There will be no loss of image quality, and conversion itself is swift and effective.

Brief Introduction of Tutorial for MPEG to MP4 on Mac OS X E1 Capitan

Step 1. Load Files.

Start up Pavtube iMedia Converter for Mac OS X E1 Capitan, Load MPEG files to the software using any of the three ways below: 
A. Click “File” menu, and select “Load IFO/ISO”, “Load from folder”, “Load from disc”, "Add Video/Audio" or "Add from folder" to import source files.
B. Click “Load file(s)” button or “Add video" button to import source files
C. Open the folder that contains source files, and drag and drop video, audio and image files to the program.


Step 2. Set Output Format.

Clicking the Format bar, you can choose output format from the format list or customize which formats to be shown on the list. Here we choose MP4 as the target format by click "common video" > " common video for android and apple device(*.mp4)".


Step 3. Set Profiles.

All formats here are set with optimized video/audio codecs, bitrates, frame rates, etc. But you can still specify as you like by clicking Settings button.

In the Profile Settings window, you can choose or specify exactly the parameters you like. And in the Task information section, you can compare the detailed information of the source video and the target video.


Step 4. Start Conversion.

Clicking the Convert button on main interface, you can go to Conversion window to start conversion. After conversion you can hit the "open" icon on the main interface to get the converted MPEG video and can transfer to the portable devices or importing iMovie for editing.

Note: If you are looking for a more cost-effective video converter for Mac OS X E1 Capitan, Pavtube Video Converter for Mac and Pavtube HD Video Converter for Mac may be suitable for you. It can also handle this task easily and efficiently.

Read More:

Thursday, October 15, 2015

Alternative to XMedia Recode for OS X El Capitan

XMedia Recode is a Freeware video and audio transcoding program for Microsoft Windows developed by Sebastian Dörfler. It can import and export many types of files such as WMV, MP4, MP3, 3GP, Matroska and more. XMedia Recode can convert unprotected DVDs or DVD files to any supported output file. XMedia Recode features a drag-and-drop style interface and uses job queuing and batch processing to automate the task of transcoding multiple files.

If you just switched to Mac, you will find there is no Mac version of XMedia Recode. Being so used to XMedia Recode, how you can finish your task without it? Don’t worry, without XMedia Recode for Mac, you can use alternative to XMedia Recode for file conversion. This article introduces a smart free Pavtube iMedia Converter for Mac replacement and a professional XMedia Recode Mac alternative to manage file conversion for you.


Other Download:
- Pavtube old official address: http://www.pavtube.cn/imedia-converter-mac/
- Cnet Download: http://download.cnet.com/Pavtube-iMedia-Converter/3000-2194_4-76177788.html


Alternative to XMedia Recode for OS X El Capitan

Step 1: Add files.

Click the "Load file(s)" or "Add video" button to import files


Step 2. Set output format

Clicking the Format bar, you can choose output format from the format list or customize which formats to be shown on the list.


All formats here are set with optimized video/audio codecs, bitrates, frame rates, etc. But you can still specify as you like by clicking Settings button.

Step 3. Edit Video.

In the Profile Settings window, you can choose or specify exactly the parameters you like. And in the Task information section, you can compare the detailed information of the source video and the target video.


In “Video Editor” there are seven edit tabs: Trim, Crop, Text Watermark, Image/Video Watermark, Effect, Audio Editor and Subtitle. 


Play/Pause: Click to start playing the current video or pause the playing.
Stop: Click to quit playback.
Previous Frame: Click and go back to the previous frame.
Next Frame: Click and go to the next frame.
Left square bracket: Click to set the start time for trimming.
Right square bracket: Click to set the end time for trimming.
Flip Horizontal: Click to flip the image horizontally.
Flip Vertical: Click to flip the image vertically.
Flip 90°towards left: Click to flip the image 90°towards left.
Flip 90°towards right: Click to flip the image 90°towards right.
Rotate counter-clockwise: Click to flip the image 90°towards left.
Rotate clockwise: Click to flip the image 90°towards right.
Reset: Click to restore default value. 
Step 4. Start Conversion

Clicking the Convert button on main interface, you can go to Conversion window to start conversion.
You can find conversion information on the window, such as Time elapsed, Time left, Generated size, and Estimated size.
Ticking off Shut down computer after conversion option, you can leave the program running and do other things instead of waiting around for the conversion.
After the conversion, you can click Open output folder to popup output directory with the converted files.

Read More:

Wednesday, October 14, 2015

How to Import Sony A7R II 4K XAVC S in iMovie for Editing?

About Sony A7R II

Like the Sony A7S before it, the A7R II is able to capture ultra-high-resolution 4K video (3840 x 2160), however, unlike the "S" model, it can record 4K video internally to the memory card (or via HDMI with an uncompressed 4:2:2 8-bit signal, as well). The A7R II makes use of Sony's higher bitrate XAVC S file format, which supports 4K bitrates up to 100Mbps. Full HD and 720p video recording is also offered in XAVC S format at 50Mbps.

For a fast and fluid workflow, people sometimes need to transcode A7R II 4K XAVC S video for editing in iMovie. XAVC S with MPEG-4 AVC/H.264 level 5.2, the highest picture resolution and frame rate video compression codec is much more than a video format that iMovie can support. According to our own experience and other user's feedback, to transfer Sony A7R II XAVC S footage to iMovie, the best workaround here is to convert Sony A7R II XAVC S to AIC MOV, the most compatible video format for iMovie

Check this short tutorial on how to convert A7R II 4K XAVC S video to Apple InterMediate Code for use in iMovie smoothly. Pavtube iMedia Converter for Mac will do the trick to transcode A7R II XAVC S footage to Apple Intermediate Codec for editing in iMovie smoothly without quality loss. If you are a Windows user, please turn toPavtube Video Converter Ultimate.


Other Download:
- Pavtube old official address: http://www.pavtube.cn/imedia-converter-mac/
- Cnet Download: http://download.cnet.com/Pavtube-iMedia-Converter/3000-2194_4-76177788.html


Other Download:
- Pavtube old official address: http://www.pavtube.cn/blu-ray-video-converter-ultimate/
- Cnet Download: http://download.cnet.com/Pavtube-Video-Converter-Ultimate/3000-2194_4-75938564.html

How to Import Sony A7R II 4K XAVC S in iMovie for Editing?

Step 1: Load iMovie project to the program.

Click "Add Video" icon to import XAVC S files to the program.


Step 2: Select output profile format.

From its drop-down option list, you can select "Apple InterMediate Codec(*.mov)" as the output file format.


Step 3: Start the Conversion.

When the conversion is done, hit right-bottom "convert" button to start the conversion process. After conversion finished, you can open the converted video and import them to iMovie directly without problem.


Read More:

  • Encode Sony A7S II 4K XAVC S to Apple Prores for FCP 6/7 Editing 
  • Import and Edit Sony PXW-F7S 4K XAVC-L to FCP X on Mac OS X El Capitan 
  • Import Sony RX100 IV XAVC S 4K Video to Final Cut Pro X Mac OS X El Capitan 
  • Import Sony XAVC MXF to Premiere Pro CC on Mac Yosemite
  • Sunday, October 11, 2015

    Play 2D/3D/4K Blu-ray on LG105UC9 with No Restriction

    There's a growing number of 4K TVs appearing, but they come with a price premium and very little supporting content. However, LG is ignoring 4K with its latest mammoth TV and instead has embraced what it classes as 5K resolution. It's called the LG Curved Ultra HD TV 105UC9. Here in this article, you will be informed of everything about the LG105UC9, and how to play Blu-ray video on LG105UC9, be it 2D, 3D or 4K Blu-ray format.


    LG has unveiled their 105-inch 105UC9 Ultra HD television feature which sports a 21:9 aspect ratio and an eye-watering display resolution of 5120×2160, and will be powered by LG's new webOS Smart TV platform. Thanks to the Tru-Ultra HD Engine, it will be able to detect any flaws during the upscaling process and adjust the image accordingly to ensure an "authentic" 4K viewing experience. However, when dealing with the Blu-ray video, there always are some tricky problems, say you cannot copy Blu-ray videos to LG105UC9 or can't play Blu-ray on LG105UC9 since Blu-ray discs are copy protected and has incompatibility problems with 5K TV- LG105UC9. To solve the problems perfectly, you need to convert 2D/3D/4K Blu-ray movies to unprotected common videos which is supported by LG105UC9.

    Pavtube BDMagic, regarded as the best 2015 Blu-ray Rippers, is bound to be your best aid to transcode, compress and convert 2D/3D/4K Blu-ray videos, for the new LG105UC9 with the readable format in superb fast conversion speed to save your time and high output quality. Through constant upgrade, it works flawlessly on Mac OS X, including the Yosemite (10.10) and the latest El Capitan (10.11). Plus, you can also trim, crop, add effect, merge files, and even customize resolution, frame rate, bit rate for video to keep the highest setting to get the ideal output effect. Here we take converting Blu-ray to LG105UC9 accepted ?HD MKV? format as an example.


    Other Download:

    - Pavtube old official address: http://www.pavtube.cn/blu-ray-ripper/

    - Cnet Download: http://download.cnet.com/Pavtube-BDMagic/3000-7970_4-75922877.htmlConvert Blu-ray for LG105UC9 watching with No Restriction

    1. Insert Blu-ray disc into your BD drive (Ensure that you have sufficient space on hard drive to store the Blu-ray). Launch the best Blu-ray to LG105UC9 ripper to load your Blu-ray files.


    Step 2: Select on "HD Video" the drop-down menu and choose "MKV HD Video(*.mkv)" as output format.


    Or you can get Blu-ray M2TS main movie by directly copy without any extras. Go to format bar to follow "Copy" > "Directly Copy" which is also suitable for playing on LG105UC9.


    Tip:

    1. You can adjust video and audio parameters, including the Bitrate of Video and Audio, the Codec of Video and Audio, Video Size, Sample Rate, Frame Rate, Audio Channels, etc., in the Profile Settings.

    2. Click “Edit” icon to enter Video Edit panel where various editing features are provided. Then polish the LG105UC9 file with those features given. For example, set video length with “Trim” tab, wipe out the black margin with “Crop” tab and insert with “Subtitle” tab.

    Step 3: Hit "Convert" button to carry out the 2D/3D/4K Blu-ray to HD MKV conversion process. Once the conversion is done, you can click "Open" button to get the output files, and then you can transfer converted video to LG105UC9 via USB. Now jst enjoy the Blu-ray movies on your LG105UC9 without limitations!

    In colusion, Pavtube BDMaic is designed for keeping your Blu-ray discs properly by converting them to some certain video format to realize free enjoyment on different devices at anytime and anywhere, for example, it has the knack for converting Blu-ray to other formats like MP4, MOV, AVI, WMV, FLV, etc. and directly to iPhone 6/Plus, iPad Air 2, iPad Mini 3, Apple TV 3, Kindle Fire HD Kids Edition, Galaxy S6/S6 Edge, Note 4, PS4KodiRoku 3, and more in a few clicks.. Never miss the 35% OFF/Giveaway for BDMagic at 2015 Summer Specia Offer. That’s all!

    Continue Reading: