Monday, March 30, 2015

Convert MKV files to iPad Air 2/iPad Mini 3 for Playing

This article shows you how to convert MKV to iPad Air 2/iPad Mini 3 supported video formats so that you can play MKV files with iPad properly.


With the Apple users' explosion, more and more people have a burning desire to play MKV files on their Apple portable devices or player, for example - iPad Air 2/iPad Mini 3. After you got the iPad, you may want to transfer some high-definition movies onto it for watching, such as transfer MKV files to iPad Air 2 and iPad Mini 3, but a lot of users have encountered the problems to play MKV on iPad Air 2/iPad Mini 3, let’s take a look first. 

In fact, the reason you cannot play MKV videos on iPad is simple: the default and downloaded player on iPad Air 2/iPad Mini 3 cannot find a suitable decoder for the file. Currently iPad Air 2/iPad Mini 3 as the old version only supports limited videos in .m4v, .mp4, and .mov formats. And as far as I know, there’s few video player for iPad can support DTS audio codec well. A fast solution I’ve worked out is to converting MKV to MP4 for iPad Air 2/iPad Mini 3 tablet. 

How to Convert/Play MKV on iPad mini 3 and iPad Air 2?

Pavtube Video Converter Ultimate - Which can help you transfer MKV HD video to iPad compatible video format, sync output video to iPad Air 2/iPad Mini 3 via iTunes, and now watch MKV video on iPad 2/3/4/Mini/Air! Besides MKV video files, this MKV to iPad Air 2/iPad Mini 3 converter supports nearly all the video formats, such as Blu-ray, DVD, AVI, WMV, FLV, MOV, MP4, M4V, MTS, VOB, etc. It is an useful tool for your iPad and other playable devices. One important feature of the video encoding software is to prevent any video/audio sync problem based on its perfect audio and video sync technology. Read the Review. 

For Mac users, you can turn to iMedia Converter for Mac. Refer to the guide for Play MKV on iPad mini 3/iPad Air 2 on Mac. 

Now,Just get the right one according to your situation. and follow the step-by-step guide to start the MKV on iPad mini 3 and iPad Air 2 playback conversion. 

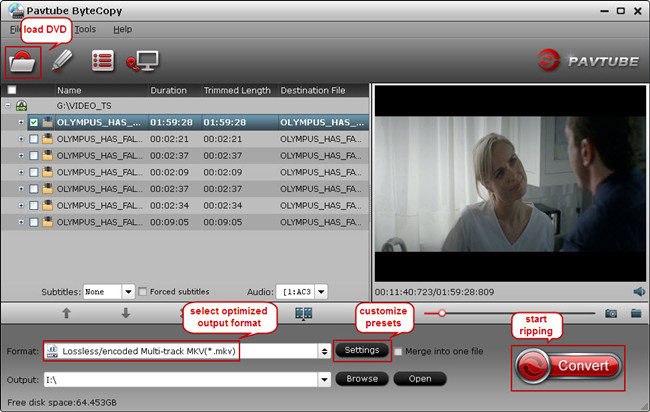
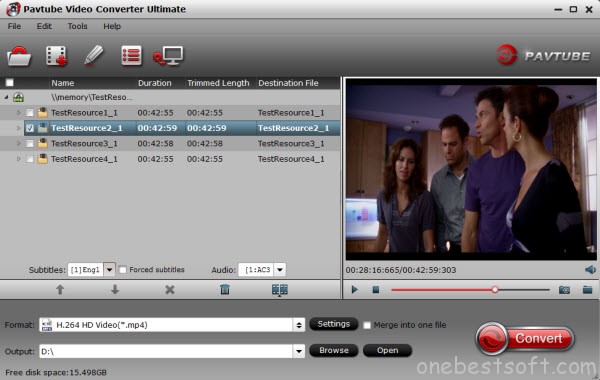
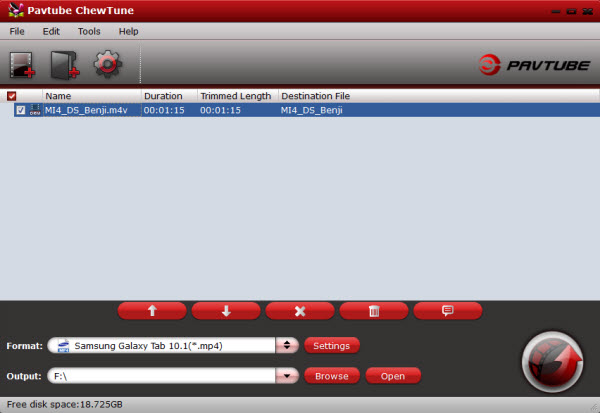
Step 1. Load MKV files

Run the MKV converter for iPad. Click "Add File" to load one or multiple .mkv file(s) into the program. Batch conversion is supported so that you can add multiple files for conversion at a time.


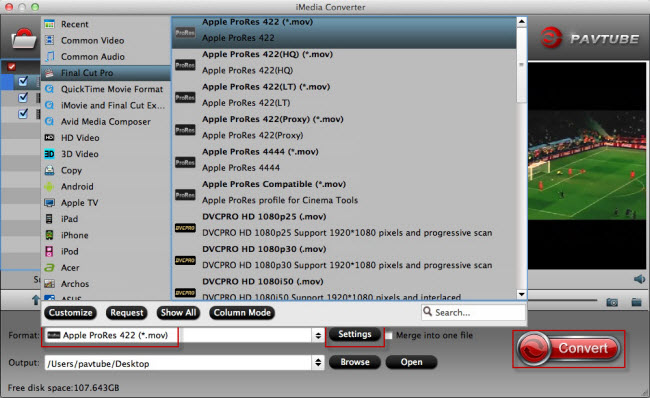
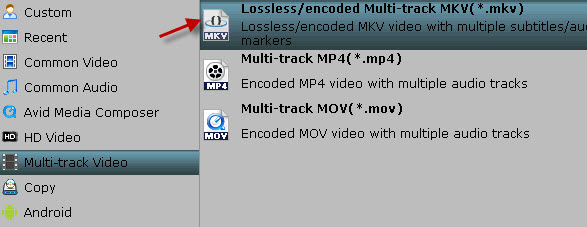
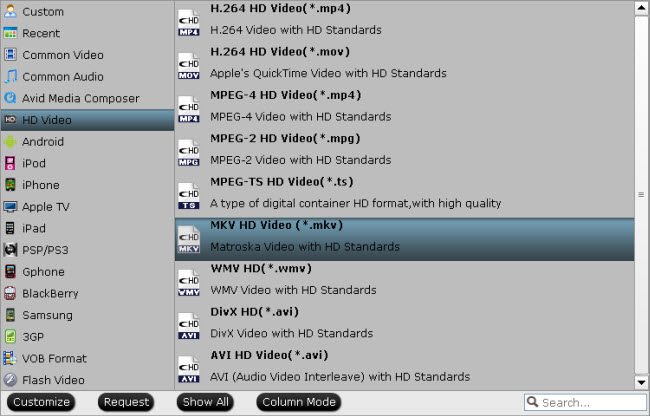
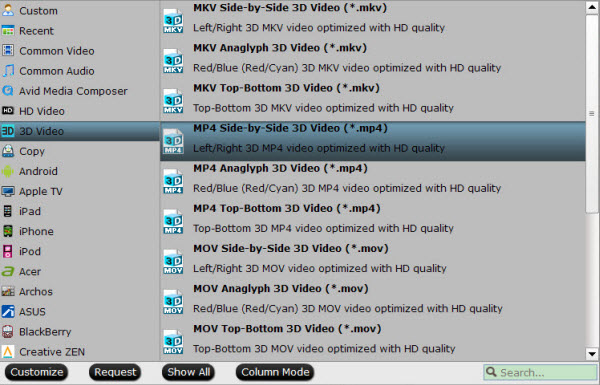
Step 2. Set video format for iPad Air 2/iPad Mini 3

Set output video file format for your device. Here you can go to Format > iPad and then select “iPad > iPad Air HD Video (*.mp4)”.Or you can click format bar and choose common video format mp4 supported by iPad Air 2, iPad mini 3, iPhone 6 plus, etc. 


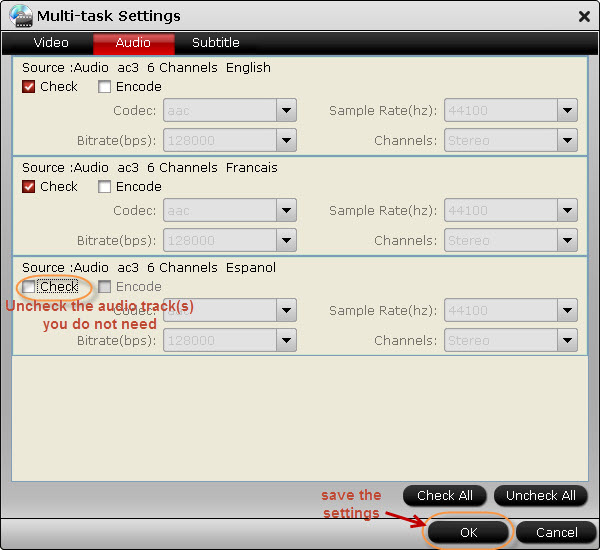
Tip: If the preset video/audio parameters can’t meet your needs, just click Settings icon to adjust the video bitrate, codec, frame rate, audio sample rate, audio channel, etc. 

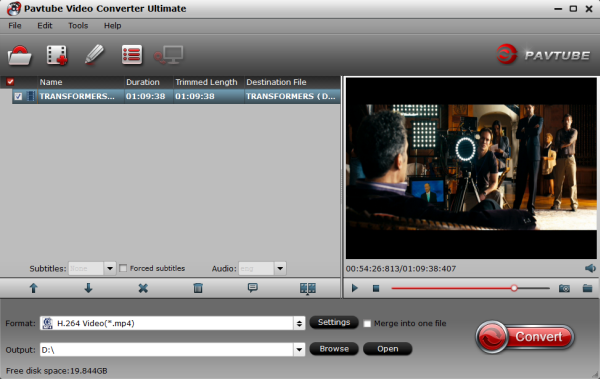
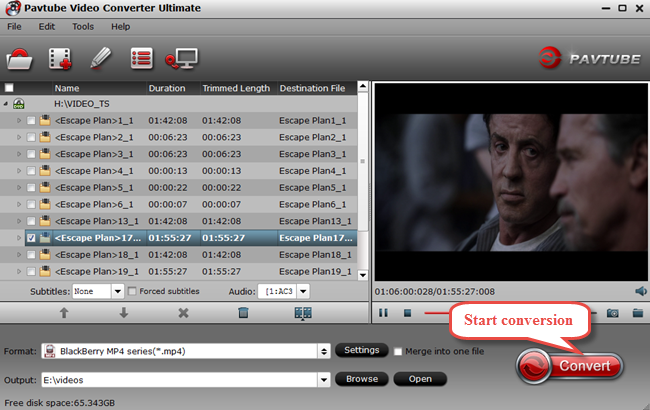
Step 3. Start the MKV files conversion 

You can hit the big red “Convert” to start converting MKV HD Video files to MP4 with best video settings for iPad Air 2 and iPad Mini 3. After the conversion, click “Open output folder” in the conversion window, then transfer them to iPad, then you will be able to play MKV files on iPad Air 2 and iPad Mini 3 with compatible MP4 format.

Read More:

Friday, March 27, 2015

Convert MPEG-4 to Prores 422 for Final Cut Pro Editing

Summary: How to transcode MPEG4 files to Final Cut Pro on Mac OS X? In this article, you will learn how to Convert MPEG-4 to Prores 422 for FCP Editing on Mac.
 

MP4 or MPEG-4 Part 14 is a digital multimedia format most commonly used to store video and audio, but can also be used to store other data such as subtitles and still images. But now maybe you are looking for a program that can convert MP4 to Apple ProRes 422 codec for Final Cut Pro X/7/6 (Just like iMovie)editing, since FCP best supported editing codec is Apple ProRes, a lot of Mac FCP users convert video to Apple ProRes codec for editing. 

When trying to import some MPEG-4 file into Final Cut Pro, you may find that the MP4 video is extremely chopping and a green frame pops into the pictures on playbacks every few seconds. In this circumstance, you need a MPEG to ProRes Converter for Mac to convert MP4 to ProRes, more editing-friendly format for Final Cut Pro. 

This software will convert MP4 to Apple ProRes 422/4444 with best video and audio quality, video and audio synchronization is perfectly guaranteed, nearly all the video formats are supported, including MKV, AVI, WMV, MOV, M4V, FLV, AVCHD, MTS, M2TS, MXF, Canon camcorder recordings, Sony/Panasonic recordings, etc. 

How to convert MPEG-4 to Apple ProRes codec on Mac? Please follow the easy steps below.

Step 1: Free download and install MP4 to FCP Converter for Mac, Install and run this MP4 to Apple ProRes converter, import the MP4 videos that you want to convert on Mac.


Note: it's best Apple ProRes codec converter on Mac OS. Rich formats are supported to import and output, presetted output formats for FCP X/7/6, iMovie, Avid Media Composer, Final Cut Express, Adobe Premiere, etc. 

Step 2: Just click and choose Final Cut Pro -> Apple ProRes 422 (*.mov) as output format, this is best codec for Final Cut Pro X/7/6 editing, once converted MP4 to this codec, you won"t have any importing or editing problems.


Learn more Apple ProRes, please refer to Types of Apple ProRes Codecs. 

Step 3: Finally click the “Convert” button to let the program convert MPEG-4 files to Apple ProRes 422 codec on Mac. when the MP4 to FCP Apple ProRes codec conversion finished, you can load the converted files to Final Cut Pro X and edit natively, just take a free try now! 
 

Read More: 

Wednesday, March 25, 2015

Convert ISO files to MKV in both English and Hebrew audio

Want to rip ISO images to MKV with English and Hebrew audio, let’s talk about ISO to MKV Converter and how to keep both audio at first.

Q: “ I want to transfer it to HD MKV movies, but can not find the way so i can have it in different audio ( english and hebrew) and also to have few subtitles ( hebrew and english)  is there a way to do it ? i can not mark more then one in the program, and when i mark Hebrew for subtitles, i can not even play it without subtitles...”
  
Nowadays many folks like backing up their DVD discs into ISO image files for managing their DVD movie in an easy way. ISO images are stored in an uncompressed format. If you’re intend to put and play the ISO files with english and hebrew audio. It’s impossible.  you need to do some work in advance.


In fact, with the right program, you can get all done easily and quickly. I recommend you Pavtube Bytecopy, which is special designed for users to rip Blu-ray/DVD ISO files to MKV with multiple audio tracks(english and hebrew). Moreover, it's also a professional Blu-ray/DVD ripper, allows you to rip and convert Blu-ray/DVD discs to any video format you like. Intimate is, there are many optimized presets for tablet and smartphone, including Kindle Fire HDX, Google Nexus 7/Nexus 10/Nexus 4, Galaxy S6/S6 Edge, Galaxy Tab 4, iPad Air 2, iPhone 6 Plus etc. which will give you best video quality.
  
Note: If you are a Mac user, you can turn to ByteCopy for Mac. Now get the right version and follow the below guide to finish converting ISO to MKV with english and Hebrew audio. 

Easy Solution to Convert ISO files to MKV in both english and hebrew audio 
  
Step 1. Free download the best Blu-ray/DVD ISO to multi-track MKV converter, install and launch it. Click "Load disc" button to import my source movie from disc drive. 


Step 2. Choose "Lossless/encoded multi-track MKV (* mkv)" from "Multi-track Video" under "Format" as output format. The profile exports Blu-ray/DVD ISO to MKV with more than one audio track.


Step 3. 4. Adjust profile settings to save both English and Hebrew audio tracks. Click the “Settings” button next to Format Tab, switch to “Audio” option and unchck other audio tracks and only leave English and Hebrew audio, and save your settings. 


Step 4. Then hit the big "Convert" button on ByteCopy main UI and rip ISO movies to multi-track MKV with english and hebrew audios. Once it finishes, open output folder and get the created multi-track MKV movie for watching on both TV and tablet. 

Read More:

Monday, March 23, 2015

Playing 2D/3D video files with AC3 audio in Gear VR

Here is my guide to transferring and playing 2D/3D movies with AC3 audio on the Samsung Gear VR for watching everywhere.


“ Has anyone been able to figure out how to play videos with AC3 audio inside Gear VR? When I play such (2D or 3D) videos, the video plays fine but there is no sound and I get a pop-up that the audio codec is not supported. In non-Gear VR mode, the stock video player can play such files with video only but the BS Player app can play such files just fine with both video and audio. Since most of my videos have AC3 audio, it is a real pain if I have to convert the audio every time before copying such video files from the PC to Note 4 SD card. “ 

I searched through several threads on the forum and after much frustration haven't found a solution to my problem yet. Fortunately, I got the best solutions and I can achieve enjoy my favorite 2D/3D video files with AC3 audio in Gear VR at everywhere. Yes, the Pavtube Video Converter Ultimate helped me out! This all-in-one Blu-ray, DVD and HD video converter. Convert latest Blu-ray and DVD to Samsung Gear VR compatible video as well as other video formats, you can also edit various video formats easily. Moreover, it allows you to do simple editing to the videos such as cropping, altering video dimension, adding special effect, and adjusting video or audio parameters and supports batch conversion.
  
In addition, it supports 150+ video presets for popular devices like the iPad, Android devices, game console, etc. For Mac users, get the equivalent Mac version. Just get the right version and follow the steps below to convert 2D/3D video files with AC3 audio in Gear VR.


Easily Convert 2D/3D video files with AC3 audio in Gear VR 

Firstly, free download and install Pavtube 3D Video Converter for Gear VR. 

Step 1: Click “Add Video” button on the main interface to load your 2D/3D Movie files to the program. (Drag & Drop function is included.) 


Step 2: Set the output audio as AC3 with 5.1 channels. Click “Format > HD Video > MKV HD Video(*.mkv)” as output codec for transcoding MKV DTS to MKV AC3 or AAC with 5.1 channels. If you only want the audio, no video, please select Common Audio (*ac3) as output format.


Tip: If you just wanna rip the 2D/3D movie files to your Gear VR, you can choose the “3D Video > MP4 Side-by-Side 3D Video(*.mp4)”


Note: To learn more about the differences between Anaglyph 3D and Side-by-Side 3D, you can click the link for more info. 

Step 3: Adjust conversion specs and 3D effect (Optional)

Adjust the video and audio parameters including the Bitrate of Video&Audio, Video Size, Sample Rate, Frame Rate, Audio Channels, etc., by clicking the “Settings” button on the main interface for getting the best quality.

Step 4: Start conversion for Gear VR
  
Now back to the main interface and hit "Convert" to start the conversion. Wait for moments till the conversion completed, then click "Open output folder" to quick locate converted SBS 3D MP4 videos, then, you can transfer the converted video files on your Samsung Gear VR for enjoy your fantastic 2D or 3D movies with 3D effects on Gear VR at anytime as you want. 

Read More:

Friday, March 20, 2015

Best Way to Convert iTunes DRM to SBS 3D to Galaxy Note 4 in Gear VR

Does anyone know how to export downloaded movies from iTunes onto the Note 4 so I would be able to watch them in the Gear VR? 

The Samsung Gear VR has plenty of potential, but it is limited by a sparse content store out of the box. The positive is that Samsung and Oculus have made it easy to import and watch your own movies in virtual cinema mode. If you have some purchased iTunes movies, you may want to watch these movies on Samsung Gear VR in Oculus Cinema. In this article, we will show you how to move our iTunes library, especially the iTunes download videos with DRM protection to Gear VR? Can we make iTunes movies into 3D for better visual effect on Gear VR? Is it feasible? 


Here is A great Pavtube ChewTune + Video Converter Ultimate bundle (Now: $74.9, save $19.1) helps you out! Pavtube ChewTune is specially designed for iTunes purchased videos with the ability of removing DRM protection, so you can free move the videos to your Galaxy Note 4 in Gear VR for freely playback; while Pavtube Video Converter Ultimate, which works as a 2D/3D Movie Converter Ultimate, can easily make your decrypted iTunes videos into Side-by-Side 3D without hassle! 

How to convert iTunes DRM movie into 3D for watching on Gear VR? 

Section One: Digital Copy DRMed Movies for Galaxy Note 4  

Step 1. Launch Pavtube DRM Removal, import iTunes videos. 

Drag and drop your videos to it directly, or you can click icon to import them as below.
Let’s click the drop-down-list besides “Format” and choose “Same as the source video”. 


Step 2. Start DRM removing. 

Now click the big red icon to start converting DRM videos. It’s better not to watch/edit videos during the conversion. After conversion, click “Open output folder” to quick locate the converted video. 

Section Two: Decrypted the removed Movies 2D Movies into Side-by-Side 3D
Step 1. Run Pavtube Video Converter Ultimate, drag and drop to import the fresh new DRM removed videos. It supports batch conversion, you can import and transcode multiple movies files at one time. 


Step 2: Click format list and choose “3D Video > MKV Side-by-Side 3D Video (*.mkv)” and hit “Convert”. 


Step 3: If you like, you can click “Settings” to change the video encoder, resolution, frame rate, etc. as you wish. According to my experience, the file size and video quality is based more on bitrate than resolution which means bitrate higher results in big file size, and lower visible quality loss, and vice versa. 

Note: You can also rip 3D Blu-ray movie from Blu-ray disc and Blu-ray movie folder and output SBS, Top-Bottom, Anaglyph 3D MKV, MP4 videos supported by Samsung Gear VR. 

Step 4: After conversion, we can hit “Open” to find the generated 3D videos. After setup your Galaxy Note 4 on your Gear VR, open your Note 4 local storage and find the ripped movie, touch-hold to find the copy option, choose "Device storage > Oculus > Movies > My video" as target file path to paste to. Now get your Gear VR to watch your own 2D/3D movies in Oculus Cinema there! 

Further reading: