Thursday, May 22, 2014

How to Put DVD onto Zune/ Zune HD for Playback with best A/V quality

The tutorials describe the way about ripping DVD to Zune/Zune HD for playback with best A/V quality.

Zune is a product line of portable media players manufactured by Microsoft. The Zune HD was a portable media player in the Zune product family which was a direct competitor with the Apple iPod and iPhone series of mobile devices. It was initially released in 16 and 32 GB capacities which provide online music, video, and podcast downloads. You can share files wirelessly with other Zunes and via USB with Xbox 360s and Windows PCs. Any Zune can also be synced wirelessly with a Windows PC. 

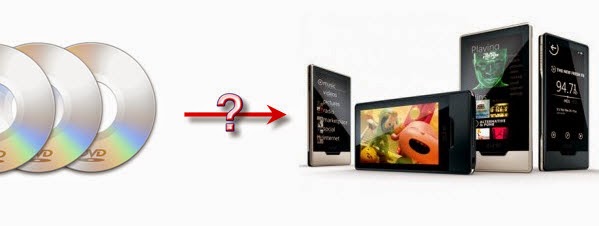
If you happen to own a Zune/Zune HD device and want to transfer your purchased DVD movie or extract beautiful DVD background music to it for watching. Let's take a look at video/audio formats Zune HD supports first:

Video Support: 

  • WMV 
  • MPEG-4 (MP4/M4V) (.mp4) Part 2 video 
  • H.264 video 
  • DVR-MS 

Audio Support: 

  • Windows Media Audio Standard (WMA) (.wma) 
  • WMA Lossless 
  • Advanced Audio Coding (AAC) (.mp4, .m4a, .m4b, .mov): .m4a and .m4b files without FairPlay DRM
  • MP3 (.mp3) 

The Zune converter software is easy to use, works flawlessly. Super fast conversion speed with high quality give you everything you need to put DVD on Zune/Zune HD. 

To get hundreds of DVDs playable with a remote control on Zune/Zune HD, the best choice is to rip and convert DVD to Zune supported video and audio format. To get it done, Pavtube DVDAid is the best tool for you which is easy to use and works flawlessly. Super fast conversion speed with best A/V quality will give you everything you need to put DVD on Zune/Zune HD. The Mac version is DVDAid for Mac . Below is guide for you to learn how to convert DVD to Zune device for watching or streaming.
Great News! To thanks for your continued support all along our previous site and the new www.multipelife.com, we are holding a 'New Site Special' with fantastic discounts up to 40% off, pay less to get more powerful Pavtube Blu-ray/DVD backup tools! 
Like us to get 20% off BDMagic(Blu-ray Ripper), 30% off ByteCopy, 40% off DVDAid(DVD Ripper) and 20% off Video Converter Ultimate on Windows/Mac platform: 
https://www.facebook.com/pavtubefans/app_209569249055691
Read more: http://device-camcorder-tips.blogspot.com/2014/05/pavtube-release-new-site-and-special.html
Step 1: Run Pavtube DVD to Zune Converter, and load DVD files to it. You can click "DVD ROM" to load movie from DVD drive or "ISO/IFO" DVD ISO file.


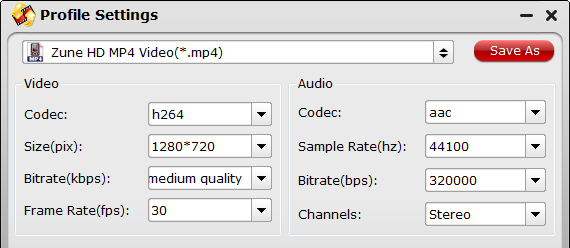
Step 2: Select output format for Zune/Zune HD. Click on the drop-down list at the opposite side of "Format", and then choose the format from "Zune/Xbox 360 Device" option like "Zune HD MP4 Video(*.mp4)" for streaming DVD rips to Zune device.


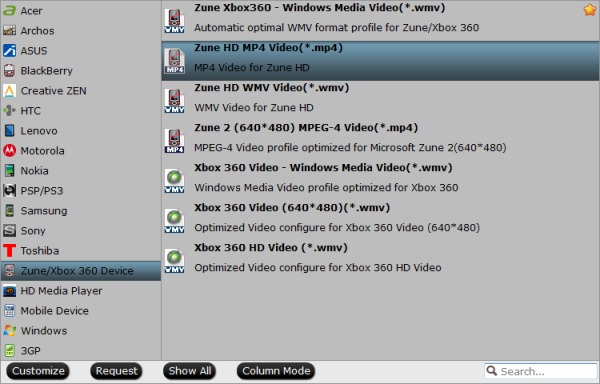
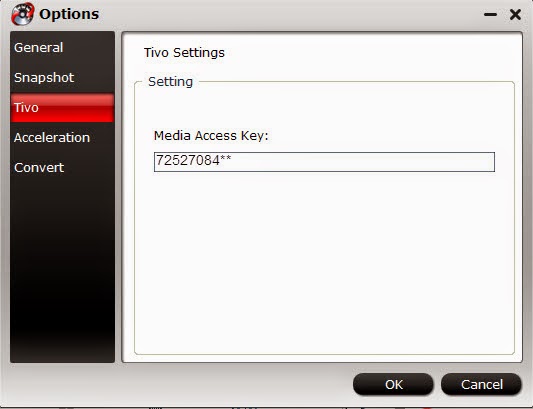
Tip: This Zune DVD Ripping Tool let users control/customize output file quality. To improve video quality, simply click "Settings" and set video bitrate up.


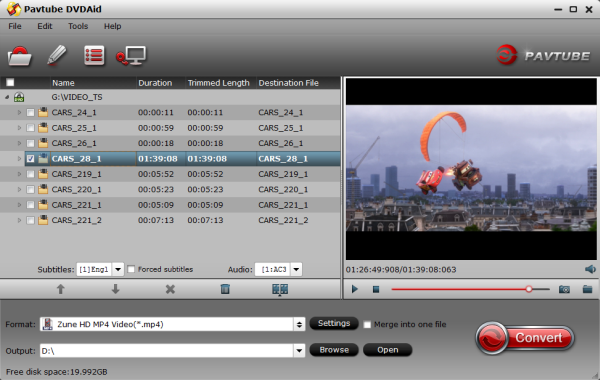
Step 3: Start ripping DVD to mp4 video for Zune playback.

Click "Convert" button to rip DVD to Zune/Zune HD, once the ripping task is finished by Pavtube DVDAid, you can click "Open" button at the bottom of the main interface to get the output mp4 file.

You can now begin to transfer them to your Zune/Zune HD with the sync of Zune Software and put them on Zune player for freely enjoying.

Just so easy to convert DVD to Zune! Enjoy!

More related:
Tips: If you also want to enjoy Blu-ray/DVD movies to 3D videos for playback, trying Pavtube Bytecopy (Win/Mac), which can help you to backup your BD/DVD keeping original subtitle streams and multi-track audios.

Wednesday, May 21, 2014

What Are DVD-5, DVD-10, DVD-9 and DVD-18?

This article will explains what Are DVD-5, DVD-10, DVD-9 and DVD-18, the difference between them and intrudoct some useful DVD tools to all of you.

Are you a DVD lover? As we know, DVD is an optical disc storage media format. Compared to CD, DVD offers higher storage capacity with the same dimensions and is widely used by people to store data and information nowadays. Generally speaking, there exist 4 types of DVDs including DVD-5, DVD-9, DVD-10, and DVD-18. Now follow this article and have a comprehensive understanding of these different sizes of DVDs. 

DVD-5, DVD-10, DVD-9 and DVD-18

  1. DVD-5 is a single-sided single-layer disc, can hold about 4.7 GB (4.38GiB) of data and is supported by DVD+R, DVD+RW, DVD-R and DVD-RW. It is the most common DVD media.
  2. DVD-9 is a single-sided dual-layer disc, can store 8.5 GB (7.96GiB) of data. It is supported by DVD+R and DVD-R formats. It is also called DVD+R9/DVD+R DL, DVD-R9/DVD-R DL.
  3. DVD-10 is a double-sided single-layer disc, can contain 9.4 GB (8.76GiB) of data with 4.7 GB on each side, equivalent to two DVD-5 discs and is supported by DVD+R, DVD+RW, DVD-R and DVD-RW formats.
  4. DVD-18 is a double-sided dual-layer disc, can hold 17.1 GB (15.93GiB) of data with 8.5 GB on each side, equivalent to two DVD-9 discs. It is supported by DVD+R format.

See Also: Blu-ray Disc Encryptions: Regions and BD Region Hack

Tips about DVD burning, DVD copying and DVD ripping

1. If you want to enjoy your favorite DVD movies on Android OS, Apple iOS, Windows RT/Pro devices, game consoles HD media player, editing programs and home theater. Pavtube DVDAid is your ideal tool to rip DVD to all popular video formats for playback. It has helped thousands of customers to backup or rip them DVD disc, folder, IFO and ISO image files which offers various outputting presets exactly according to device model, it couldn’t be easier for users to make their choices. Besides that, it also offers many small video editing options to help user trim, crop source movies, add subtitles, or edit the audio.
  
2. If you want to backup your DVD movies, you can use Pavtube DVDAid. It is an easy-to-use DVD copier to backup DVD movies to hard drive losslessly. For customers who want to make 1:1 copy of original DVD Disc without quality loss with all audio streams, subtitle tracks, extras, etc. “Full disc copy” is the most recommended feature. Plus, "Directly copy" option will help you copy DVD main movie content and leave out extras, commentary, etc. with outputing an intact m2ts file of the main title.

In conclusion, Pavtube DVDAid integrates DVD backup and DVD transcoding features to help users simply choose the best video presets according to their own terminal requirements in one go. (See also: Store/Rip DVD disc on Windows 8.1 with original quality)

3. If you want to burn videos to DVD discs, you can use Pavtube DVD Creator to burn and back up all kinds of videos to playable DVD with ease.

Breaking news: Pavtube New Site (multipelife.com) is offering new money saving bundles for DVDAid and DVD Creator.

DVDAid($35) + DVD Creator($35) = Only $35.9, Save $34.1

With either bundle package, not only can you save more money, you will get the most powerful combination from Pavtube to handle Blu-rays, DVDs, regular videos as well as DRM protected videos files at this Special Offer Page. Never miss!!!

See also:

Good News! Pavtube Release a New Site - multipelife.com with Product Migration and Name Change.

To thanks for your continued support all along our previous site and the new www.multipelife.com, we are holding a 'New Site Special' with fantastic discounts up to 40% off. You can get 20% off BDMagic, 30% off ByteCopy, 40% off DVDAid and 20% off Video Converter Ultimate on Windows/Mac platform:https://www.facebook.com/pavtubefans/app_209569249055691

Read more: http://device-camcorder-tips.blogspot.com/2014/05/pavtube-release-new-site-and-special.html
  

Sunday, May 18, 2014

How to make free blu-ray ISO image file from commercial blu-ray discs?

Description: This article will give you the best way to create Blu-ray ISO file from commercial Blu-ray discs so that you can get them work in PowerDVD or WinDVD or play them on Blu-ray players. 

As an advanced disc format, Blu ray can store more data of higher quality and capacity. So it is not an easy thing to backup/copy Blu ray files because it will have more protections. Plus, when you got a bunch of Blu-ray backups, you may also wanna make an .iso out of these ripped Blu-rays for widely use or reduce the physical drive’s frequency of utilization.

Then how to create BD ISO File from Blu-ray disc? If you are confusing about making ISO copy of a Blu-ray disc, this article may help you figure out a way.
 

To accomplish the task, we need the aid of a software called Patube BDMagic which can decrypt Blu-ray discs with AACS,BD+, etc and copy Blu-ray content with ‘BDMV’  and ‘CERTIFICATE’ folder for burning.

Overall, Pavtube BDMagic is designed as a professional Blu-ray/DVD converting program which works with 1:1 backup solution and convert Blu-ray/DVD to MKV/MP4/MOV/M4V/MPG/FLV/AVI/WMV, etc. Well I haven’t got the chance to try every profile, but it’s really the best Blu-ray/DVD backup tool I’ve met ever; I mean it’s ease of use, not fuss and simple to follow. This best Blu-ray Ripper can rolls off Blu-ray/DVD disc protection, supports loseless 1:1 Blu-ray backup and keeps all the disc titles and chapter structure perfectly.  
They provide free trial (no time limitation) before purchase; and you can reach the Mac version here.  

Below guide will show you how to make BD ISO from Blu-ray. Please note a Blu-ray drive is needed before conversion. Regular DVDdrive cannot handle BDs.

Copying blu-ray directory to PC

Step 1.  Load Blu-ray movie to Pavtube BDMagic.Run Pavtube Blu-Ray Coping tool and you will see the below interface. Click the "BD/DVD" icon to load Blu-ray movie from external/internal Blu-ray Disc Drive. Ensure your computer network unblocked in order to crack Blu-ray Disc copy-protection.


Step 2. Specify an Output location for saving the blu-ray movie.  

Click "Browse" icon and  browse to your desired location. 

Note: make sure there is enough space for a  blu-ray movie. 

Step 3. Decrypt and back up  blu-ray contents to hard drive.

Click the “Copy the entire disc” icon on the top to output 1:1 Blu-ray file exactly the same as original. The prompt window shows you the progress and generated  size. Click ‘Cancel’ if you feel like aborting the task.

Basically, the whole contents of the disc, including the main movie, commentary, sidelights, trailer etc, will be copied to PC within an hour. With the Blu-ray and DVD structure,  you do not have to create new menu when burning  the blu-ray movie to blank blu-ray disc for backup.  

When the copying process completed, click ‘Open’ button  to find generated blu-ray directory. The directory contains two folders, ‘BDMV’  and ‘CERTIFICATE’. To view the movie (m2ts files), please open BDMV STREAM  folder. The m2ts files can be played with VLC player and KMPlayer.

Burn the Blu-ray contents to Blu-ray ISO image file

Step 1. Load BDMV and CERTIFICATE Folder to Imgburn.

Once  that's done then using Imgburn choose 'Create Image from Files & Folders',  drag in the BDMV and CERTIFICATE Folder along with any extra files that in your  root folder outside of those two folders.


Step 2. Create blu-ray ISO image  file using the source blu-ray contents. 

In  Imgburn on the 'Options' tab set to UDF and 2.5. On the 'Labels' tab type the  name of the film in the UDF box. Then choose the destination where you want it  to build the ISO and set it going.


So far using this method all my Images play back perfectly in PowerDVD using Virtual Clone Drive to mount them with. 

How to Play Blu-ray ISO on computer& HDTV?

Software Download: Virtual BD Drive (this is a free tool), Blu-ray ISO player (this is trial of shareware)

Guide to follow: How to play Blu-ray ISO image file on HTPC?

For playing Blu-ray ISO with HD media player, you can choose WD TV Live Plus/Hub, Popcorn Hour A-210, or Dune HD Media Player.

Thursday, May 8, 2014

Catch Special and Hottest Gifts for your Mom at Pavtube 2014 Mother’s Day Promotion

Description: Haven't figured out a strategy or got any plan to show as well as tell your mom how much you love her at 2014 Mother's Day? Take a look at up to 40% off Specials and Deals from Pavtube Facebook!

Good news: 2014 Mother’s Day is just around the corner, have you got something unique and special for Mom? A bunch of flowers? It droops easily. A Mother & Baby Pendant, a bracelet, or a pair of earrings? Sounds nice but first you have to pick out the right style. LOL. Anyway, they can be easily lost too. So this Mother’s Day, let’s give mom a super surprise!

To thanks for your faithful support during the past years, Pavtube now offer 30% off ByteCopy, 40% off Ultimate Converter and 40% off DVD Ripper as 2014 Mother’s Day specials for your beloved Mom. It starts from May 8th to May 12th, five days in total. Time-limited! Never Miss these promotion items!

This is 2014 Mother's Day best Gift Idea from Pavtube Facebook


1. 30% off Pavtube ByteCopy Windows/Mac

A magic Blu-ray/DVD ripping software (Pro version), it’s not only capable of ripping Blu-ray/DVD to desire formats (MP4, MOV, M4V, TS, MKV, AVI, WMV, MPG, VOB, etc), but also offer a Multi-track preset to enable you backup movie to lossless MKV or MP4/MOV/ProRes with multiple audio tracks and subtitles, so that you can free choose wanted languages during playback. Now start watching your favorite BD/DVD discs with your deal mom.

2. 40% off Pavtube Video Converter Ultimate/iMedia Converter for Mac

The best deal of Ultimate Converter ever! With this tool at hand, you’re not only able to rip Blu-ry/DVD movies, but also convert footages of your Mom and make a easy-to-watch video to put on portable devices, computers, to video editing programs or uploading to your YouTube channel.

3. 40% off Pavtube DVD Ripper Windows/Mac

It has outputs for almost all the mobile devices, so you can start getting DVD movie library ready for your various Apple/Android/Windows Tablets and Smartphones like Kindle Fire HDX, iPad Air, Galaxy Tab Pro, Galaxy Note Pro, Galaxy S5, Google Nexus 7, Google Nexus 10, Nexus 4, Google Nexus 5, Sony Xperia Z2, Surface 2, Surface Pro 2, etc... This is definitely a good gift for frequent travelers. If you already bought a tablet or a smartphone for your mom, begin your journey with wonderful movie entertainment.

Like us at Facebook to get up to 40% OFF Mother's Day awesome Gifts (for fans only):

https://www.facebook.com/pavtubefans/app_201742856511228

More money saving bundles can be found here:

http://www.pavtube.cn/special-offer.html

From: http://bestvideosolution.blogspot.com/2014/05/2014-mothers-day-deal.html

Monday, May 5, 2014

Play TiVo recordings on Kindle Fire HDX, Kindle Fire HD and Kindle Fire

When you have captured TV shows and would like to enjoy them on your Kindle, you will find it difficult to put them to Kindle Fire HDX, Kindle Fire HD and Kindle Fire as the Tivo files are saved by digital video recorders with copyright protection. If you also have this problem to figure out how to play Tivo videos on Kindle, this article is right here to help you out.

Amazon's Jeff Bezos announced the new fall 2013 line-up of new Kindle Fires, now called the Kindle Fire HDX. The new HDX, like the previous models, will come in both 7- and 8.9-inch sizes and HD displays with resolutions of 1920 x 1200 (323ppi) and 2560 x 1600 (339ppi) respectively.


Well, anyhow this Amazon new tablet becomes much better for movie playback as the original Kindle Fire HD and Kindle Fire. If you want to freely take your favorite TV programs to Kindle Fire HDX for watching when travelling, you are suggested to transcode Tivo into MP4 format for that it’s well accepted by Kindle Fire HDX, Kindle Fire HD and Kindle Fire for steaming directly. To accomplish this, Pavtube Tivo to Kindle Converter is highly recommended for its easy interface, efficient workflow and reliable video quality.

For Mac users (include Mavericks and Mountain Lion), Mac Tivo Video Converter is recommended to you.

How to transcode Tivo files to Kindle series Tablets playable video format?

First, get it installed and let’s start to quick convert Tivo to proper video formats on PC with perfect videoaudio sync technology

Part 1: Transfer TV shows from TiVo to PC

It takes a while depending on length of TV program you are transferring. Make sure your TiVo and computer are in the same home network, and follow this guide to proceed TiVo file transfer:

1. On your PC, launch TiVo Desktop for PC (click to download), the freeware that transfers shows from your networked TiVo box to your computer.

2. Click “Pick Recordings to Transfer.” A window showing your TiVo box’s “Now Playing” or “My Shows” list appears.


3. Highlight any title in the list to see more information about the show. Check the box next to the title of the show (or shows) you want to transfer.

4. Click “Start Transfer.” Transfer times vary, but may take as long as the show’s duration to complete the transfer.


Part 2: Convert TiVo shows to Kindle Fire HDX, Kindle Fire HD and Kindle Fire friendly MP4 video

After transferring to computer the TV shows are saved as .tivo files. See below how to convert TiVo shows to Kindle playable videos.

Step 1. Open Pavtube Tivo to Kindle converter and press “Option” button. Switch to “TiVo” tab in Option window, and enter TiVo Media Access Key.

Tip: How to find your Media Access Key on TiVo: Go to “TiVo Central” menu >> “Messages and Set Up” “Account and System Information”, and your Media Access Key would be there.


Step 2. Drag and drop TiVo shows to the main interface for converting.

Step 3. Click “Format” and select an output profile for your Kindle Fire HDX, Kindle Fire HD and Kindle Fire.

Click the drop-down list on the bottom, select “Andoid” on the left, and then we will find all the presets for different models.

"Amazon Kindle Fire HD(*.mp4)" works well for Kindle Fire HDX 7-inch and 8.9-inch.

"Amazon Kindle Fire(*.mp4)" is compatible for Kindle Fire.

Or you can submit “kindle” in search box at the bottom right corner.


Optimize the settings – The default settings may not satisfy you, and you can click the settings button to change the settings by yourself. Keep in mind that the file size and conversion quality is based more on bitrate than resolution (bitrate higher results in big file size, and lower visible quality loss, and vice versa).

According to my experience, for watching videos on Kindle, 720p with 1500~2500kbps is just all right.

Step 4. If you’re happy with the output videos, just press the “Convert” button to begin encoding TiVo shows to MP4 for Kindle.

Once the encoding task completes, you can transfer the converted videos to your Kindle Fire HDX, Kindle Fire HD and Kindle Fire for viewing on the move when travelling.

If you have the intention to convert Blu-ray, DVD movies as well as your personal HD video files to Kindle playable format for playing, Pavtube Tivo to Kindle Converter can also do! It is a very affordable, fastest and most effective converter software.

Don’t know how to transfer converted video to Kindle? Read the steps below:

How to Transfer media files to Kindle?

You can transfer content files from a Windows or Mac computer to your Kindle Fire HD device, including books, music, video, photos, and documents, using the USB cable that came with your Kindle. Both Macintosh and Windows users can download and transfer compatible content files from a computer to Kindle Fire HD device using a compatible USB cable. When your Kindle Fire is plugged into your computer, it will appear as a removable mass-storage device. This method is highly recommended.

System Requirements to transfer files:
  • Windows-based: Windows Vista or later. Windows XP users may be required to update their copy of Windows Media Player. Visit the USB Transfer Tools page for details.
  • Macintosh: Mac OS X 10.5 or later. Note: Mac users need to install a free app, Android File Transfer, to complete a USB transfer. Visit android.com/filetransfer and follow the onscreen instructions.
  • USB port: An available port or an attached USB hub with an available port.

Step-by-step Instructions:

1. Connect Kindle Fire HD to your PC via USB.

2. Once you've connected your Kindle Fire HD to a computer with a USB cable (sold separately), your Kindle Fire HD will appear in the same location as external USB drives usually appear. For Windows users, this is typically in the "Computer" or "My Computer" menu.

3. Open the Kindle drive; you will see several folders inside. You may need to unlock your Kindle Fire HD before it can be opened on your computer.

4. Locate the downloaded file and drag and drop it into the applicable content folder, such as Video, Music, or Pictures.

5. Safely eject your Kindle Fire HD from your computer and unplug the USB cable.

Your content will appear within the corresponding content library on your device:
  • Books will appear in the Books library.
  • Personal documents will appear in the Docs library.
  • Music will appear in the Music library.
  • Pictures will appear in the Gallery app.
  • Videos will appear in the Gallery app. Note that videos transferred via USB will only be available in the Gallery app. Only videos from the Amazon Video store are shown in the Video library.

Now freely play your favorite TV programs on your Kindle devices when travelling.