Friday, January 31, 2014

Convert Sony 3D Bloggie MHS-FS3 video to 3D SBS video for playabck

Want to convert Sony 3D Bloggie MHS-FS3 3D MP4 file to 3D SBS videos without lossing any quality? This simple guide tells you to convert your 3D MP4 to Side-by-Side MKV/MP4/MOV/WMV/AVI on Windows/Mac.

Sony has always impressed us with its creative cameras, music player, computers, camcorders, and other innovative devices. With fast growing market of pocket video cameras, Sony has recently released world’s first HD 3D pocket camera to its Bloggie range of pocket camcorders, namely Sony 3D Bloggie HD Camera. Jump into exciting world of digital 3D with smartest and most affordable Bloggie 3D camera.


Here take a look at Sony Bloggie MHS-FS3 3D camera, as for recordings, users are presented with a few different options for 2D and 3D recording in MPEG-4 format with it. And due to the different technology required for the LCD screen to playback 3D without glasses, very wonderful experience! When in 2D mode, you see a vivid screen with no loss of quality. Once you are ready to shoot in 3D, simply click the 3D icon and your screen will fade to black and reappear in 3D mode.

Note that 3D recording can only be achieved in 1080p, which is actually fine for us. It gives us a higher resolution but gives you a higher resolution but not easy to handle. Then what should you do?

Of course, those 3D movies can also be viewed and edited in 2D, but is it possible to keep 3D effect preserved when editing or playing Sony Bloggie MHS-FS3 mp4 footage? Big Yes! To convert Sony MHS-FS3 recorded 3D mp4 to general 3D video formats, such as 3D MKV, 3D MP4, 3D MOV, 3D WMV, 3D AVI on Windows/Mac you need a professional yet easy-to-use 3D MP4 Video Converter.

Here recommend you the ideal conversion tool Pavtube Video Converter Ultimate or HD Video Converter or Mac which can not only freely and easily convert MHS-FS3 3d mp4 files to 3d Video (MKV, MP4, AVI, MOV, WMV) on Mac with perfect quality and fast conversion speed, but also offers several editing functions like cropping video dimension, trimming file length, adjust playing effects, etc. The converted 3D videos are well supported by mobile phones, different portable devices and many editng programs. What's more, each of which has profile of side-by-side, anaglyph, top and bottom 3D video preset.

Below is a brief guide for you to convert Sony Bloggie MHS-FS3 3D mp4 video to Side-by-Side(SBS) 3D MKV/MP4/MOV/WMV/AVI on Windows/Mac.

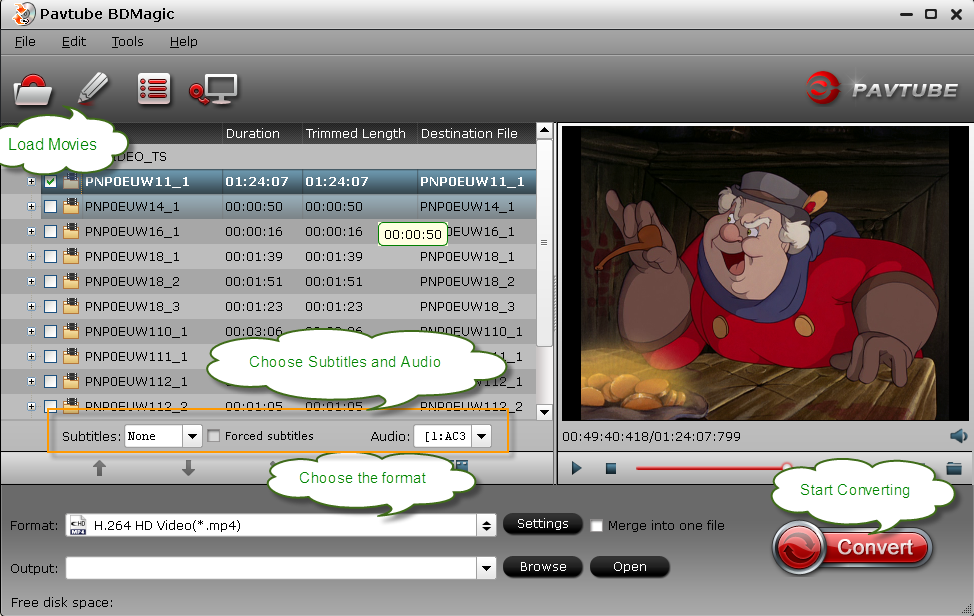
1. Download and install Pavtube Sony Bloggie MHS-FS3 Video Converter, Click "Add Video" or "Add from folder" icon to load 3d .mp4 video clips from Sony MHS-FS3 to the software.


2. Choose 3D MKV/MP4/MOV/WMV/AVI as the output format

Click format bar to choose output format, here you can choose 3D MKV/MP4/MOV/WMV/AVI for editing and playing. Among them, you will have Side-by-Side, Top-Bottom, or Anaglyph 3D three options. To get SBS 3D video, you can choose the Side-by-Side option.

For example, in consideration of burning to disc or playback on TV later, you are suggested to choose “3D Video>MKV Side-by-Side 3D Video (*.mkv)”.


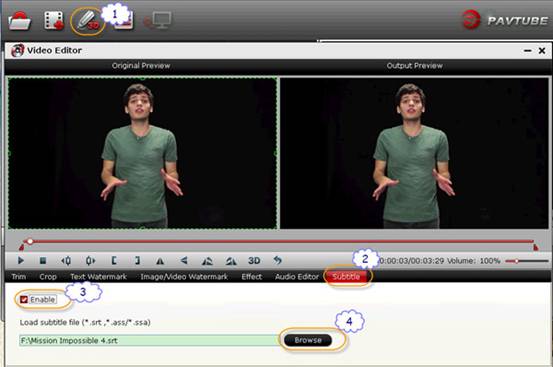
3. Adjust target video settings and 3D effect.

Click “Settings” which is next to “Format”, free change your target video size, bitrate, frame rate and 3D depth. If you want to get best video quality, pls switch them to “original”.

4. Start conversion.

Now hit the big red “Convert” to start converting videos to start converting Sony 3D Bloggie MHS-FS3 3D MP4 to SBS 3D video. After the conversion, click “open output folder” to quick locate the generated media file in 3D MKV/MP4/MOV/WMV/AVI format.

Now you can freely edit, play and share Sony 3D Bloggie MHS-FS3 mp4 videos. Just have a try now!


Related Articles:

3D MTS to 3D MOV Converter- Solve 3D MTS playback and editing issues
The way watching and enjoying 3D AVCHD on PC and Mac
Can FCPX process Sony 3D DEV-5 .mts footage?

From: http://handycameratips.jimdo.com/2014/01/31/convert-sony-3d-bloggie-mhs-fs3-mp4-to-3d-sbs-format/

Thursday, January 30, 2014

ByteCopy Settings Tutorial- Rip/Stream DVD to MKV/MP4/MOV with chapter structure

This tutorial aims to teach you how to backup DVD to MKV/MP4/MOV and preserve the chapter structure with ByteCopy.


First of all, what is ByteCopy

ByteCopy is a professional Blu-ray & DVD ripping/ video transcoding application.

Why should I use ByteCopy?
  • Automatically detect Blu-ray/DVD main movie
  • Full disc copy Blu-ray/DVD by chapters without quality loss
  • Rip/convert/backup BD/DVD to any other format for playback on any iOS/Android/Windows tablets and phones
  • Backup BD/DVD to MKV format with multi audio/subtitle tracks and chapter markers without any quality loss
  • Convert BD/DVD to MP4/MOV with multi audio (language) tracks
  • Add SRT, ASS, and SSA subtitles to BD/DVD movie
  • Edit BD/DVD movies: trim off commercials, crop off black bars, merge several chapters into one, split one movie into several pieces, and more
  • Support TrueHD 6.1 and TrueHD 7.1 decoding
  • Support latest BD and DVD
  • All of these are legally.

Where can I download ByteCopy

Get two programs together to save more money:

What OS is suitable for ByteCopy
  • ByteCopy for Windows (Required Windows XP, Vista, Window 7 or Windows 8, Windows 8.1)
  • ByteCopy for Mac OS X (Mac OS X 10.9 Mavericks, 10.8 Mountain Lion, 10.7 Lion, Snow Leopard10.6, Leopard 10.5)

Now your are sold lets get started!

To begin:

Launch the program and add the movie you want to encode by clicking the "add file" icon on the main interface. You can see the chapter information of your DVD movies on the main interface after you loading to the program.


Then choose the output format. In order to preserve the chapter structure, you'd better choose the "Multi-track Video". Under this profile, you have three choices which all can preserve chapter structure. If you choose the MKV format, you can output the BD/DVD with lossless quality and allow multiple audio tracks, multiple subtitles.

One special function that makes ByteCopy stands out is you can easily select you needed tracks, subtitles.


The last thing you need to do is hit the "Convert" button to begin the conversion. Just wait a moment and then you can output the MKV/MP4/MOV videos with the chapter structure. Have a fun of it!

Some posts you may interest:

Wednesday, January 29, 2014

Get Blu-ray/DVD/VCD collection backed up on Apple TV 3 with 1080p format

This article will show how to get Blu-ray/DVD/VCD collection backed up and at the same time get them converted to 1080p format supported by Apple TV 3.
Apple TV is a digital media player, it is a small network appliance designed to play digital content from the iTunes Stone, Netflix, YouTube, iCloud, etc.

Supported formats:


Video: 
  • H.264 up to 720p at 30 frames per second (1st & 2nd generation)
  • H.264 up to 1080p at 30 frames per second (3rd generation)
  • M4V
  • MP4
  • MOV
  • MPEG-4
  • Motion JPEG
Audio:
  • HE-ACC (V1)
  • ACC
  • MP3
  • AIFF
  • WAV
  • Dolby Digital (5.1 surround sound pass through) (aka AC-3)
The supported formats show that Apple TV does not support to play DVD directly. However, I want to get my DVD and VCD collection backed up and at the same time get them converted to 1080p format which supported by my Apple TV 3, so that I could use the output video for entertainment playing on TV.

Then I searched in google using “dvd video converter”, Pavtube does not figure in the top results while the other like wondershare, avs, ameersoft, etc, but I was luck to just do a random search to compare with wondershare before I bought and come across Pavtube Video Converter Ultimate (Mac version: iMedia Converter for Mac). It is easy and quick to get started with UI. The most important thing is the support for Apple TV 3 format.

How to convert Blu-ray/DVD/VCD to 1080p format for Apple TV 3

Step 1: Load DVD

Insert the program to your computer, and then launch it. Click the “Load file” icon to load your Blu-ray/DVD/VCD files. It also supports ISO/IFO files.
 
backup Blu-ray/DVD/VCD on Apple TV 3

Step 2: Choose out put format

Pavtube has designed many different formats for Apple TV. In order to get the most suitable format for my Apple TV 3, I usually choose “Apple TV 3 1080P Dolby Digital Pass-through (*.m4v)”.

backup Blu-ray/DVD/VCD on Apple TV 3

Step 3: Customize profile settings

I can also adjust video size, bitrate, frame rate, audio codec, channels, etc according to my own needs. But the original settings are good enough for me to be play on my Apple TV 3 with good quality.
  
backup Blu-ray/DVD/VCD on Apple TV 3

PS: Pavtube is so sweet that it gives a tip for customers about the audio track.
  
Step 4: Start conversion

The last thing you need to do is just click the convert button to start the conversion of DVD to 1080p format for Apple TV 3.

When the conversion is over, I just need to find my output videos and transfer to my NAS or iTunes through Apple TV 3. It is so easy and save much trouble for me. If you also want to view your Blu-ray/DVD/VCD collection on your Apple TV, just have a try, you will like it!

Source: http://open-mobile-share.com/backup-blu-raydvdvcd-to-play-on-apple-tv-3/

Friday, January 24, 2014

Convert GoPro Hero 3 footage to iMovie on iPhone for editing and upload to Instagram

This is a brief guide of how to convert your GoPro Hero 3 footage to iPhone, so that you can edit these video in iMovie and share it to friends on Instagram.

GoPro's lineup of mount-anywhere cameras have been dazzling extreme sports enthusiasts for years. With the GoPro 3, you can easily shoot footages with your hands free – that’s pretty convenient yet safe when you are surfing, skating, snowboarding or traveling.

I’m rather fond of taking this little magic box out on vacation with great fun. However, unlike professional cameras, I always need to edit some of them. As I just got a new iPhone 5S, iMovie should be a good choice which is free to IOS 7 users.

Convert GoPro Hero 3 footage to iMovie

With the help of Pavtube iMedia Converter for Mac, I am able to import GoPro Hero 3 footage to iMovie on iPhone and post it on Instagram.

Pavtube HD Video Converter for Mac is a professional Mac GoPro to iMovie Converter; it’s very easy-to-use and totally painless during the whole conversion from GoPro MP4 to Apple Intermediate Codec.

How to convert GoPro Hero 3 MP4 video to iMovie on iPhone?

Step 1. Load files to the GoPro to iMovie Converter for Mac.

Launch the GoPro MP4 to iMovie Converter for Mac and add footage files to it. Keep your GoPro Hero 3 on and connect it to Mac; click “Add video” to load video clips or “Add from folder” to load the entire folder. Then you can preview the whole videos in the preview window on the right area.


Step 2. Choose AIC MOV format for iMovie.

Click “Format” drop-down list and choose “iMovie and Final Cut Express>Apple InterMediate Codec (AIC) (*.mov)” as the most compatible format for iMovie.


Notes: If the default settings do not fit your needs, you can click “Settings” button to customize output video bitrate, channels, frame rate, etc. In general, the higher video bit rate you choose, the larger output file size will it be; and vice versa.

Step 3. start conversion.

Now hit the big “Convert” button to start converting GoPro Hero 3 MP4 to AIC MOV for iMovie. After it completed, hit “Open” button to find the generated.

Now transfer the converted video to iPhone via iTunes and open it in iMovie for iPhone app. Edit it and upload to Instagram; just have a try. (See also: How to transfer video to iPhone/iPad via iTunes 11?)

Related Posts:

How do I transfer Blu-ray movie to VTech InnoTab 3/InnoTab 2 for kids?

This guide explains how you can convert Blu-ray movies for your VTech InnoTab 3/InnoTab 2, so that your kids can watch movie on InnoTab 3/2, without having to purchase them again from a digital movie store. 

Nowadays, with the ability to purchase movies online, and watch it in a matter of seconds, more and more people prefer to digital content. But if we look at digital content, we will find each brand and device category has their own movie store. iTunes only works with Apple, Google Play works only with Android, Samsung MediaHub only works with Samsung devices, etc.

None of these stores take the content you already have into account, so if you want to play these movies on your VTech InnoTab 3/2, you will need to purchase it twice, and what makes things even worse is that purchases from one don’t mix with those from another.

Play Blu-ray on VTech InnoTab 3
These disadvantages make physical form stand out. Have you happened to have some Blu-ray disc and want to play on your VTech InnoTab 3/2? You can use a Blu-ray to VTech InnoTab Ripper to convert your Blu-ray movies to a format that will work perfectly on your VTech InnoTab 3/2, and if you do upgrade later-on, you can either use the same file, or convert the disk again for your other devices.

Requirements:

Of course your VTech InnoTab 3/2. While you don’t need it for the conversion process, but you need it to be able to put the movie onto it.

The connection cable for your VTech InnoTab 3/2.

An sd memorycard that works with your VTech InnoTab 3/2. 

A computer with either Windows OS or Mac OS as Pavtube BDMagic is available for Windows XP/2003/Vista/Window 7/Windows 8/Windows 8.1, while Pavtube BDMagic for Mac supports Mac OS X 10.9 Mavericks, 10.8 Mountain Lion, 10.7 Lion, Snow Leopard 10.6, Leopard 10.5

There is a large variety of different tools available for this. But for this guide I am using Pavtube BDMagic, one of the most popular conversion application for phones and tablets due to its ease of use, the support provided when needed, and of course the very affordable price.


A DVD drive for you to convert DVDs while Blu-ray drive for converting Blu-rays for your VTech InnoTab 3/InnoTab 2

Step-by-step Guide:

This guide will take Windows OS as a example, if you are a Mac user, just choose the right version and the process is almost same.

Step 1: Download and install Pavtube BDMagic on your computer.

Step 2: Load the Blu-ray movies to the program.


Step 3: Choose the output format. Click “Common Video” > “ H.264 Video (*.mp4)” as the output format.

rip blu-ray to VTech InnoTab 3

Step 4: Click the “Convert” button to start the conversion.

Step 5: Connect your VTech InnoTab 3/InnoTab 2 to your computer and copy the file over to the MOVIE folder located in the LLN folder on your VTech InnoTab 3/InnoTab 2’s memeorycard.

Once completed, just open the build-in video player app on your VTech InnoTab 3/InnoTab 2, and tap the movie to play it.

What happen during the conversion:

The actual movie conversion process takes some time. Many people don’t realize that converting a Blu-ray to play on the VTech InnoTab 3/InnoTab 2 is a bit more involved than just copying over the movie from the Blu-ray to the tablet. Conversion tools such as Pavtube BDMagicactually have to do a lot more than that:

Disc Transfer. You can not just stick Blu-ray in your VTech InnoTab 3/InnoTab 2 as it don’t have a Blu-ray drive, even though you connect a Blu-ray drive with some cables and adapters to your tablet, there are no Blu-ray player apps available, so it will not work anyway. So, a conversion tool such as Pavtube BDMagic plays the role of reading your Blu-ray and storing it on your computer in a video file.

Format Change. The VTech InnoTab 3/InnoTab 2 do not support the format like AVI and MKV, so in order for VTech InnoTab 3/InnoTab 2 to play your movies, the video files needed to be optimized. This is where the actual conversion part comes in. Pavtube BDMagic reads your Blu-ray movies and then transforms it into a format that is optimized for VTech InnoTab 3/InnoTab 2 so that it will play your video without any issues.

Compression. It is usually that a movies on Blu-ray takes up 5-9GB of space. When you copy a movie over to your VTech InnoTab 3/InnoTab 2 of that size, you can only store a few movies, and there is no room left. Pavtube BDMagic can compress movies to a much smaller file size enabling you to store much more movies on it.

Screen size adjustment. The conversion process adjust size of your movies to make it fit properly on the VTech InnoTab 3/InnoTab 2 screen.

Related Articles: