Friday, September 13, 2013

DVD to Galaxy Tab 3 8.0 - Can Galaxy Tab 3 8.0 Play DVD (ISO/IFO image file)

Samsung Galaxy Tab 3 8.0 cannot play DVD movies because of lacking DVD drive. Want to watch your favorite DVD on Galaxy Tab 3 8.0? This article will tell you how to convert DVD to MP4 Galaxy Tab 3 8.0.

Galaxy Tab 3 8.0 is an ideal Android portable device for watching movies. Thanks for its 1280*800-pixel resolution on 8 inch screen, 1.5GHz dual-core processor with 1.5GB of RAM, 16/32GB onboard storage, microSD card support, a 4,450mAh battery. If you have owned one, it is amazing for you to enjoy movies on the flight of business trip, on the railway of travel or wherever you are. 

However, when you want to watch DVD movies on Galaxy Tab 3.8.0, you may feel frustrated. Because just like the other tablets, Galaxy Tab 3.8.0 is not equipped with DVD-ROM or DVD Player, so DVD movies cannot be played directly on Galaxy Tab 3.8.0. What should you do when you want to watch your new DVD Olympus Has Fallen with Galaxy Tab 3.8.0?

The best way is to convert DVD to Galaxy Tab 3.8.0 supported formats like MP4. Pavtube DVDAid is specialized in ripping DVD including commercial DVD with protections like BD+, region code. What’s more, you do not need to worry about the ripping and converting speed. It is excellent for it and it supports CUDA acceleration technology, which will provide you 6 x faster speeds. Apart from it, it will provide the high quality output files for Galaxy Tab 3.8.0 and many other videos formats. Go to get it and freely enjoy your favorite DVD movies on Galaxy Tab 3.8.0. If you are a Mac user, please turn to Pavtube DVDAid for Mac. 

Note: If you still have a variety of Blu-ray movies waiting for transferring to Galaxy Tab 3.8.0 for playback, you’d better turn to Pavtube BDMagic. It can rip and convert both DVD and blu-ray disc.

How to convert DVD(ISO/IFO) to Galaxy Tab 3.8.0?
  
Firstly get your DVD in your DVD drive and then launch the software to get things ready.

1. Load DVD (ISO/IFO image file) to Pavtube DVD to Galaxy Tab 3 Ripper.

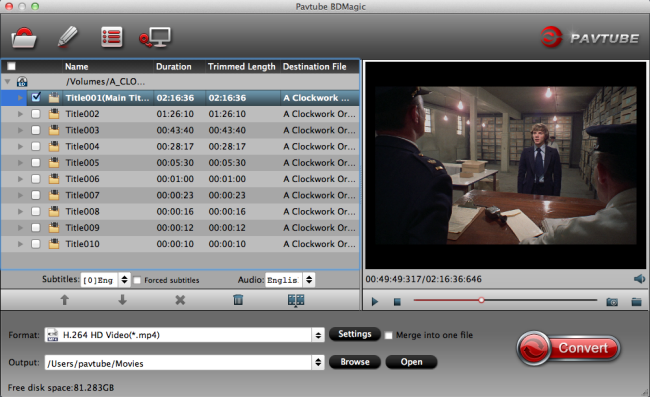
Click “Import DVD” button on the top left to load the DVD from DVD-ROM, you can also “Load ISO/IFO” or “Load from folder”. It will only take few seconds for ripping and importing DVD and you will be kept informed of timely state with a progress dialogue box.

When it has been imported successfully, you can preview the whole movie and select the subtitle and audio you want.


2. Choose Galaxy Tab 3.8.0 friendly format.

Click “Format” menu to find the “Samsung” option in the dropdown list, choose “Samsung Galaxy Tab 3 Video (*.mp4)” for output. It is the most compatible format, which is especially made for Galaxy Tab 3.


Besides, click “Settings” button on the interface, you will be able to check and adjust the video and audio parameters like bitrate, size, channels, etc. Just do it when you need.

3. Convert DVD (ISO/IFO image file) to Galaxy Tab 3.8.0 MP4.

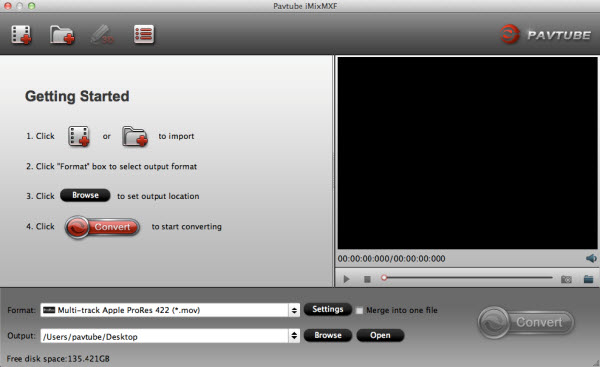
You can “Browse” your computer to choose a new folder for output file before conversion. When everything is ready, click “Convert” button to start converting DVD (ISO/IFO image file) to MP4 Galaxy Tab 3.8.0, then “Open” button will show you the location of output files. 

Pavtube DVDAid More Features:
  • Edit the videos before conversion, such as trim, crop, add subtitles, video effect, etc.
  • Convert DVD to many other mobile devices and editing software like iPad 3, iPad mini, ATV 3, Nexus 10, Galaxy Tab 3, S4, Note 2, Sony Vegas and more.
  • Add srt, ass, ssa subtitles to your movies.
  • Backup DVD main movie to VOB format with original quality.
Now you can watch DVD movies on Galaxy Tab 3.8.0 anytime and anywhere. 

Hope it will help you.

Related Articles:

Thursday, September 12, 2013

Watch Star Trek Blu-ray movie on Google Nexus 10, Nexus 4, Nexus 7 & New Nexus 7

Description: A easy, quick and reliable Blu-ray Ripping workflow to let you enjoy Star Trek Blu-ray movie on Google Nexus 10, Nexus 7 & New Nexus 7 and Nexus 4 with perfect audio and video synchronization.

Question 1: 

  • "I have created several ISO image files from my Blu-ray collections. Recently I bought a Google Nexus 7 (2013 version). I would like to copy these Blu-ray ISO files to my Nexus 7 so that I can watch them easily. But it seems Nexus 7 would not work with a Blu-ray ISO file; how can I do this?" 
  
Question 2: 
  • "We just received my Star Trek into Darkness Blu-ray and can't wait to enjoy it. But the problems is we are heading for Europe on vacation tomorrow, and we'd rather not to take discs, Blu-ray drive and my Macbook Pro – all of these on board. I was wondering if I take my new Nexus 10, is that possible to watch Star Trek Blu-ray on Nexus 10?"

Not a long ago, Google and Asus released the second generation of Nexus 7 (2013); any of you already got it yet? Google Nexus series is so hot after releasing and it's sough-after by Google fans and Android fans for super-sharp screen, powerful processor present us excellent performance from a dual-core chip, and most of the importance - the high reputation of Google itself.

With such a portable smartphone or tablet in high resolution, watching videos could be such a big enjoyment especially when you have Blu-ray collections. Maybe not all of you know how to playback Blu-ray movies on Nexus 4/7/10, so we share our experience here:


Blu-ray to Google Nexus Mac Workflow: How to watch Blu-ray on Nexus 4/7/10? 

Most commercial Blu-rays are heavily encrypted by film studio and the distributors, so that if you want to move Blu-ray movie to Google Nexus Tablet or Phone, the key point is to remove the disc protection. After testing several Blu-ray protection removing programs, we choose the Pavtube BDMagic for Mac for its simple interface, easy workflow and reliable video quality. Surprisingly we found it's on 30% off atm; are you still waiting?

Download a free trial version here 


Step 1. Load Blu-rays to this Mac Blu-ray to Google Nexus Ripper.

Firstly you need to get a Blu-ray drive to make Mac recognize your Blu-ray discs; the built-in drive in Mac is only able to play DVDs.

After that, let's launch Blu-ray Ripper for Mac, click the top left icon to import disc.

It will detect and show all the Blu-rays that connected to Mac, click the disc name to import them directly. And no worries if you only have Blu-ray ISO files, Pavtube will recognize the ISO files directly so that you don't need to run virtual drive to extract videos from ISO image file firstly.


Step 2. Choose video format.

For Google Nexus 4/7/10, the most compatible video format is MP4. Now click the drop-down list besides "Format", choose Android and find presets for Google Nexus. Another way to quick locate these presets is to submit "Nexus" in the search box.

Step 3. Edit video before conversion. (Optional)

Click the pencil-like icon on the top to edit videos before conversion. You can trim, crop, edit audio, add subtitles here.


After editing video, let's back to the main interface. Have you noticed the red "Settings" besides Format drop list? Click it, you can customize video size, bitrate, frame rate, sample rate(Hz) at your needs.

Step 4. Start conversion.

Click the big red "Convert" to start converting Blu-ray to MP4 for playback on Nexus 4/7/10. Wait for moments, and quick locate the converted video by clicking "Open Output folder".

Tips: Please keep the Internet connected during importing and converting, so that the whole process would be successfully managed.
  

Google Nexus Tablet and Phone related guides:

Best MXF Converter for Mac Review: Pavtube iMixMXF vs Tipard MXF Converter for Mac

Description: A brief review on top MXF Converter for Mac: Pavtube iMixMXF vs Tipard MXF Converter for Mac.

Main interface

Pavtube iMixMXF:


Tipad MXF Converter for Mac:


Import

Pavtube iMixMXF offers two icons on the top left for "add videos" and "add from folder"; Tipard MXF Converter for Mac integrates them into one, the same place on the top left.

We load three mxf clips in different Camera models.

Source video properties

In Pavtube iMixMXF, we can find a bubble under the three titles. Click it to check the input video/audio properties including video/audio stream, format, resolution, frame rate, bitrate and duration.


Tipard MXF Converter for Mac also has an icon to show source file properties as following. But it seems it didn't show all the info of audio stream. If you want to check/switch them, you'll need to click and select in "Audio Track".


Output Presets:

As a beginner, the output presets (or profiles) are very important to give you conversion guidance with no need to change the bitrate, framerate, size or other figures. Both Pavtube and Tipard have various presets for different devices, and NLEs. Both of them support customize outputting preset if it's needed.


Video Edition:

Let's move on to edit videos before conversion.

Click the 3D icon on top of Pavtube iMixMXF, it pops up a windows to let you trim, crop, add text/image/video watermark, remove/replace audio, add subtitles and add 3D effect. Well organized.


In Tipard MXF Converter for Mac, the Trim feature is listed separately. The rest crop, effect, edit audio and add 3D effect work the same with Pavtube iMixMXF, except the preview window is difficult to see. Besides, the Tipard MXF Converter for Mac is not able to add video watermark as the former.


Now let do a test to convert mxf to prores on both the converters.

Test: workflow of converting MXF to ProRes 422 for FCP X

We test with one MXF clip from Canon XF100 with two audio tracks.

1. We choose "Multi-track video -> Multi-track Apple Prores 422(*.mov)" in Pavtube iMixMXF and "Final Cut Pro -> Apple ProRes 422(*.mov)" in Tipard MXF Converter for Mac.


2. Choose audio tracks in Settings.

Pavtube iMixMXF offers settings for Video and Audio; all the audio streams are showed here. We check both the audio track as apparently we want to save all the sound we recorded. Also it offers a mix into one track option; we keep it unchecked.


In Tipard MXF Converter for Mac main interface, we found the options for Audio Track; but there's no way to select all of them. So we just check the first stream.


3. Start conversion.

Click the Convert icon at nearly the same time. We can see Pavtube iMixMXF (right) shows the percentage while Tipard MXF Converter for Mac (left) doesn't, the preview window changes with the process, but it's stuttering all the time.


4. Import to Final Cut Pro X.

Both the two converted completes at the same time. Now click Open output folder to locate the converted video and import them into FPCX.

We can see both the audio tracks saved separately as original in Pavtube converted video, and the timecode is kept.


While in converted video from Tipard MXF Converter for Mac, it only includes one audio track—the first one we selected. And the original timecode is removed; it's really confusing us as we thought it's basic and should be not difficult to realize.


All the steps done; thanks to Pavtube and Tipard for bringing us the great MXF converting programs despite that we have made a decision. 

FYI: during our research online, there's another MXF Converter for Mac from Pavtube but it seems to be the lite version of Pavtube iMixMXF. For users who only records one audio track, the former is recommended and it costs less than the latter Pro version.

Related Articles:

Wednesday, September 11, 2013

Apple launches iPhone 5S and 5C

Apple yesterday unveiled not one, but two new iPhones, the high-end iPhone 5S and a less expensive version known as the iPhone 5C.

Apple launches iPhone 5S and 5C
Apple Senior Vice President of Worldwide Marketing at Phil Schiller speaks about the new iPhone 5C on September 10, 2013 (Note: the "free" iPhone 4S requires a 2-year telephone contract)

Apple will begin taking orders on Friday, and on September 20 the two devices will go on sale in the United States, Australia, Britain, China, France, Germany, Japan and Singapore.

According to Apple vice president Phil Schiller, the iPhone 5S is the "gold standard in smartphones". 

Schiller said the 5S model includes a speedier chip which brings up the computing power from 32 to 64 bits. 

"It has over a billion transistors in it," he said, adding that the device will be "about twice as fast in graphics and computing power and about 40 times faster than the original iPhone." 

The 5S will also have improved battery life, with some 10 hours of talk time, or 40 hours of music listening, Schiller added. 

Apple introduced a fingerprint sensor for the iPhone 5S, as a new security measure in place of passwords. 

 
Apple's new iPhone 5S features a fingerprint sensor has an upgraded camera, and contains an A7 chip.

"You can just press the home button to unlock your phone," Schiller said. "You can use it to authenticate iTunes purchases " 

Schiller added: "We have so much of our personal data on these devices and they are with us almost everyplace we go, so we have to protect them." 

The iPhone 5S also features a new "iSight" camera that uses a special flash designed to improve colour balance. 

The iPhone 5C is aimed at more budget-conscious consumers, including users in emerging markets like China and, yes, Thailand.

 
Apple Senior VP of Worldwide Marketing Phil Schiller shows off a green iPhone 5C. The new phone comes in a range of colours and will run on iOS 7.
 
The iPhone 5C with 16 gigabytes of memory has cut costs through the use of less expensive materials. The case is plastic rather than metal, for example. 

Apple insists however, that there have been no compromises in quality. 

"We took the same fanatical care with how the iPhone 5C feels in your hand," Ive said. 

The budget phone has a 4-inch Retina display and the same 8-megapixel rear camera and A6 processor as the iPhone 5. 

The "C" in the model name may stand for colour. Buyers now have five choices: lime green, white, yellow, red and bright blue. 

Story contains information from AFP.

Official Apple video for the iPhone 5C:

10 New iOS 7 Features for the enterprise | 2013

Summary: Apple has added 10 new enterprise features to iOS 7 making it the most manageable and secure mobile OS on the planet.
  
Much fuss was made about iOS 7 at Apple's iPhone event yesterday in Cupertino, but aside from a lot of eye candy (and iTunes radio!) what's in it for the Enterprise? As it turns out, quite a bit.

iPhones and iPads are being deployed at companies in increasing numbers and with close to 700 million iOS devices sold, even those that don't "officially" support them are seeing an influx of them as part of the BYOD phenomenon.

Apple revealed that its next-generation mobile operating system will be released on September 18, 2013 and Enterprise users and IT administrators should note several new features that will make iPhones and iPads more secure and easier to manage in corporate environments. In addition, iOS 7 offers some new ways to configure and deploy devices at scale, and has new features to help businesses purchase, distribute, and manage apps. 
 
Perhaps the biggest new enterprise feature is the iPhone 5S' fingerprint identity sensor, which while technically hardware, is enabled by new software features in iOS 7. Branded as the Touch ID fingerprint reader and invisibly embedded in the home button, this 500ppi fingerprint sensor can keep enterprise data more secure than ever. Touch ID brings two-factor authentication to the iPhone, combining something you know (i.e. a passcode) with something you have (your fingerprint) to increase security.

As detailed in its iOS 7 for business webpage, Apple's new OS has several offerings that will appeal to Enterprise users and administrators:

"Open in..." management

When you touch an email attachment on an iPhone you'll see the familiar "open in..." option which allows you to choose which app opens said attachment. iOS 7 allows business to protect corporate data by controlling which apps (and accounts) are used to open documents and attachments. Managed "open in..." gives IT the ability to configure the list of apps available in the sharing panel. This keeps work documents in corporate apps and also prevents personal documents from being opened in managed apps.

Per app VPN

iOS 7 apps can be configured to automatically connect to VPN when launched giving administrators granular control over corporate network access. It ensures that data transmitted by managed apps travels through VPN — and that other data, like an employee's personal web browsing activity, does not.

Enterprise single sign on

Enterprise single sign on (SSO) means user credentials can be used across apps, including apps from the App Store. Each new app configured with SSO verifies user permissions for enterprise resources, and logs users in without requiring them to reenter passwords.

Mobile Device Management (MDM)

The new MDM protocol in iOS 7 includes several commands, queries, and configuration options that make third-party MDM solutions even more powerful. With iOS 7 MDM IT administrators can set up managed apps, install custom fonts, configure accessibility options and AirPrint printers, and whitelist AirPlay destinations over the air.

But that's not all!

Apple has also added Streamlined MDM enrollment, improved App Store license management, third-party app data protection, improved mail and support for Caching Server 2 into iOS 7, making it the most manageable and secure mobile OS on the planet.