Tuesday, September 10, 2013

New Nexus 7 Flash Player-Play Flash FLV/F4V video on new Nexus 7

Description: Most of Flash videos are in FLV/F4V format and not supported by new Nexus 7. This article introduces the way to how to play Flash videos well on new Nexus 7.

The Powerful and portable new Nexus 7 from Google is thinner, lighter, and faster and features the world’s sharpest 7" tablet screen putting over 2.3 million pixels in the palm of your hand. 

With 323 pixels packed into every inch, you can read text that’s sharper than the printed page, see images more vivid than the highest quality photo magazine, and what’s more, watch videos come to life in vibrant 1080p HD. It is made for what matters you. 

When you have downloaded many flash videos usually in FLV or F4V format from video sharing websites like YouTube and want to watch them on Nexus 7, you may find that it cannot be accepted by new Nexus 7. Because many video sharing webs use Adobe flash technology, which is not supported by new Nexus 7. 

There is a very easy way to get Flash FLV/F4V videos played on Nexus 7. Install a Flash Player on new Nexus 7 without any more complicated steps. This tip will help to enable flash videos with Nexus 7 quickly. 

However, if you still have problems, you should turn to the following solution, which is the most reliable and effective solution. Turn to third-party software to convert flash FLV/F4V to new Nexus 7 MP4 format, the most compatible format for most Android devices.

A professional Flash Video Converter: Pavtube Flash Video to Nexus 7 Converter is recommended. With it you can download any Flash videos for enjoying it with new Nexus 7 anytime and anywhere. It has the user-friendly and easy interface and superfast conversion speed especially with CUDA acceleration. And it supports to import a variety of videos besides FLV/F4V and output various videos with high quality. Moreover, it will get conversion done in few clicks.  

Download and install the software to learn how to convert FLV/F4V to MP4 format for playback on New Nexus 7. (New Nexus 7 Mac Video Converter is right for Mac users)

Step 1. Import Flash videos to Flash video to New Nexus 7 Converter.

There are two ways for loading files: 

1. Find the flash videos on your computer and then directly drag and drop it to the software, and you can pick several files you want and import them at one time.

2. Click “Add video” or “Add from folder” button to locate the flash videos on your computer and then import to the software.


Step 2. Choose H.264 MP4 format for new Nexus 7.

A mass of video formats for output is listed in “Format” menu. You are recommended to choose the “Google Nexus 7 H.264 Video (*.mp4)” under “Android” catalogue for output.


If you want to customize the video parameters, just click the “Settings” button on the main interface. In order to get the best view effect, you can set display resolution to 1280×800 pixels for get full screen

Tips: You can edit the videos like trim, crop, add effect and watermark, etc. If you want to edit, click “Edit” button to achieve it.


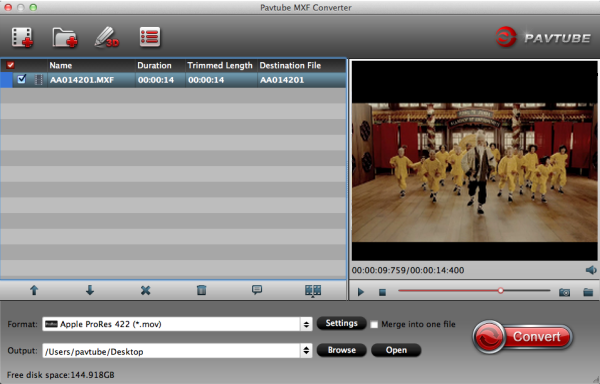
Step 3. Convert Flash FLV/F4V to new Nexus 7.

“Borwse” your computer to find a convenient folder for output video, then click “Convert” button to start conversion. Once completed, you can press “Open” button to get the output files quickly.

Tips: If you want to watch the online flash videos in YouTube, Google videos, etc, Youtube Converter is the best helper for you and it will detect, download and convert flash FLV/F4V videos to MP4 format for Nexus 7. You can have a try.

Since everything is done, you can go to transfer the output video to new Nexus 7 for watching at any time.

Related articles:
           

Friday, September 6, 2013

Rip/Sync Blu-ray to iTunes with forced subtitles for iPad, iPhone, iPod, Apple TV

Do you want to make Blu-ray portable on Apple devices? Want to preserve forced subtitles of Blu-ray on iTunes? This article mainly introduces the way to sync Blu-ray movies to iTunes.

Blu-ray HD movies can give you great detail and sharpest bright colors. There are no details that can escape from HD movies even an aging actress's wrinkle. When you already have a Blu-ray, most of you are not willing to repurchase it with ridiculous prices from iTunes. But Blu-ray cannot be played directly on your Apple devices like iPhone, iPod, iPad, iPad Mini or Apple TV because of lacking Blu-ray player. How to make Blu-ray portable with Apple devices? The answer is to rip Blu-ray to iTunes compatible videos so you can transfer them to your iPhone, iPad, iPod, or stream to Apple TV etc for playback.

What you need is a professional Blu-ray Ripper that can help you to remove the protection of Blu-ray and then convert to iTunes supported videos formats like MP4, MOV etc with outstanding video quality. What's more, some Blu-ray contains the unknown language like Avatar and you cannot understand it without subtitles. So to keep the subtitles for unknown language is necessary for full enjoyment. In this case, Pavtube BDMagic (now you can get 30% off) is the ideal software to you. It will help to rip and convert Blu-ray to a mass of videos formats with fast speed and high video quality. 


Moreover, you can choose the desired subtitle for output and select forced subtitles for some unknown languages. Now let's go to learn how to do it.

How to convert Blu-ray to iTunes with forced subtitles for iPad, iPhone, iPod and Apple TV?

Get your Blu-ray drive ready and insert Blu-ray you need to the drive. And keep networked when ripping Blu-ray.

Tips: If you are running on Mac, please try BDMagic for Mac.

Step 1. Load Blu-ray to Blu-ray to iTunes Converter.

Run the best Blu-ray to iTunes Converter, click "Load file" button to select the inserted Blu-ray and import it for transferring to iTunes. It will take only few seconds to rip Blu-ray. Then the software will recognize the actual main title of Blu-ray and pick it automatically. You do not need to look for the main title manually.

Press the selected main title you can preview the whole Blu-ray movies on the preview window on the right, which works like a media player.


Step 2. Check forced subtitles for output.

Because Blu-ray always contains multiple subtitle and audio tracks, you can go to choose the desired subtitle and audio on the interface for output.

Beside subtitles option, "Forced subtitle" is optional and uncheck by default. Go to check "Forced subtitles" for output. Take note that it will output forced subtitles only if it is checked.

Step 3. Choose iTunes compatible format for Apple devices.

Choose the iTunes supported formats in the "Format" dropdown list. You can go to "Common Video" or "HD Video" options to find what you like. I think MP4 format is better for iTunes.

But, here you are recommended to choose the Apple devices like iPad, iPone, Apple TV, etc directly. Find a suitable format under these Apple devices options.

Tips: For some advances users, you can go to adjust video and audio parameters like bitrate, resolution, channels, etc. Click "Settings" button you can go to check and change them as you like.

Step 4. Convert Blu-ray to iTunes.

Before conversion you can go to "Browse" your computer to find the folder for output files. Then click "Convert" button to get Blu-ray to iTunes conversion started. After a while, you can find the generated file for iTunes quickly via "Open" button.

Now open your iTunes and then sync the ripped Blu-ray movies to iTunes library for convenient playback on Apple devices. In this way, you can enjoy your favorite Blu-ray with forced subtitles on your iPad/iPhone/iPod wherever you are.

Related articles:

Thursday, September 5, 2013

Free Convert C300 multi audio channels MXF files to FCP X, FCP 6/7 with best quality

How to editing Canon C300 multi audio channels MXF footage in Final Cut Pro 7 and FCP X? Follow our tips to make video editing with C300 MXF footage go as smoothly as possible.

------------------------------------------------------------------------------

Working with Canon C300 footage – which is XDCAM 422 50/Mbs footage in a .MXF wrapper – should ordinarily be quite straight forward. MXF files will work natively in Adobe Premiere and ingest quite happily through a free plugin in Final Cut Pro 7 and FCP X.  You can also bring this footage in through AMA into Avid Media Composer 6. AbelCine has an excellent step by step guide to importing C300 footage to Premiere CS6, FCP X, FCP 7 and Avid Media Composer 6. You can check it out here.

Everything will work seamlessly, that is, if your cards have been copied correctly to the hard drive with their entire folder structure intact. Without that folder structure you are effectively locked out of accessing your footage and an editing application like FCP7 will give you an error message like this one:


How to Copy MXF Files Correctly

So how do you copy cards correctly?

Well first, and this may go without saying, but if you're going to get an intern or producer to do it make sure they know what they're doing. Essentially you must copy the entire card structure (preferably not through dragging and dropping in the finder).

Sony and Canon both have free browser apps that will let you back up your media. Or you could invest in something like Shotput Pro to duplicate your cards to multiple drives simultaneously. You are backing them up as you go, right?

If that's not enough detail, just watch this great tutorial on a correct tapeless media workflow from Shane Ross. Although the tutorial winds up in Final Cut Pro 7, the initial principles are the same for any system. If you want even more tips, check out this great video from Chase Jarvis on his complete tapeless workflow.

<iframe width="560" height="315" src="http://www.youtube.com/embed/AhDnyWFAM10" frameborder="0" allowfullscreen></iframe>

What To Do If Your C300 Card Structure Is Broken

If for whatever reason your card structure doesn't come across intact, what can you do?

Depending on your NLE you have various options. If you're in Adobe Premiere it doesn't matter, as it will read the MXF files just fine.

First, you can try to 'fake it' out by recreating the C300 card structure (which should look like the example below). In the past I'm sure I've gotten lucky with it but its a pretty slim chance of actually working.

FCPX needs a correct card structure so if you have to, transcoding in a 3rd party app is a feasible workaround.


Free App For Converting C300 MXF Files

Miro is a great free app (one of the few free apps I found) that actually works and works well. Miro Video Converter will allow you to grab the .MXF files and transcode them into ProRes 422, DNxHD and AVC Intra 1080p and 720p. You can batch transcode as many of them as you like and it works pretty quickly. The files look great and were a higher quality than files I created using the demo of MXF Converter for Mac from Pavtube. But as Miro is a free app, there are a few catches.
(Tips: If you want to preserve multi audio channels when convert Canon C300 MXF, or mix multi tracks into one track, Pavtube iMixMXF is highly recommended to you. Refer to the guide: How to convert MXF to ProRes 422 preserving multi-track for FCP?)


canon c300 mxf to fcp converter


First, you cannot specify the output folder and it defaults to your MacHD > User > Movies folder. So you need to have enough space on your boot drive to transcode the footage too. This is also a problem if you have multiple files with the same name, (which I had on this edit with a two camera shoot) as this means you have to transcode one set at a time and move them out of the folder so as not to overwrite them with the next batch. Annoying.

Also the original camera footage I was working with had two audio tracks in it where as Miro would only export a single mono track. This was not helpful either as I needed to be able to mix each track individually.

Paid Apps for Working With C300 MXF Files


As I was editing on an FCP7 system I had to find a way to get my C300 MXF files to play nice with Final Cut Pro 7, while getting around the broken file structure. A cry for help on Twitter led to this great recommendation from Andy Mees who saved the day by suggesting I check out both MXF Import from Calibrated {Q} or MXF4Mac from Hamburg Pro Media. Both plugins essentially do the same thing which is to allow Quicktime (and any apps that make use of the Quicktime architecture) to work with MXF files, just like any other file.

Calibrated{Q} MXF Import for OSX is a QuickTime Import component for NATIVE Importing and Editing of MXF Files within Final Cut Pro 6, 7, and X without using Log and Transfer.

And you’re not just limited to Final Cut Pro, you can also natively import and work with MXF files in CatDV, Compressor, Motion, Sound Track Pro, QuickTime Player and Shake.


You can download a free demo of MXF Import from Calibrated {Q} to test that it will work on your system. The demos only restriction is that it only allows you to view the first 30 seconds of the clip, other than that it’s the same as the full app. After installing the plugin I could drop the C300 MXF files directly onto the timeline in FCP7 and get editing – and with the dual audio tracks in the original files! Huzzah.

Hopefully these tips will save you some time, effort and frustration with broken MXF file structures.  And next time you’ll just copy the cards structure correctly…and get to editing!
  

Wednesday, September 4, 2013

DVD to Nexus 7-Free Put DVD movies to new Nexus 7 with best quality

Description: Do you ever think about converting DVD to Google new Nexus 7 for playback? Go ahead, this article will show you how to convert DVD movie to new Nexus 7 compatible format with best video quality.

The new Google Nexus 7, Claimed as the world's highest-resolution 7" tablet, is thinner, lighter and faster. It is an amazing device for e-book, music as well as  videos when traveling or being at home. However, the new Nexus 7 tablet cann't play DVD movies because of lacking DVD drive. If you want to free play DVD on your new Nexus 7, this guide will tell you how to do it.

Given that the New Nexus 7 lacks a DVD drive, there does seem to be one big question. Take it easy. There are many DVD ripping software available on the market. In this guide, Pavtube DVDAid would be highly recommended. As a professional DVD to Google new Nexus 7 Converter, makes it easy to convert and move DVD movies to New Nexus 7 recognized format. The synchronization of audio and video and superfast conversion speed are also wonderful.

Just a few clicks, you can enjoy your favorite DVD movies on Google Nexus 7 at will.

Download DVD to New Nexus 7 Converter trial version.


(Good news: Pavtube Studio release Free DVD Ripper and Free DVD Ripper for Mac)

How to rip DVD movies for playback on Google's new Nexus 7?
  
1. Load DVD to the DVD to Nexus 7 (2) Ripper.

Insert DVD movies into your DVD drive, then click "Load file" button to navigate to DVD movies you want to convert. And it is able to find and pick the actual main movie up automatically.

After importing successfully, you can go to select subtitle and audio track on the main interface for output.


Tips: If you want to watch Blu-ray movies on New Nexus 7, you arrive a right place. We recommend you the best Nexus 7 (2) Blu-ray Ripper with 30% off to you.

2. Select Nexus 7 (2) compatible format.
  
Click "Format" menu to find the optimized video format for Nexus 7 in the dropdown list, Choosing the built-in "Google Nexus 7 H.264 Video (*.mp4)" under "Android" option is perfect for Nexus 7.

new nexus 7 playback format

Tips: You can press "Settings" button on the interface to adjust the video and audio parameters like codec, size, bitrate, etc. The output videos quality is based on bitrate than resolution. The higher bitrate will result in lower picture quality loss but a larger file size. But there is a balance between quality and size. I think 1500kbps~2000kbps is all right for 720p movies on Nexus 7.

new nexus 7 video settings

3. Start DVD to Nexus 7 (2) conversion.
  
It's time to click "Convert" button to start converting DVD to Nexus 7 (2) compatible format. With the help of technology of CUDA acceleration, you can get 6X faster conversion speed. Just wait for a while, then you can click "Open" button to quickly get the generated files for Nexus 7.

Note: With great decrypting capability, high quality video output and specific format list for versatile portable devices including iPad 3, iPhone 5, Apple TV 3, Xbox, PS3, Android tablets and phones, etc,. Pavtube DVD Ripper ranks top on the list of DVD ripping application. And it also provides lifetime free upgrade of product and technical support.

Now you can watch DVD on that gorgeous screen of Nexus 7 anywhere you like. Just enjoy it now.

Related Article:
               

Monday, September 2, 2013

Convert/Share Blu-ray/DVD movie to YouTube, Facebook, Vimeo on Mac

Do you want to post it to Youtube and Facebook for sharing it with your friends? You may have encountered some problems of doing this. Here is right for you. No matter you want to play Blu-ray on Blu-ray player, YouTube or Facebook, what you need is powerful BDMagic for Mac

A lot of software is listed when searching it. You may want to use the free software, so you tried free Handbreak. However, you will find that it cannot rip some Blu-ray well or totally cannot handle it. That is because it cannot rip protected Blu-ray. Now you need to find the alternative to help you to deal with commercial Blu-ray with copyright protection. 

Pavtube ByteCopy for Mac is recommended. It is one of the best Mac Blu ray Ripping software at present. Its simple interface and operation will help you easily rip Blu ray/DVD to various formats (like MP4, FLV, MOV, M2TS, MKV, etc.) for playback on Mac.
  
Main features:
Backup Blu-ray and DVD to MKV/MP4/MOV with multiple audio and subtitle tracks as well as chapter markers preserved;
Rip/Convert the latest Blu-ray/DVD for playback on iOS/Android/Windows devices and HD Media Players;
Backup the intact Blu-ray main movie in original m2ts format with super fast speed;
Copy/Backup the entire disc with only one-click.

Following let’s check out the procedure of ripping Blu-ray to YouTube as example.

Download the Best Blu ray Ripper for Mac and install it in your Mac first. (If you are a windows user, go to download Blu-ray Ripper).

Step 1. Launch it and import Blu-ray movies.

Firstly, you need to properly insert your Blu-ray to Blu-ray drive and keep the networked. Run the software and hit the “Load file” button to import the inserted Blu-ray. After loading successfully, the true main title will be recognized automatically. So you do not need to look for it manually.

Then you could go to choose the desired subtitle and audio for output on the main interface.

load blu-ray to pavtube bytecopy for mac

Step 2. Select output format.
  
First, let’s review the formats YouTube supports. Here is a list of some well-known formats that YouTube supports:

  • WebM files – Vp8 video codec and Vorbis Audio codecs
  • MPEG4, 3GPP and MOV files – Typically supporting h264, mpeg4 video codecs, and AAC audio codec
  • AVI – Many cameras output this format – typically the video codec is MJPEG and audio is PC
  • MMPEGPS – Typically supporting MPEG2 video codec and MP2 audio
  • WMV
  • FLV – Adobe-FLV1 video codec, MP3 audio

Then choose one suitable format in “Format” drop down list, I recommend you choose MP4, WebM or FLV which are used commonly by YouTube.

rip blu-ray to mp4, webm

rip blu-ray to flv 

Step 3. Adjust parameters. (Optional)

Before conversion, you can change the video and audio parameters including size, bitrate, channels, etc. Click “Settings” to see the detailed profile settings. For example, if you want to have a smaller file size, you can choose lower bitrate to achieve it. When you have no idea about it, you can skip this step. The default setting is also a good choice.
  
Step 4. Convert Blu-ray

Click “Convert” button to start ripping Blu-ray to MP4, FLV, WebM, etc. Formats for YouTube, Facebook, Vimeo and more. If you wan to get the generated files quickly, “Open” button will take you there.

You can share your Blu-ray movies on YouTube and Facebook as you like. If you want to find more software to help to deal with videos or creating DVD, Money Saving Software Bundles is wonderful. There you can get more software with special offer. If you’re interested in it, go to have a try and you will love it.

Good news for you that Pavtube Back to School Promotion is coming, you can get more coupons during sale time, like:

20% off Blu-ray Video Converter Ultimate for Windows and Mac: Support multiple file types as source media, including Blu-ray and DVD movies, and a wide range of HD and SD video files, like MTS, M2TS, TOD, MOD, MOV, WMV, MP4, TiVo, FLV, some MXF files, etc that are downloaded online and recorded by camcorders. 

30% off BDMagic for Windows and Mac: one of the best BD/DVD disc handling tools on the market, integrates disc backing up and ripping skills to make it standout. 1:1 copying BD/DVD Disc content to local computer or external hard drive in original file structure with all subtitle tracks and audio streams preserved. 

DVD Creator for Windows and Mac: A simple wizard-style user interface and powerful DVD authoring and burning.

Media Magician for Windows and Mac: A nice camcorder assistant manager, lossless camcorder video joiner, MTS/ M2TS/ MXF/ MOV/ MKV/ TiVo/ WMV/ AVI/ MPG converter and editor, and efficient camcorder video uploader for YouTube.

Related guides: