Showing posts with label Media Player. Show all posts

Wednesday, November 11, 2015

Play M2TS with Plex media server via Mac OS X El Capitan

Does Plex support m2ts streams natively? Read the following service and you will know the step about convert M2TS to Plex compatible format via Mac OS X El Capitan.

Q: “ I have several m2ts files in my movie/video folder, but they are not recognized by Plex. Is it required to convert these to an mkv or other supported format before Plex will pick them up and add them to my library? Based on a quick google search, it doesn't seem so, but I can't figure out why mine don't show up.” - Asked from reddit

At First, you may want to know: Why Plex media server cannot play m2ts?

Again this is a question that has several answers and for the same reasons it is difficult to answer all of these by part. The answers will therefore be answered in points and parts to get a clearer view:
  • The Plex Media support has a very limited outside codec support.
  • In some cases the user needs to make sure that the m2ts files are transcoded and the Plex media player will play them.
  • It is also advised to make sure that the relevant format which the Plex media server is supporting is used and the file is converted to this format to make sure that the playback is not interrupted ever in this regard.
  • The Plex TV support is also effective to make sure that the m2ts files are converted to the appropriate formats which are usually using the .FLV extension in this regard.
Searching Plex forum, we found many guys are facing the similar troubles "MTS files not seen in Plex", "Plex won't play MTS files"... In fact, there is an easy way to fix the issue. In order to stream MTS files via Plex Media Server from Mac 10.11 without problems, the easy option is to convert MTS to Plex most compatible video files(MP4 seems to be the best one). 

Hot Search: DVD to Plex | YIFY videos to Plex | WTV files via Plex | Blu-ray to Plex | VIDEO_TS files to Plex  

Here, Pavtube iMedia Converter for Mac is high recommended for you. (review). this video app is professional on fast transcoding M2TS to Plex Media Server with MKV format without quality loss from Mac OS X El Capitan. In addition, it not only supports TiVo videos, but also handles various common video formats, like MXF, MTS, MOV, MP4, AVI, WMV .etc. Plus, with the built-in video editor, you can also choose to trim, crop, add watermark to your original videos. 

For Windows users, Pavtube Video Converter Ultimate is also a helpful app to encode M2TS to Plex on Windows 10 for further usage. Follow below guide to start M2TS movie to Plex conversion on Mac OS X (El Capitan included). 

Learn>>Best Windows video to Mac Mini Converter with Plex installed

Free Download M2TS to Plex Converter for Mac 10.11: 


Other Download:

- Pavtube old official address: http://www.pavtube.cn/imedia-converter-mac/
- Cnet Download: http://download.cnet.com/Pavtube-iMedia-Converter/3000-2194_4-76177788.html 

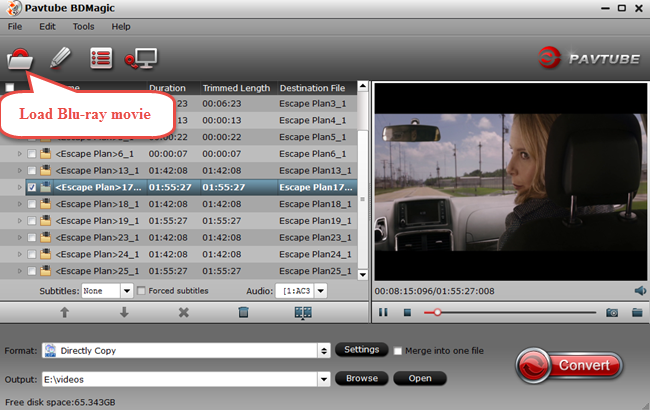
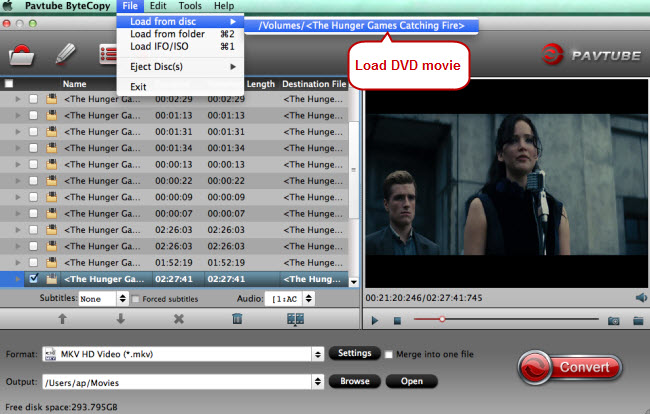
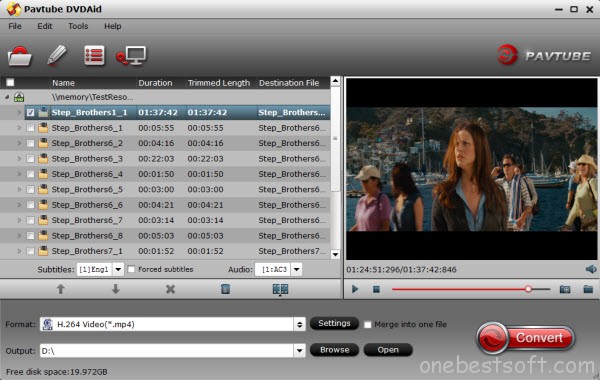
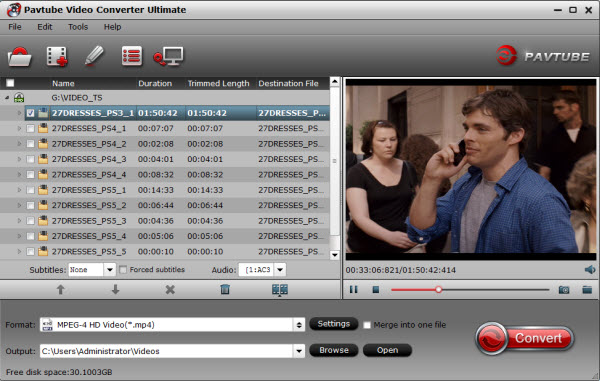
Step 1. Load original M2TS files. Click “Add Video” button on the main interface to load your M2TS files to the program. (Drag&Drop function is included.)


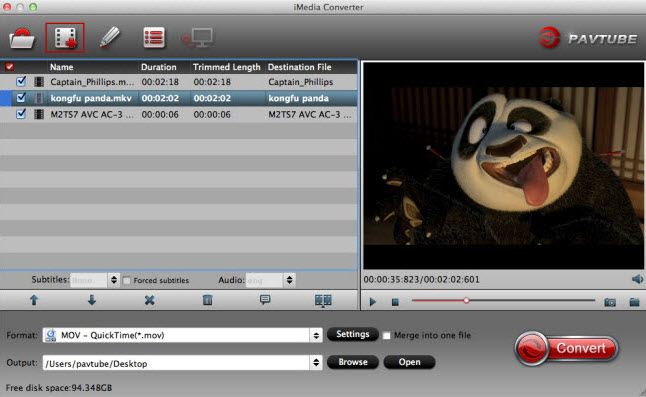
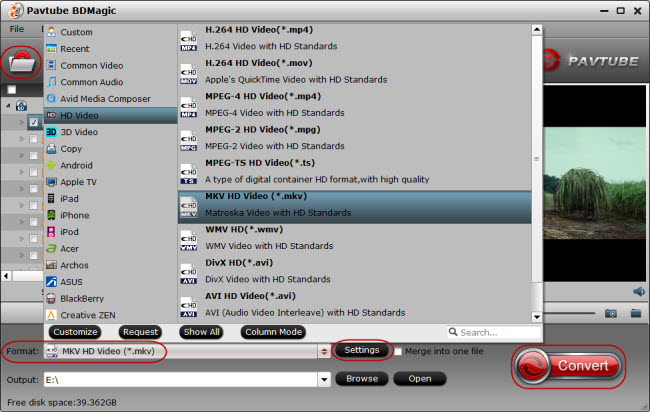
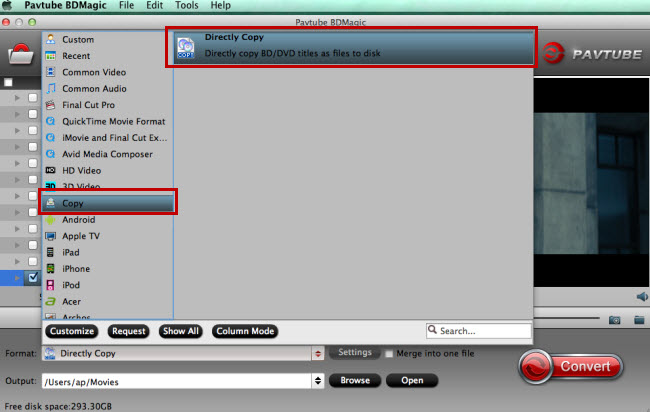
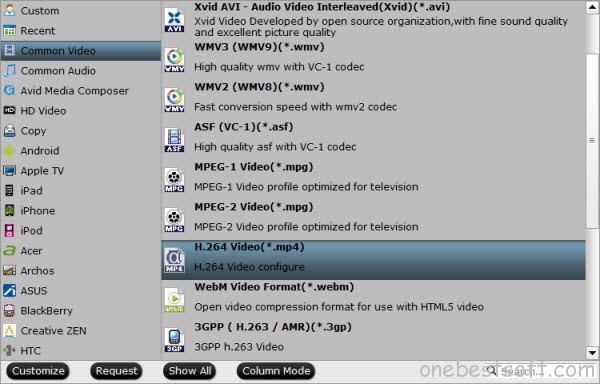
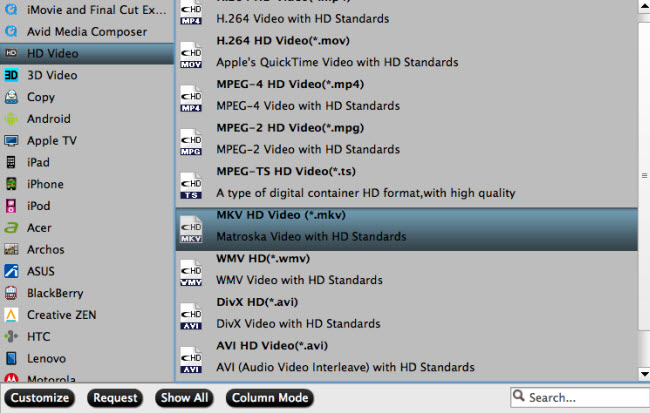
Step 2. Specify output format for Plex. Click Format bar and choose a compatible format for Plex Media Server. MP4, MKV from Common Video are the proper choice. 


Tip: With the right settings you can retain the quality of the original video while also saving space. This is particularly helpful when streaming over your network, depending on your network quality. Simply click Settings bar and you can tweak the settings to your satisfaction and even save it as preset. 

Step 3: Start M2TS to Plex Conversion 

Once you’re sure all the settings are OK, click the Convert button to start converting M2TS format to Plex. It will take several minutes to finish the conversion. 

After the conversion, you can easily find the converted M2TS video clips in the destination folder by clicking “Open” button. Now it’s easy for you to play and share your movie on different media devices via Plex Media Server. 

Learn>> How to Add Your Movie Collection to Plex for Streaming?

Conclusion:

The expert advice can also be utilized if the user is not the member of these forums as the guest login can be created to get the issues resolved. The Plex media server also has a guide that has been published online and for all those users who want to play m2ts and mts players can make sure that the issue is resolved for them and they get the best deals within no time at all. There are wide range of media file extensions both audio and video that are supported by this service and the user just needs to make sure that the needful is done within no time at all. These file extensions can also be viewed at https://support.plex.tv/hc/en-us/articles/203810286-What-media-formats-are-supported- and the user can get the player as per the advice that has been provided there. 

Read More:

Sunday, October 11, 2015

Play 2D/3D/4K Blu-ray on LG105UC9 with No Restriction

There's a growing number of 4K TVs appearing, but they come with a price premium and very little supporting content. However, LG is ignoring 4K with its latest mammoth TV and instead has embraced what it classes as 5K resolution. It's called the LG Curved Ultra HD TV 105UC9. Here in this article, you will be informed of everything about the LG105UC9, and how to play Blu-ray video on LG105UC9, be it 2D, 3D or 4K Blu-ray format.


LG has unveiled their 105-inch 105UC9 Ultra HD television feature which sports a 21:9 aspect ratio and an eye-watering display resolution of 5120×2160, and will be powered by LG's new webOS Smart TV platform. Thanks to the Tru-Ultra HD Engine, it will be able to detect any flaws during the upscaling process and adjust the image accordingly to ensure an "authentic" 4K viewing experience. However, when dealing with the Blu-ray video, there always are some tricky problems, say you cannot copy Blu-ray videos to LG105UC9 or can't play Blu-ray on LG105UC9 since Blu-ray discs are copy protected and has incompatibility problems with 5K TV- LG105UC9. To solve the problems perfectly, you need to convert 2D/3D/4K Blu-ray movies to unprotected common videos which is supported by LG105UC9.

Pavtube BDMagic, regarded as the best 2015 Blu-ray Rippers, is bound to be your best aid to transcode, compress and convert 2D/3D/4K Blu-ray videos, for the new LG105UC9 with the readable format in superb fast conversion speed to save your time and high output quality. Through constant upgrade, it works flawlessly on Mac OS X, including the Yosemite (10.10) and the latest El Capitan (10.11). Plus, you can also trim, crop, add effect, merge files, and even customize resolution, frame rate, bit rate for video to keep the highest setting to get the ideal output effect. Here we take converting Blu-ray to LG105UC9 accepted ?HD MKV? format as an example.


Other Download:

- Pavtube old official address: http://www.pavtube.cn/blu-ray-ripper/

- Cnet Download: http://download.cnet.com/Pavtube-BDMagic/3000-7970_4-75922877.htmlConvert Blu-ray for LG105UC9 watching with No Restriction

1. Insert Blu-ray disc into your BD drive (Ensure that you have sufficient space on hard drive to store the Blu-ray). Launch the best Blu-ray to LG105UC9 ripper to load your Blu-ray files.


Step 2: Select on "HD Video" the drop-down menu and choose "MKV HD Video(*.mkv)" as output format.


Or you can get Blu-ray M2TS main movie by directly copy without any extras. Go to format bar to follow "Copy" > "Directly Copy" which is also suitable for playing on LG105UC9.


Tip:

1. You can adjust video and audio parameters, including the Bitrate of Video and Audio, the Codec of Video and Audio, Video Size, Sample Rate, Frame Rate, Audio Channels, etc., in the Profile Settings.

2. Click “Edit” icon to enter Video Edit panel where various editing features are provided. Then polish the LG105UC9 file with those features given. For example, set video length with “Trim” tab, wipe out the black margin with “Crop” tab and insert with “Subtitle” tab.

Step 3: Hit "Convert" button to carry out the 2D/3D/4K Blu-ray to HD MKV conversion process. Once the conversion is done, you can click "Open" button to get the output files, and then you can transfer converted video to LG105UC9 via USB. Now jst enjoy the Blu-ray movies on your LG105UC9 without limitations!

In colusion, Pavtube BDMaic is designed for keeping your Blu-ray discs properly by converting them to some certain video format to realize free enjoyment on different devices at anytime and anywhere, for example, it has the knack for converting Blu-ray to other formats like MP4, MOV, AVI, WMV, FLV, etc. and directly to iPhone 6/Plus, iPad Air 2, iPad Mini 3, Apple TV 3, Kindle Fire HD Kids Edition, Galaxy S6/S6 Edge, Note 4, PS4KodiRoku 3, and more in a few clicks.. Never miss the 35% OFF/Giveaway for BDMagic at 2015 Summer Specia Offer. That’s all!

Continue Reading:

Monday, October 5, 2015

Encode Blu-ray movies playback on Mac Mini HTPC with PLEX

Summary: One common question always puzzle you that want to play Blu-ray films on Mac Mini HTPC with PLEX? Here is the answer. 

Blu-ray must be a hurt for Mac mini owners, If you’re HD movie lover and wish to add Blu-ray movies to the newly built Mac HTPC, Pavtube BDMagic for Mac and PLEX are good combination. PavtubeBDMagic for Mac copies protected Blu-ray movie to your Mac HTPC and PLEX plays high-definition 1080p M2TS files from Blu-ray structure. In that way you can play Blu-ray movie on Mac Mini HTPC without quality loss. The following guide tells how to copy/rip Blu-ray movies to Mac Mini HTPC with Pavtube BDMagic for Mac. 

Preparations: 

1.Mac mini 
2.external BD drive 
3.source Blu-ray Discs. 
4.Pavtube Mac mini Blu-ray Player (The software is able to back up Blu-ray movies and commercial DVDs for Mac HTPC Media Center without quality loss or compress the BD and DVD movies to MOV, MP4, MKV, M4V, etc. in perfect sync.) Review:Enrich your Mac Mini HTPC Media Library: rip DVD and Blu-ray movies to Mac Mini HTPC with XBMC 

How easy it is to get Blu-ray movie playback working with the popular Mac Mini HTPC with XBMC? 

Step 1. Load Blu-ray movies. 

Install and run the Pavtube BDMagic for Mac on your Mac. When the below interface pops up, click "Blu-ray disc" icon to import Blu-ray or DVD movie. If you already have a Blu-ray folder or ISO file on your HDD, you can either click "Blu-ray Folder" icon or "IFO/ISO" to load your source files. 


Step 2. Specify an output format. 

Click “Browse” button and specify an output location. Make sure there is enough space for a whole BD movie (usually 25GB-50GB) when backing up Blu-ray disc to Mac HDD. 

Step 3. Back up Blu-ray for PLEX playback on Mac Mini HTPC. 

Click on “Copy the entire disc” button to back up Blu-ray/DVD movie to Mac. A 90 min. Blu-ray takes about 40 min to copy to Mac hard drive. After the copying process completes, you can get the final output files by clicking “Open” button with ease. The ripped Blu-ray directory contains two folders, “BDMV”and “CERTIFICATE”. The PLEX is able to play the M2TS files from Blu-ray directory. 


Tips: Wanna copy the M2TS/ VOB streams only without menus and ads? Make some changes in Step 3. Click on the “Format” bar and choose “Copy”>> “Directly Copy” mode, and then click “Convert” button to start conversion. 

Now, you can enjoy the Blu-ray movies on Mac Mini HTPC with PLEX. And Blu-ray/DVD playback can also be realized on these multifunctional game consoles just like: WiiXbox 360 and so on. 

Money Saving Boundles: 

BDMagic($49) + Vidpie($29) = Only $49.9, Save $28.1 
BDMagic($49) + DVD Creator($35) = Only $49.9, Save $28.1 

You may also like: 

Wednesday, September 30, 2015

Convert DVD to HD MKV via Mede8er Multi-Media player at home on Mac

Summary: Looking for an easy way to view DVD movies like Captain America: the winter soldier, Non Stop and Divergent via Mede8er Multi-Media player for home entertainment on Mac. This guide can help you. 

I love the internet. It’s a place for sharing. In this article, I’m glad to sharing my experience of how to complete the DVD to HD MKV conversion for Mede8er Multi-Media player on Mac. Some folks over at google dvd ripping software on the internet. I did just that and I picked Pavtube. I have boon using the windows version since last year, and after getting the Mac Computer, I decided to get the Mac version

Here I just free downloaded the mac version and It works perfectly. Now, sharing my operating of this application: 

1.After the installing, I open it and the concise interface of Pavtube ByteCopy for Mac at once shows up in my eyes. Then I Click “File” > “Load from disc” in top left corner to import DVD movies. (This function is really a humanized operation design and easy to use!)

 
2.What really astounds me is that Pavtube ByteCopy for Mac also supports preview, which means I can watch the video before the conversion from DVD discs. At the meantime, capture and progress are also available. I just need to choose an output format as ““HD Video” > “MKV HD Video (*.mkv)”for Mede8er Multimedia Player


Note: If you want to backup DVD movies and DVDs to MKV container format with multiple audio tracks and subtitles included, also try Pavtube ByteCopy And choose "Multi-track Video> Lossless/encoded Multi-track MKV(*.mkv)" to get multi-track mkv format.
  
3. This great converter also supports customizing output format value. If you have other demands on videos, you may click the Settings button to specify the video and audio parameters. You can alter its size, sample rate, bitrate, frame rate and channels in it. This practical function can satisfy your specific needs for videos! 

4.After I set everything I need, I just need to click the red “Convert” button. Thus I can get my HD NKV file in a very short time! I successfully convert my DVDs (Captain America: the winter soldier, Non Stop and Divergent) for Mede8er Multimedia Player. then, watching DVD movies on a TV with Mede8er Multimedia Player. 

By the way, the Windows users can refer to this guide and enjoy the happy times! 

I found some useful guide from this blog for you:

Wednesday, September 16, 2015

How to upload over 500 DVDs to Seagate Wireless Plus

Want to watch your favorite DVD movie via Seagate Wireless Plus? This article will the best methods to rip and upload DVD to Wireless Plus with ease.

We travel a lot an have over 500 DVDs in hand, so I bought a 2TB Seagate Wireless Plus then my family members don't have to fight over the laptop for watching DVD movies. In fact, we can get together with friends and family to enjoy DVD movies via Wireless Plus, the question is: how to convert DVD for uploading to Seagate Wireless Plus?


Here what you need is to make use use of a professionally designed DVD to Wireless Plus converter to rip Seagate Wireless Plus video files. And Pavtube DVDAid would be your best choice, which can easily rip DVD movies to Wireless Plus compatible H.264 video, MPEG-4, and Motion-JPEG for video, and AAC, MP3, Audible (formats 2, 3, 4), Apple Lossless, A IFF, and WAV for audio quickly with excellent output video quality.

Besides converting DVD files, it can also compress a DVD to smaller file size, saving the space for your console if you need. In addition, the built-in editor allows you to customize your DVD videos to get the very part and effect you want with ease. I have tested it, now after perfectly ripping DVDs, I can get my DVDs uploaded to my 2TB Seagate with ease and freely watching on my mini iPads, 1 kindle and 1 nook. The equivalent Mac version is DVDAid for Mac. Just get the right version and copy DVD to Wireless Plus with ease. (Windows 10 or Mac Yosemite are supported). 


Other Download:

- Pavtube old official address: http://www.pavtube.cn/dvd_ripper/
- Cnet Download: http://download.cnet.com/Pavtube-DVDAid/3000-7970_4-76158510.html

1. Load DVD movies

First, insert your DVDs into DVD Drive, and then drag the DVD files to the program; Or you can get to "File" Menu, click "Load DVD" to draw into DVD movies you want to rip. DVD folder and ISO image files are supported as well.


2. Select Seagate Wireless Plus compatible formats

Click the Format bar to select output profile for your Wireless Plus, say "H.264 Video(*.mp4)" from "Common Video".


3. Convert DVD movies to Seagate Wireless Plus

After all necessary settings, you can just click the "Convert" button to start converting your DVD movies. After the conversion, click Open to get the output files for your Seagate Wireless Plus.

4. Connect Seagate Wireless Plus to computer for uploading

Now you can copy the converted DVD files to your Seagate Wireless Plus via USB.

Tip: Free apps are available across Android, iOS, and Kindle for download, and after downloading the app, users can view available wireless networks and select the Seagate Wireless. And content can be played in many different ways, via the Media app on iOS, Android, or Kindle Fire, via any browser, via Apple Airplay or to any DLNA devices via minidlna, which is built into the OS.


To play your converted files on your mobile devices, your just need to tap the movie file and play it. Now you have successfully carry your entire DVD media library with you with the Seagate Wireless Plus Portable Hard Drive. Just enjoy while traveling with your family!

Want to get more DVD entertainment? Rip DVD to your Nexus 6/9iTunes 11/12 library or Drobo 5n and TV

Read More:
Source: http://onebestsoft.com/upload-dvds-to-seagate-wireless-plus/

Upload DVDs to Dropbox for viewing anywhere

Overview: This is an instructional article on showing how to upload DVD to Dropbox by ripping and copying DVD to a Dropbox readable format.


Dropbox is a mobile document and media storage tool that allows you to sync you files online for backup. Anything like movies and music you save to your computer can be saved to your Dropbox. If you are looking for a way to upload DVD to Dropbox for viewing as above thread mentioned, read on to find the best solution.

Hot Search: Dropbox Transfer Guides | iTunes to Dropbox | Blu-ray to Dropbox | Compress videos to Dropbox | 

As you know, Dropbox doesn't support DVD video format. If you have some nice DVD movies and want to add to Dropbox for streaming and playback on iPhone, iPad, Android, Surface 3, BlackBerry, Plex, PS4/3, PSP, PS Vita, WDTV, smart TV and more media devices, you have to rip and copy DVD to Dropbox readable formats, as MP4, MOV, etc.

To do so, a DVD ripping software is essential. Here Pavtub DVDAid is recommended to you. This DVD ripping tool can rip any encrypted DVD and convert DVD to Dropbox readable MP4, MOV etc. formats as well as other popular formats, like rip DVD to AVI, MKV, M3U8, H.265, WMV, MPG, FLV, SWF, M4V, etc. on Windows (including Windows 10, 8.1 and 8). For the video size limit of Dropbox site, the built-in editor also allows you to extract DVD clips with the very part you want. Or, you can just choose to rip certain chapters of a DVD as you like.

If you are a Mac user, please turn to DVDAid for Mac, support Mac OS X Yosemite 10.10, 10.9 Mavericks, 10.8 Mountain Lion, 10.7 Lion, Snow Leopard10.6, Leopard 10.5. 

Now download the right version of the program and follow the guide below.


Other Download

- Pavtube old official address: http://www.pavtube.cn/dvd_ripper/
- Cnet Download: http://download.cnet.com/Pavtube-DVDAid/3000-7970_4-76158510.html

Part I. How to rip DVD to Dropbox readable video format for uploading?

Step 1. Load DVD movies

Insert the DVD disc into your computer’s DVD drive and run DVD Ripper. You can click the "Load DVD" button to load the DVD files to the program. DVD ISO/IFO, VIDEO_TS folder are supported also.


Step 2. Specify output format

As has been stated above, Dropbox supports MP4, etc video files. So you can just select "Common Video" > "H.264 Video(*.mp4)" as the output video format. Also you can transfer your DVD to media hubCloud Storage and External Hard Drive/Thumb DriveFlash drivePlex for storage and playback.


Step 3. Trim/Edit DVD files

Since Dropbox has limitations about the uploading video size(If you only have the free account, you only have 2 GB of space), please pay attention to the video size when ripping DVD movies for Dropbox. Here we should highlight the trim function on this software. Just click "Edit" to trim the DVD videos to get the very part you want. Besides trimming, cropping, adding watermark, adjusting special effect, are well supported as well.

Step 4. Start converting DVD to Dropbox

When all these settings are ready, you can click the "Convert" button to begin the DVD to Dropbox conversion. When the ripping is done, you can click on "Open" button to locate the ripped videos.

Part II. How to Upload the ripped DVD movies to Dropbox for storage?

1. Sign in to the Dropbox website.

2. Click the Upload button from the very top of the window. The upload button.

3. A window will appear. Click the Choose File button and then select the file on your computer that you’d like to add to your Dropbox.

4. Choose as many files as you like, and then click the Start Upload button.

5. The window will disappear, your files will start uploading, and you'll be shown a progress indicator. That’s it, you’ve added files to your Dropbox!

Detailed steps can be found here.


That's all the instructions to rip and upload DVD to Dropbox for sharing.
  
More Tips

Source: http://filmholics.tumblr.com/post/105430096750/upload-dvd-to-dropbox

Wednesday, August 12, 2015

Add SRT Subtitles to AVI File on Windows 10/Mac El Capitan

Have you met this situation that there is no embedded subtitle in AVI movie files? Want to add external subtitles to AVI video? This article will introduce a simple way to easily add subtitles to AVI movies.

The AVI digital video format only supports audio and video tracks, and cannot be encoded with a subtitle track. So you've saved a heap of downloaded AVI movies, TV shows, etc in foreign language and feel like to put subtitles into AVI for better understanding? If you are having the issue and want to add subtitles to AVI movies or videos as aforesaid, find your answer here. This guide will focus on how to embed SRT subtitles to AVI file using Pavtube Video SRT Subtitle Adder, which helps you not only merge SRT with AVI file but also add external subtitles to MP4, MKV, WMV, MOV, FLV, etc, so that you can enjoy your videos with subtitles. 

Before start adding subtitles to AVI, take a few seconds on the brief introduction below on how to get subtitles.
  • Download subtitles from Opensubtitles.org with thousands of translated subtitles uploaded daily;
  • Get subtitles from moviesubtitles.org where you can find subtitles for the most popular movies and TV films (Or you can refer to the post – Top 5 Websites to Download Subtitles);
  • Extract subtitles from video clips in hand with this step by step guide on how to extract subtitles from video.
Hot Search: add Subtitles to DVD | embed subtitles to MP4 | insert subtitles to AVI | extract Blu-ray/DVD subtitle |download subtitle with VLC  

Maybe you want to add your desired subtitles to any format movie you have, so that the professional Video Subtitle Adder is not enough for you, here suggest you multifunctional software –Pavtube Video Converter Ultimate for you. With it, you not only can add subtitle like .srt, .ass, and .ssa to your AVI files, you also can choose the language and subtitles you want from original BD/DVD and source video to display on your media devices. If you also collected some DVDs, blu-rays or videos unable played on your devices, you can also use it to convert them to the MP4 format without quality loss. Here is review

Free Download Top Video SRT Subtitle Adder: 


Other Download:

- Pavtube old official address: http://www.pavtube.cn/blu-ray-video-converter-ultimate/
- Cnet Download: http://download.cnet.com/Pavtube-Video-Converter-Ultimate/3000-2194_4-75938564.html

Note: In addition, this tutorial is based on Windows, if you are a Mac El Capitan user, please download the Pavtube iMedia Converter for Mac and refer to this article: How to add subtitles to videos on Mac OS X El Capitan?
  
Supported video and subtitle formats 
  • Video formats: MP4, AVI, MKV, WMV, MPG, MPEG, VOB, TOD, MOD, FLV, and all regular video formats.
  • Subtitle formats: SRT, ASS, SSA
Step 1. Import AVI without subtitles 

After installed this subtitle to Video Converter Ultimate (Windows 10 supported), run the program and import your AVI video by dragging video to the primary windows, or by clicking “Add Video” button to locate AVI video on your computer. 


Step 2. Click the “Edit” to add subtitle 

Before you do this step, you should have the subtitle for your movies or audio. Then click the “Edit” to choose the “Subtitle” to check “Enable” to select your Subtitle paths. After completing, hit “OK”  to return to the main interface.


Step 3. Export AVI video with subtitle 

Now it’s time to save subtitle to AVI video permanently. Firstly, choose a desired output format by clicking the “Format” option on the right side. Then, choose a video format (e.g. keep MP4 format) or device format (e.g. iPhone, iPod, iPad) to convert AVI video with subtitle to a video file. 


Step 4. Start to add SRT Subtitle to your AVI. 

After that, click the big red “Convert” to add your subtitle to your AVI files. The subtitle will be written permanently on the output video. 

Tip: If your original video is not AVI format and you want to get MP4 files playing on your iPhone, or your Android Phone and Tablet, you can use Pavtube Video Convert Ultimate to convert your video or your DVDs or Blu-rays to MP4 formats. Even you also can use it to get .SRT subtitle from your DVDs or Blu-rays. 

Now, you will get a new video with subtitle embedded, and play it with a Windows 10 video player. Surely, you won't feel annoyed when you listen to the incomprehensible dialogues in your no-subtitles AVI files any more. Have Fun! 
   
Read More:

Thursday, July 30, 2015

Tivo to WMC- Watching TiVo videos in Windows Media Center

The recorded TiVo files usually are not compatible with most media players we adopt, so this article enables you to convert TiVo to Windows Media Center within Four steps.

Hot Search: Alternatives for WMC | TiVo files to WMP | iTunes to Windows Media Center | DVD to Windows Media Center | Blu-ray to Windows Media Center

With the rising popularity of the TiVo format, it becomes the pursuit of more and more people who are getting bored with endless and annoying ads. But, you may get into trouble - just like cannot play TiVo files on Windows Media Center. that's because the recorded TiVo files usually are not compatible with most media players we adopt, Thus, looking for a work-around to add TiVo playback ability to Windows Media Center is much important. So this article enables you to convert TiVo to Windows Media Center within four steps.   

Fortunately, after searching online for a long time, we found a simple workaround. Since Windows Media Center can not support TiVo files natively, then we can change TiVo to Windows Media Center supported video formats like WMV or AVI with a powerful third party program. Here, Pavtube Video Converter Ultimate is a great Tivo Converter for Windows Media Center, you can easily achieve your goal smoothly. This video app works as the best software to change TiVo to Windows Media Center compatible format with least quality loss.

Besides that, you can also convert Tivo recordings to MP4, MOV, AVI, MPG, WVM, etc for easily opening, playing, editing and uploading without any hassle. No worry about any audio/video sync problem. (Here is the review). If you are running on Mac, please turn to its equivalent Mac version.

Here is a step-by-step tutorial to convert TiVo files to high quality H.264 MP4 on Windows for Windows Media Center playback. Let’s take a look!

Tips: How to Transfer Television Programs (TiVo files) to PC

Launch TiVo Desktop software on your PC. Connect TiVo to your home network, and then the TiVo Desktop will provide you with a list of shows for transferring to your PC. Then please transfer the TiVo TV shows you want to PC. Once all the shows you selected have been downloaded from your TiVo, they will appear in the Now Playing list in TiVo Desktop.


Step 1. Download Windows Media Center video converter – Pavtube Video Converter Ultimate(for Windows, for Mac). Install and launch it. 


Other Download:
- Pavtube old official address: http://www.pavtube.cn/blu-ray-video-converter-ultimate/
- Cnet Download: http://download.cnet.com/Pavtube-Video-Converter-Ultimate/3000-2194_4-75938564.html


Step 2. Import TiVo files to the software.

Launch the TiVo file converter, click Add button to load your TiVo video files. When first loading, the program will ask you to input your Media Access Key. Simply enter your Media Access Key and click “OK” to confirm.


Step 3. Choose setout format. 
   
a.Click the drop-down list on the right side of the “Format” to select desired audio or video formats from “Common Video” or “HD Video” Category.

b. If your source TiVo video files are 1080p or above 1080p resolution, choose “HD H.264/MPEG-4 AVC Video(*.mp4)” from “HD video” or “WMV HD(*.wmv)” category. 

c. If your source TiVo files are 720p or lower resolution, choose “H.264/MPEG-4 AVC Video(*.mp4)” or or “WMV3 (WMV9) (*.wmv)” from “General Video” category. 


Step 4. Start Convert. Click “Convert” button to start convert TiVo to Windows Media Center supported MP4 or WMV. 

With the help of the professional WMC Video Converter, now you can easily solve Windows Media Center cannot play video TiVo, MKV, MP4, AVI, FLV, WebM, MXF, MTS, MOD, TOD issue. It’s that easy to play any kinds of video in Windows Media Center.  

Read More: