Showing posts with label Amazon. Show all posts

Thursday, December 19, 2013

How to play1080p/720p MKV movie on Kindle Fire HDX 7?

If you are troubled in playing 1080p/720p MKV movies on Kindle Fire HDX 7, here's the Windows solution to convert MKV to MP4 videos for your Amazon tablets, e.g. Kindle Fire HDX, Kindle Fire HD, Kindle Fire. 


Kindle Fire HDX 7 User's Reviews:
This evening when arriving home from work, I anxiously opened the packaging on my brand new Kindle Fire HDX 7". After spending only a few moments, from setup to navigating through various apps (books, web, videos, etc...), I must say that the device is near flawless. 

Kindle Fire HD 7" is great media player for watching movies, however, just like other Android os tablets, the Android os tablets can only play limited video formats. So sometimes, you will find you can not play MKV files on Kindle Fire HDX 7 properly or missing audio when enjoying MKV videos on your Kindle Fire HDX 7. So how if you want get these MKV HD videos work normally on Kindle Fire HDX 7? Get frustrated? Here you will find the best solution.

MKV is a container format which has many different codecs, so it's hard to handle it. The reason you cannot play MKV videos on Kindle Fire HDX 7 is simple: the default or downloaded video player on your tablet cannot find a suitable decoder for the codec in the MKV file.

To solve these problems, a great method is to convert MKV to Kindle Fire HDX 7 supported video formats (H.264 MP4 is highly recommended) with some help from third-party tools. To get the work done, below I will take Pavtube MKV to Kindle Fire HD Video Converter (20% OFF now at 2014 Summer Holiday special offer) as example to show you how to encode MKV to MP4 videos under Windows 8/XP/7/Vista  for viewing on Kindle Fire HDX without problems.

The equivalent Mac version is the Video Converter Ultimate for Mac (Also 20% off), which can help you successfully convert MKV to Kindle Fire HDX 7 on Mac OS X. Just download it and follow the step-by-step guide to transfer and play your 1080p/720p MKV files on Kindle Fire HDX 7 smoothly.

See also: Best Free Video Player Apps for Kindle Fire HDX + Video Playback Tips 

How to Convert MKV to Kindle Fire HDX 7 playable formats on Windows 8.1/8/7? 

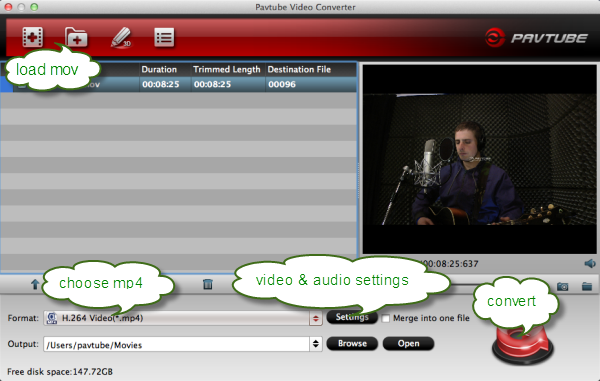
The below guide uses Video Converter Windows screenshots. The way to encode MKV files to your Kindle Fire HDX 7 on Mac is almost the same. Just make sure you get the right version.

1. Download, install and launch the best MKV to Kindle Fire HDX Converter. And then click "Add Video" or "Add from folder" to import your source materials in .mkv format. Besides MKV, you can also load FLV, AVI, WMV, VOB, TiVo, MPG, MOV, etc. files to the program. Batch conversion is supported so that you can add multiple files.


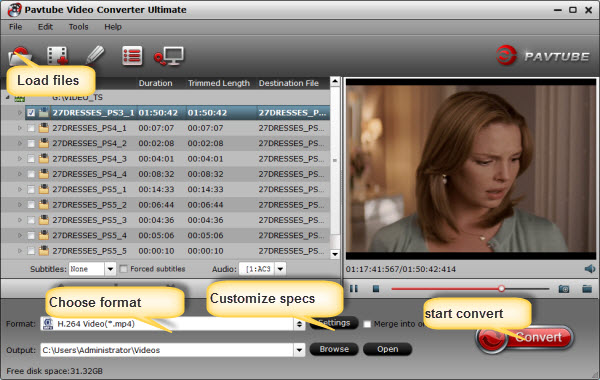
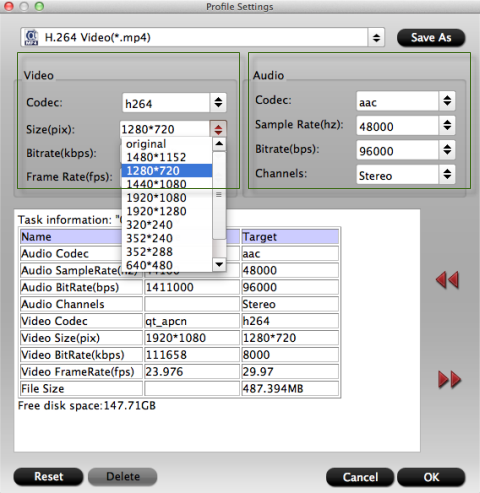
2. Choose the output video format and output folder. Click "Format" bar and move mouse to "Android" column, you can easily find the profile of Amazon Kindle Fire HD H.264(*.mp4). The output videos could also fit on your Kindle Fire HDX 7 perfectly. And choose the destination folder to save the converted videos. If you like, you can click "Settings" to change the video encoder, resolution, frame rate, etc. as you wish.


3. After above settings, you can start the MKV to MP4 Conversion for Kindle Fire HDX 7.

Once the process completes, download and transfer the converted MP4 videos to your Kindle Fire HDX 7 from your Mac via USB cable. Then you are free to enjoy and play 1080p/720p MKV videos on Kindle Fire HDX 7 as you like.

(The workflow also fit your Kindle Fire HDX 8.9 of course)

P.S. If you have no idea about Kindle Fire HDX file transfer, you can check out our post How to transfer media files to Amazon Kindle Fire HDX? to learn more.

See Also:

Source: http://1080p-video-tool.blogspot.com/2013/10/watch-mkv-on-kindle-fire-hdx-7.html

Related Articles:

Friday, November 1, 2013

Convert DVD ISO/IFO to Kindle Fire HD 7/8.9 on Windows/Mac

Description: A detailed instruction of how to convert DVD ISO IFO to Kindle Fire HD 7/8.9 supported video formats, so that you can play DVD movies on Kindle Fire HD on the go.
“I got a Kindle Fire HD tablet for Halloween and thought it would be great if I could copy some of my DVDs to the device so that I could watch on the train. However, I have backed up all my collection to ISO files while some of the original discs are lost. How can I put DVD ISO on the Kindle Fire HD tablet?”
Both the 7-inch Kindle Fire HD's beautiful 1,280x800-pixel screen and the 8.9-inch model's 1,920 x 1200-pixel screen are great for watching DVD movies.

However, as you may realize, Kindle Fire HD (7-inch and 8.9-inch) does not have a virtual drive to let you mount the ISO image files and playback DVD ISO on it. Surely you can mount the DVD ISO/IFO on computer, but how to put them to Kindle Fire HD?

No worries for this, here an easy solution on both Windows and Mac: all you need is a simple and easy-to-use DVD to Kindle Fire HD Converter to convert DVD ISO/IFO image files to MP4 that works beautifully on Kindle Fire HD.

Tips:
1. Get the Mac version here: DVD to Kindle Fire HD Converter for Mac;
2. Get 30% OFF for Sumarry Holiday now, don’t miss it!
3. If you want to get multiple languages or 3D video, try this DVD Ripper Pro.

To achieve your goal smoothly, below is a simple tutorial for you, guaranteed to get DVD ISO/IFO to your Kindle Fire HD 7 or 8.9 for smoothly watching on the go. 

How to Convert DVD ISO/IFO to Kindle Fire HD 7/8.9-inch? 

Step 1. Add ISO/IFO files to the program.

Import ISO image files by dragging and dropping, or clicking "ISO/IFO" button. As you can see, added files can be previewed on the right viewing window. You can adjust the video volume and take snapshots of your favorite movie scenes. 


Step 2. Choose format for Kindle Fire HD.

Click the Format drop-down list, choose “Android -> Amazon Kindle Fire HD(*.mp4)” as the most compatible preset for Kindle Fire HD. Or you can submit “kindle” in search box at the bottom right corner to quick locate this preset.


Step 3. Customize video specs (Optional).

Your can click “Settings” to free change video size, bitrate, frame rate and others. If you own a 16GB version and do not want to keep videos in large size, you can lower the bitrate settings to get smaller files.

Tips: You can click "Settings" to tweak the detailed video and audio encoding settings. Or click "Edit" button to trim video into several segments by setting a specific output file size, append special effects, crop video screen area, add text/picture watermark. 

Step 4. Start Conversion.

Now hit the big red “Convert” to start converting DVD to MP4 for Kindle Fire HD. After conversion, you can click “Open output folder” to quick locate the converted video.
Related Articles:

Friday, October 18, 2013

Amazon Kindle Fire HDX 7 and 8.9-inch tablets launch in UK

The Amazon Kindle Fire HDX was initially launched in the US a few weeks ago but now it looks like Amazon is taking the fight to the iPad Mini here in the UK.


Amazon has unveiled the Kindle Fire HDX 7-inch and 8.9-inch tablets along with an updated Kindle Fire HD for the UK. Amazon's new range of tablets will be looking to steal the thunder from Apple's potential iPad Mini 2 launch next week.

The new Kindle Fire HDX tablets are not only lighter and thinner than the previous generation they also come with Amazon's new HDX display which the company is boasting as their best yet.

Amazon Kindle Fire HDX 7-inch specs

The first in the lineup is the Kindle Fire HDX which will come with a 7-inch HDX display boasting an impressive 1920x1200 resolution at 323ppi along with 100 per cent sRGB colour accuracy which should mean brighter more vivid colours when looking at images or watching video.

The HDX 7-inch also comes with dynamic image contrast which means that not only will the tablet adjust the brightness of the display dependent on its surroundings it'll also adjust the contrast of the display which should mean better viewing in direct sunlight.

Inside you'll find a 2.2GHz Snapdragon 800 quad-core processor making it not only three times faster than the previous Kindle Fire HD but faster even than some flagship smartphones like the HTC One max.


There's also 2GB of RAM which should mean that it's more than capable of switching between movies, books and apps without any hesitation.

Finally you'll find dual speakers powered by Dolby Digital Plus along with a 720p front-facing camera for video calls. You'll also be able to get the Kindle Fire HDX with 3G and 4G through Vodafone.

Amazon Kindle Fire HDX 8.9-inch specs

The HDX 8.9 is, according to Amazon, the lightest large screen tablet available weighing in at 374g making it 34 per cent lighter than the previous Kindle Fire HD 8.9.

You also get a HDX display boasting a mighty 2560x1600 at 339ppi making it an even higher resolution display than the HDX 7.

The HDX 8.9 does however come with the same hardware specs as the HDX 7 boasting the same 2.2Ghz Snapdragon 800 quad-core processor and 2GB RAM.

There's no word on storage however if you look at the US options available the UK pricing would suggest that Amazon will be offering the 8.9-inch with 16GB storage.


Amazon Kindle Fire HDX with Fire OS 3.0 'Mojito'

Both tablets will come running Amazon's latest Fire OS 3.0 'Mojito' which will bring with it a whole host of new features including a totally new email client, Silk browser and calendar.

You'll also get VPN integration, enterprise compatibility and the ability to wirelessly print as well as Amazon FreeTime, a feature which Amazon introduced allowing parents to control what content their children have access too.

Amazon Mayday button

Of course what everyone will be talking about is the Mayday button, a service which at the press of a button, will provide live tech support in the form of a one-way video chat with an advisor.

Whilst you'll be able to see them, they won't be able to see you help avoiding any privacy issues, they'll also be able to remotely control your device showing you tips by drawing arrows or writing on the display, or helping you solve any tech problems.


Amazon Kindle Fire HDX price and release date

The Kindle Fire HDX 7-inch will start at £199 for 16GB WiFi-only and £269 with 4G making it clear that Amazon is not only gunning for the Google Nexus 7 2013 but also for the upcoming iPad Mini 2, it'll also be launching in 32 and 64GB versions.

UK pricing for the 16GB HDX 8.9-inch starts at £329 for WiFi-only whilst the 4G version will set you back £399 with shipping starting on 13th December for both tablets. You'll also be able to get the HDX 8.9 in 32 and 64GB versions as well.

Source: T3

Amazon Kindle Fire HDX: A More Helpful Tablet - YouTube


Thursday, October 10, 2013

Amazon WMV DRM Removal: Play Amazon Instant Video on Nexus 10

If you have problems about playing Amazon Instant Video on your Nexus 10  tablet, you can check out the tutorial to Remove DRM from Amazon WMV and record Amazon Instant Video(.wmv) to your Nexus 10.

Have you purchased lots of WMV videos from Amazon store and want to put these Amazon Instant videos to your Google Nexus 10? As is known to everybody, the WMV videos purchased from Amazon store, including music, videos, movies, and TV show etc. are usually format type unsupported by the Google Nexus 10. The problem is, those WMV videos you downloaded from Amazon are protected (by DRM), and can't be played on any Android/Windows 8 tablet except for the Amazon Kindle Fire (HD). So if you would like to transfer Amazon WMV videos to Nexus 10 for playback, you have to remove DRM from Amazon Instant Video and convert/record it to Nexus 10 compatible formats.

Refer to Google Nexus 10 supported codecs
  • Video codec: H.263, MPEG-4 SP, H.264 AVC
  • Audio codec: AAC LC/LTP, HE-AACv1 (AAC+), HE-AACv2 (enhanced AAC+), AMR-NB, AMR-WB 9, MP3, MIDI SMF, Ogg Vorbis, WAV

To do it, Pavtube ChewTune is a great help. It is an all-in-one DRM Removal Program to help you convert/record Amazon WMV videos effortlessly to Nexus 10 supported MP4 format in high quality. After that, you can play your Amazon Instant Video(WMV) on Nexus 10 very smoothly. Now, let's start to convert and transfer Amazon WMV to Nexus 7. (Note: For the common WMV videos, Pavtube Video Converter is recommended to you).

The screen is undoubtedly one of the standout features of the Nexus 10. As the name suggests, it measures 10 inches on the diagonal but more importantly packs an astounding 2,560x1,600-pixel resolution. We were previously blown away by the pin-sharp display of the new iPad with its 2,048x1,536-pixel resolution. The Nexus 10 casually swans past that, to offer an even more refined viewing experience.

Now you want to put some Amazon Instant videos to the Google Nexus 10? Wait a minute. The Amazon Instant videos, though mainly .wmv format, are not supported by Google Nexus 10. The problem is, those WMV videos you downloaded from Amazon are protected (by DRM), and can't be played on any Android tablet except for the Amazon Kindle Fire. To get the Amazon WMV playable on Nexus 10, you'll have to remove the DRM protection first. 

The tools you need to transfer Amazon WMV movies to Nexus 10: A powerful Amazon WMV video DRM remove tool and a WMV to Nexus 10 converter. Pavtube ChewTune combines these two tools together and makes it possible to watch purchased DRM videos on Nexus 10.

ChewTune for Windows | ChewTune for Mac

Read more: Top 5 Best DRM Removal Programs Review for Android, Windows 8 Tablets/Phones

To convert videos to Google Nexus 10 with best settings, you can download profile patch for the software(Windows only).

Remove DRM protection off Amazon video and convert WMV to the Nexus 10 for playing

Step 1: Load Amazon WMV video files to Pavtube ChewTune.

Install and launch the Pavtube WMV to Nexus 10 Converter, then click the add button to load the WMV video files to the program.


Step 2: Choose H.264 codec format for the Google Nexus 10 playing.

Click "Format" and select an output format for the Google Nexus 10. Here I choose "Android -> Google Nexus 10 H.264 Video (*.mp4)".


Step 3: Optimize the settings for Amazon video to Nexus 10 conversion.

If you find the default settings may not satisfy your need, can click the "Settings" button to change the settings by yourself.

For Mac users, it is necessary to custom profile settings, since there's no profile patch for OS X. Similarly, you can choose Nexus 7 format and custom the profile for Nexus 10 by clicking "Settings" and set the recommended settings as it shows below:


Video
  • Codec: h264
  • Size (pix): 1920*1080 /  1280*720
  • Bitrate (kbps): 2000 ~ 3000
  • Frame Rate (fps): original

Audio
  • Codec: aac
  • Sample Rate (hz): 44100
  • Bitrate (bps): 128000
  • Channels: Stereo

Step 4: Convert Amazon video to Nexus 10 video format.

Having finished the settings? OK, just click the convert button and start to convert Amazon video to Google Nexus 10 format with ease.

When the conversion task is finished, you can click "Open" button to get the final output files for your Google Nexus 10 and transfer the converted videos to Google Nexus 10.

If you have music and videos to watch on the tablet, here's a guide for copying local videos to Google Nexus 10.
1. Use the USB cable that came with your 16 GB or 32 GB Nexus 10 to connect the tablet to your PC, and you'll receive a notification that the USB is connected.

2. Open the Notifications panel and touch USB connected. Then touch Turn on USB storage in the screen that opens to confirm that you want to transfer files. The Nexus 10 tablet is connected as USB storage, and the screen will indicate that USB storage is in use and you receive a notification. The Nexus 10 is mounted as a drive on your computer.

3. You can now copy videos from PC to the Google Nexus 10. During this time, you can't access the SD card from your Nexus 10 or share your tablet's data connection with your computer via USB.

4. When the videos are copied to the 16 GB/32 GB Nexus 10, you can disconnect your Nexus tablet from PC.

Like the Nexus 7, it does not include an SD card slot for additional storage, so you may need a Video Converter to compress very big file to smaller file size. (Learn more on Nexus 7 Column)

Tips: MKV, MOV, TS, MPG, Tivo, FLV, F4V and some AVI videos are not accepted formats and you have to convert HD Videos to Nexus 10 MP4 for playing before downloading them to the device.

Good news! Pavtube is offering Money-saving Tips, Up to 35% Off, Saving Up to $35. such as:

Video Converter Ultimate($65) + Vidpie($29) = Only $74.9, Save $19.1
BDMagic($49) + Vidpie($29) = Only $49.9, Save $28.1
ByteCopy($42) + Vidpie($29) = Only $54.9, Save $16.1
DVDAid($35) + Vidpie($29) = Only $49.9, Save $14.1

Plus, Like Pavtube on Facebook and you would get Free DVD Ripper, DVD Ripper for Mac, Video DVD Converter Ultimate! 

If you have any problem to buy or use Pavtube, pls feel free to contact support@pavtube.com (for windows user), macsupport@pavtube.com (for Mac users).

Monday, September 23, 2013

Sync Amazon Videos/Movies to iTunes for iPhone 5S/5C, iPhone 5, iPhone 4S, iPod 5...

Amazon Store offers instant streaming on the Kindle Fire, as well as PC, Mac, Roku, and hundreds of TVs and Blu-ray players. All of your videos are stored in Your Video Library, so you can access them anywhere you go. Good news is that Amazon Instant Video is now playing on your iPad. Videos you've purchased or rented are already available on your iPad. However, you can not transfer Amazon Videos to iTunes for synchronizing with more iOS devices like iPhone 5S, iPhone 5C, iPhone 5, iPhone 4S, iPod 5, etc. The problem is that video files purchased from Amazon Instant Video are usually DRM-protected WMV (Windows Media Video) files. To sync Aamzon videos to iTunes, you may have to fix two things:

  1. Since DRM limited your use on iTunes, so you'll need to strip DRM from Amazon Videos so as to play them on more non-authorized devices.
  2. WMV is a not an iTunes-supported format. You'll need to convert it to either .mov, .mp4, or .m4v that is supported by iTunes.
Sync Amazon Movie to iTunes  

As you see, the DRM-protected Amazon movies are not eligible for transfer or playback, but but that's expected from a non-official solution along with some help from third-party softwares. To achieve your goal smoothly, below is simple tutorial for you, guaranteed to transfer Amazon Instant Videos to iTunes for playback smoothly.
  
How to Get Rid of DRM restriction and Convert Amazon WMV videos to iTunes friendly format?

The quick workaround is to use the easy-to-use yet intuitive ChewTune app(or ChewTube for Mac) which lets you quickly remove DRM protection and convert Amazon Videos to iTunes-compatible formats – as well as AVI, MKV, FLV, etc. Just download it and follow the step-by-step guide to upload Amazon Videos to iTunes.

Note: Before the process, please make sure you have the Amazon Instant videos downloaded onto your computer before importing. If you don't know the detailed process of purchasing and downloading Amazon Instant Videos, please refer to how to get Amazon Videos downloaded with Amazon Unbox Player.

Step 1. Add Amazon video files to ChewTune.

After downloading, install and launch the DRM Removal Converter, then click "Add" button to import Amazon DRM WMV video files to the program. You can add multiple files at a time thanks to the batch conversion.

pavtube chewtune

Step 2. Select iTunes friendly format.

You can select M4V, MP4, or MOV from "Common Video" as output format for iTunes or directly go to "iPod, iPhone, Apple TV, iPad" to get the optimized videos for playback on a certain Apple device. You can click "Settings" button to customize size, bit rate, frame rate, sample rate, and audio channel to your required ones.
choose ituens friendly formats

Step 3. Start the Amazon Videos to iTunes conversion.

When all the settings are OK, hit the "Start" button on the main interface to start removing DRM from Amazon and converting Amazon movie to iTunes.
When the conversion completes, you can add the files to your iTunes and sync the videos to your iPhone 5S, iPhone 5C, iPhone 5, iPhone 4S, iPod 5, iPad 4, iPad 3, Apple TV 3, etc. and just enjoy the movies on the go!

Related Articles:
         

Friday, June 28, 2013

How to Free Rip a DVD movie with MakeMKV and Handbrake?


Hollywood wants you to buy its movies on DVD and Blu-ray, but it also wants to control what you do with them once you get home. That doesn't sit well with us, so we're going to show you how to do something that Hollywood most definitely does not want you to do: Rip movies and copy them to your computer's hard drive so you can enjoy them without ever having to get up off your couch to drop a disc in the DVD player.

Once you've got a movie onto your hard drive, you can do all kinds of other cool stuff with it: Transcode it into a different format so that it'll play on your smartphone or gaming console, or maybe just delete those annoying FBI warnings that tell you how much trouble you can get in for doing exactly what we're about to show you.

While we fully acknowledge that the movie industry has the right to protect it's intellectual property, we also believe that consumers have the right to enjoy the property they purchase. It's called fair use - if you buy a movie on a disc, then you should have the right to make a back-up copy, or transfer the content to another medium, like a hard drive. Of course, you don't have the right to distribute or sell copies of the movies you buy, but you probably knew that already.

How to Free Rip a DVD disc with MakeMKV and Handbrake?


What you'll need:

1. DVD-ROM drive. Most modern PCs will come equipped with optical drives that can read DVDs, but many of the newest ones (ie, ultrabooks) have ditched them to save space. If you don't have a DVD-ROM drive, you can pick up an external one that connects to your PC via USB up for around $30 on Newegg.

2. MakeMKV. You'll need this program to break the disc's copyright protection and perform the initial rip. It's free, open source.

3. HandBrake. After the initial rip, you might want to make the file smaller or change its format so you can watch it on your phone or media center. Handbrake is a free video encoder that lets you tweak just about everything after you've got the movie on your hard drive.


Step 1: Defeat copyright protection with MakeMKV

There are a lot of other software programs out there that make this a very involved process, but MakeMKV makes it extremely simple. Just open the program and pop your DVD into the disc drive. Once the program recognizes the disc, click on the big "Open Disc" button and MakeMKV goes to work.

Step 2: Rip the movie with MakeMKV

After you've vanquished the AACS encryption, MakeMKV will return a list of chapters and segments that you can rip. Find your movie (usually the longest title or biggest file) and uncheck all the other boxes. Next, designate an Output Folder where you'd like the file to end up once it's been ripped. When you're all ready to go, hit the "MakeMKV" button. This process can take anywhere from two minutes to half an hour depending on your computer's processing power, but when it's done you should have a nice big MKV file waiting for you in the folder you specified.

Step 3: Transcode with HandBrake

Once you're done using MakeMKV to subvert the DVD's copyright protection and save the movie to your computer, you'll probably want to transcode the file to make it smaller and ensure that it's in the format you want. This is where HandBrake comes in. It's got TONS of settings and tools you can use to tweak your video, and comes with an extensive collection of presets (displayed in the right-hand column) that make the ripping process relatively foolproof. The developers have already created presets for most Apple products, including the iPhoneiPad and iPod Touch, and Apple TV; the PS3 and Xbox 360 gaming consoles; and several other platforms. You can also modify any of these presets and save them with new names or create custom presets from scratch.

Play around with the settings until you've got everything just right, then go ahead and click Start. This part will take a while, so sit back, relax, and let HandBrake do its thing.


Did something go awry?

Don't worry, there are still many top DVDAid tools used to rip DVD discs on Windows or Mac. Refer to the guide for beginners:


If you have any problems, we highly recommend hitting www.multipelife.com, here's the right place to share ideas, ask questions, report problems, and give feedbacks. Or you can contact their customer service Support Center, believe that can solve your any problems.

If you like the article, please share it with your friends. Thanks.     

Wednesday, June 26, 2013

Convert H.264 MOV to MP4 on Mac for playing on Android, iOS, Windows 8, HD Media Player and more

Cameras are becoming more and more popular among common people, many people not only buy a DC but also buy DSLR to take photos and record high-definition videos. In the latest cameras, video recording format mainly is H.264 MOV format, like Canon DSLR and Nikon DSLR.

Maybe you have bought a DSLR or a DC that records H.264 MOV videos, MOV is not supported by many portable devices, like tablets and smartphones, it's not well for playback. In this case, you may need to convert H.264 MOV to MP4 format on Mac OS for watching or editing.

MP4, originally MPEG4, is a file format that is commonly used to store media types defined by the ISO/IEC Moving Picture Experts Group. Being an international standard, has more support. Especially true on hardware devices, such as Apple TViPhone, iPod, iPad, Android tablets/phones, PSP, various DVD players, etc.

Here I'll introduces a viable solutions for converting H.264 MOV to MP4 on Mac for playback on portable devices. Of course, at the very beginning of the task, you need a professional assistant - Pavtube Video Converter for Mac - to help you. The Mac program used here would do the most of work by adjusting H.264 MOV to MP4 on Mac (Mac OS X Leopard 10.5, Snow Leopard 10.6, Lion 10.7, Mountain Lion 10.8 included) so that you needn't do much but several clicks by yourself. Easy to use, efficient in conversion, excellent in quality are the three basic but necessary features of the software:


Just free download, install and run it, then start the trip of converting now!

How to convert H.264 MOV to MP4 on Mac OS X?

Step 1. Load H.264 MOV files into the program.

Click "Add video" or "Add folder" to load your MOV files you want to convert. Or directly drag and drop the MOV files to the Mac MOV to MP4 Converter program.

Batch conversion is supported by this Mac software, so you can convert several H.264 MOV files to H.264 MP4 at one time.


Step 2. Click "Format" column to choose the best video format for output.

You can click and choose "Common Video -> H.264 Video (*.mp4)", if you need to convert MOV files to other formats, just click and choose the corresponding formats according to your device.


Tips:

1. You can click "settings" button to customize the resolution, bitrate and other parameters as you want. If you want to play videos on tablet, you can change the resolution to the same as tablet's screen definition, what's more, higher the bitrate, you can get higher quality, but it also requires higher hardware support. such as:


The default setting works well.

2. Edit function is easy in the Mac H.264 MOV to MP4 Converter, you can trim, crop, add watermark or adjust effect to the footages before conversion. Details in the online help of Video Converter for Mac.

Step 3. Start H.264 MOV to MP4 conversion on Mac OS X.

Click the "Convert" button in the main interface, and let the rest be finished automatically by the professional Mac H.264 MOV to MP4 Converter. The converter also works on MacBook, MacBook Pro, MacBook Air, iMac.

With this Pavtube Mac Video Converter, you can easily transcode camera or camcorder H.264 MOV files to MP4 or any other formats you want. Pavtube HD Video Converter for Mac will help you convert H.264 MOV video to MP4 on Mac at a fast speed, just have a try.

Read More: